Getting app visitors registered can be a challenge. It is the first hurdle in any onboarding process. Popular products handle it in different ways. The available signup flows have a major impact in this step.
Some products force you to login immediately, without being able to access anything else until you do. Others let you skip logging in until you are ready. Immediate access to the software’s value leads to a greater signup rate.
Onboarding
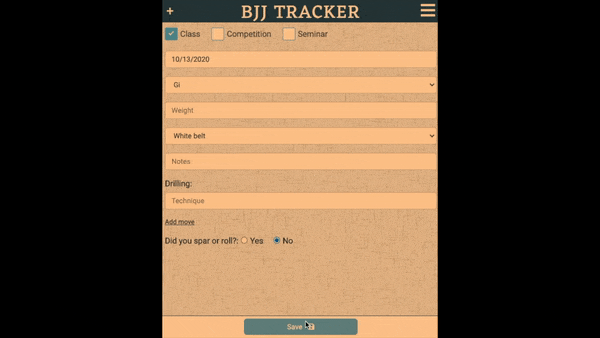
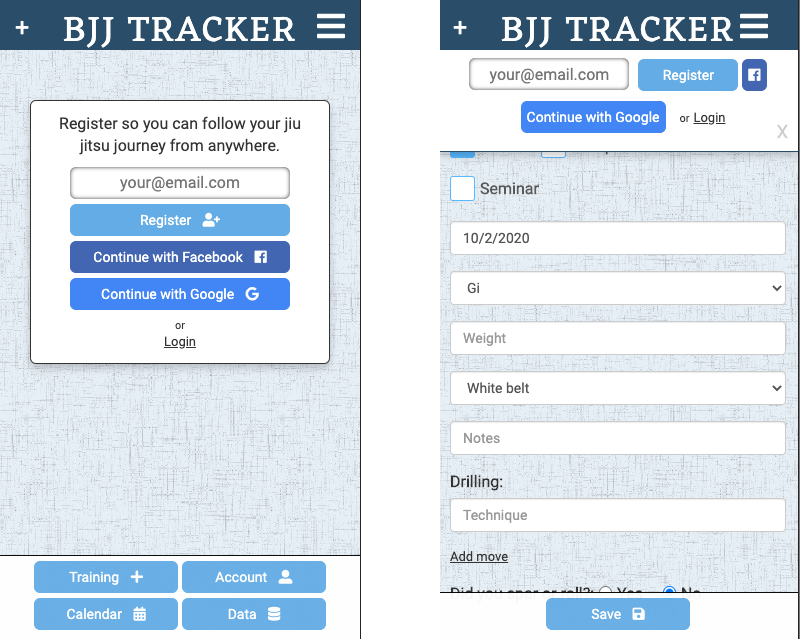
BJJ Tracker is a fitness tracking app for martial arts. It allows full access without ever registering. If a non-registered visitor records a training session, the app inserts an anonymous account record into the ‘users’ database table. That record’s ID is saved as a cookie on the client’s device. If they ever do sign up, that account record is updated with their credentials.
Here is the markup that describes my registration form UI:
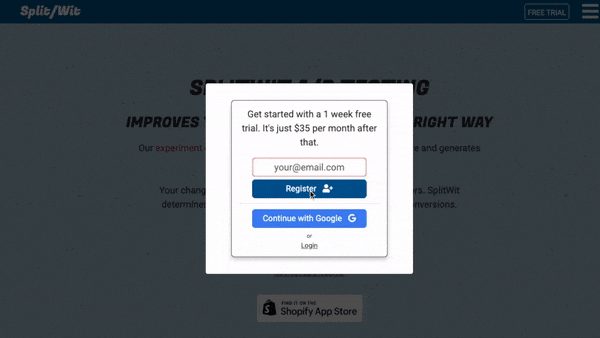
<div class="form-wrapper register-ui">
	<div class="reg-ui-email">
		<div class="reg-el-wrap">
			<form class="password-register-form">
				<input placeholder="your@email.com" type="email" class="email-input" />
			</form>
			<div class="button-section">
				<button type="button" class="register-button btn">Register <i class="fas fa-user-plus"></i></button>

			</div>
		</div>
	</div>
	<div class="reg-ui-pw">
		<div class="reg-el-wrap">
			<form class="password-register-form"> <input placeholder="password" type="password" class="password-input" name="password" /> </form>
			<div class="button-section">
			  <button type="button" class="password-button btn">Set Password <i class="fas fa-user-plus"></i></button>
			</div>
		</div>
	</div>
	<hr />
	<!--  facebook login -->
	<button type="button" class="facebook-login facebook-login-button btn">Continue with Facebook <i class="fab fa-facebook"></i></button>
	<!--  google login -->
	<button type="button" id="google-login-button" class="google-login google-login-button btn">Continue with Google <i class="fab fa-google"></i></button>

	<p class="or">or</p>
	<p class="switch switch-txt login-cta">Login</p>
</div>
I use CSS to transform the same HTML from the homepage view to the sticky bar UI.
When the app first loads, they are immediately presented with options to register or login. But, they also have full sight of the app’s most important features. If they try to record a training session, the registration UI persists as a sticky bar. The signup prompt remains prominent, but is not a road-block to exploring functionality.
This workflow ensures that:
- The value proposition speaks for itself
- Minimal input is required, creating the least amount of friction
- Core features are highlighted
- It’s quick, easy, and not overwhelming
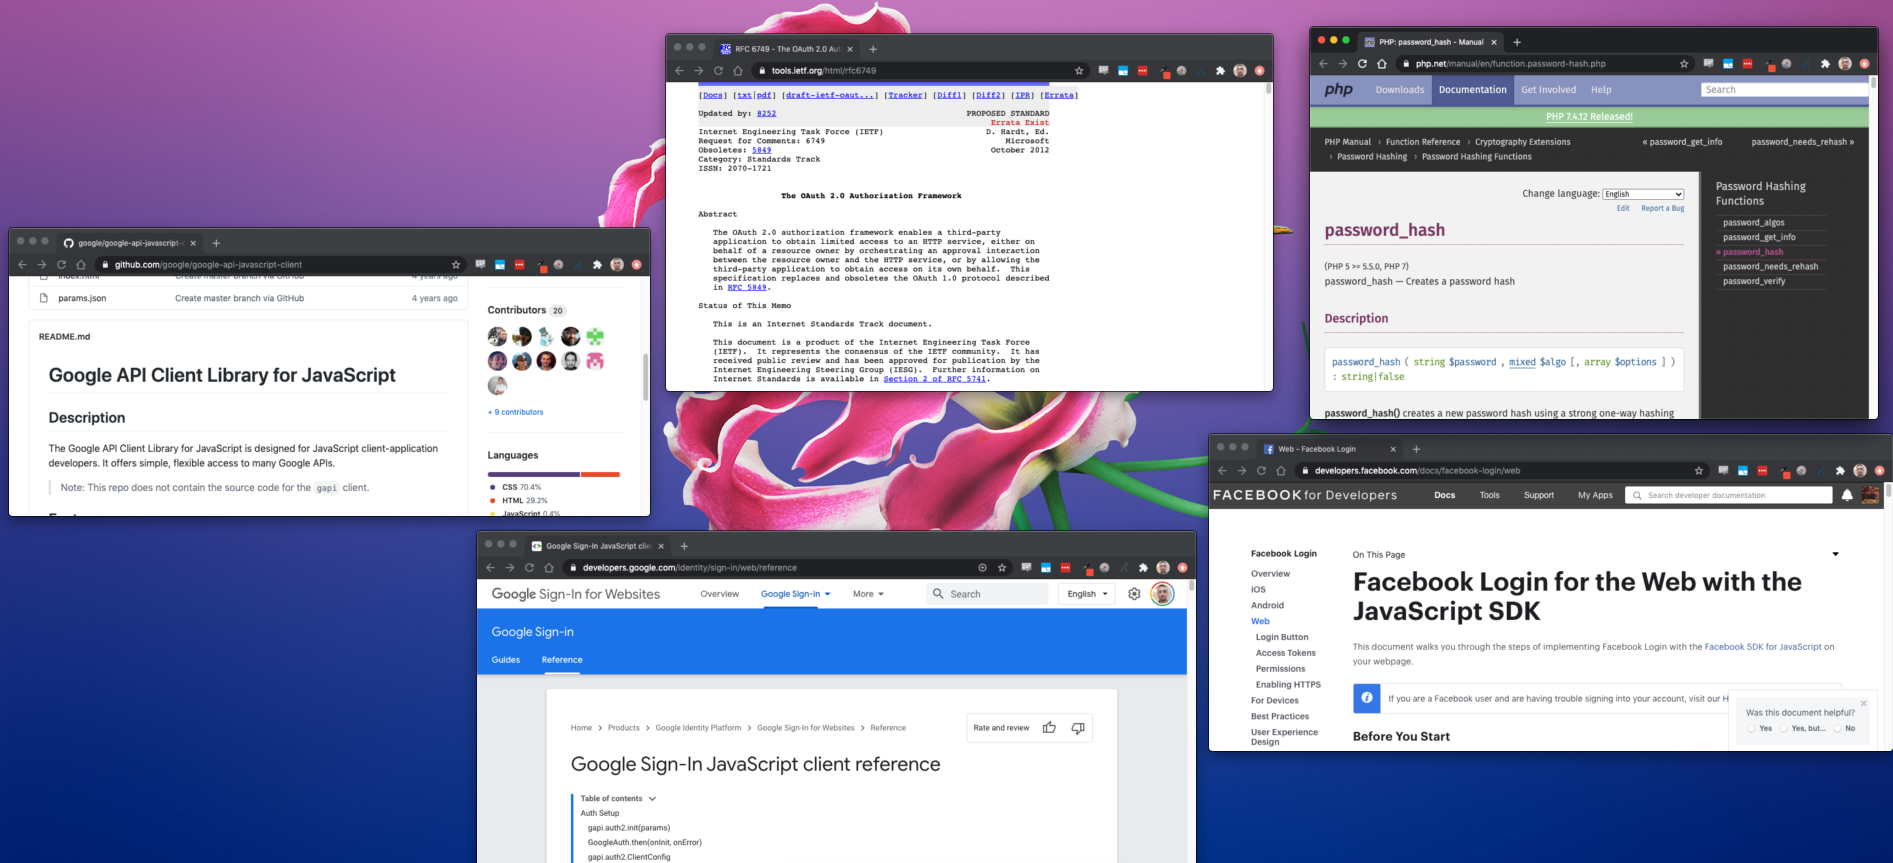
If a user does decide to register, they have three choices: email (with a password), Google, or Facebook. The last two have greatly increased conversions for products I have developed. Social signup reduces friction and provides a quick option for logging in.
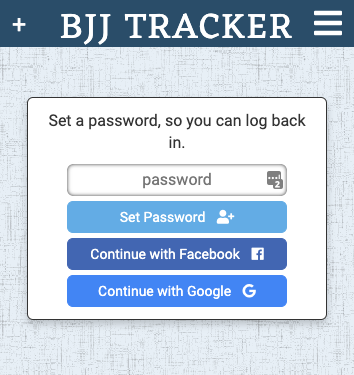
Email is a simple way to sign up for any app. In this example, I make email address and password two separate steps in the registration process. Doing it that way is a UI/UX decision that I’ve found to have a positive impact on conversions (which I’ve confirmed via A/B testing).
When the “Register” button is clicked, I validate the input via JavaScript:
window.validateEmail = function(emailInput){
	var regex = /^([a-zA-Z0-9_.+-])+\@(([a-zA-Z0-9-])+\.)+([a-zA-Z0-9]{2,4})+$/;
	validEmail = regex.test(emailInput.val());
	if(validEmail){
		return true;
	}else{
		//error
		return window.inputError(emailInput, "Please use a valid email.");
	}
}
If email is not valid, a custom error message is displayed. Otherwise, I pass that value along to a back-end service:
$(".register-button").click(function(){
	window.emailRegister();
});

window.emailRegister = function(){
	var emailInput = $(".email-input");
	var email = emailInput.val();

	if(window.validateEmail(emailInput)){

		$.ajax({
			url: "/service-layer/user-service?method=registerEmail&email="+email,
			complete:function(response){
				var jsonResponse = JSON.parse(response.responseText);
				if(jsonResponse['duplicateEmail']){
					window.inputError(emailInput, "That email is already registered. <span class='reset-pw-cta' data='"+email+"'>Reset password?</span>");
				}else{

					$(".reg-ui-email").slideUp(function(){
						$(".reg-ui-pw").slideDown();
					});
					$(".reg-copy").text("Set a password, so you can log back in.")
					$(".or, .login-cta, .login-alt").hide();
					$("body").addClass("auth");

				}

			}
		});

	}
}
My server-side PHP code checks if that email address already exists. If it does, a “duplicate email” error is thrown. Otherwise, we continue through our logic tree.
If the user had logged a training session before signing up, an anonymous account will have been created and that user ID saved as a cookie. During this email registration step, we check to see if that blank record exists, so we can update it. If not, we can safely create a new account in our database.
$first = "";
$last = "";
$password = "";
$timestamp = time();
$authid = md5($timestamp);
$emailFound = 0;

if($number_of_rows > 0){

	$row = $this->row;
	$email = $row['email'];

	if(strlen($email)>0){
		//check if email exists for this record (not anon user)
		$emailFound = 1;
		$this->status = "Duplicate email found.";
	}else{
		//user might have anon userid already set, in which case we want to update, not insert
		$email = $this->email;
		$stmt = $conn->prepare("UPDATE `users` SET email = ?, first = ?, last = ?, password = ?, authid = ? WHERE ID = ?");
		$stmt->execute(array($email, $first, $last, $password, $authid, $_SESSION['userid']));

	}

}else{
	$email = $this->email;
	$stmt = $conn->prepare("INSERT INTO `users` (email, first, last, password, authid) VALUES (:email,  :first, :last, :password, :authid)");
	$stmt->bindParam(':email', $email);
	$stmt->bindParam(':first', $first);
	$stmt->bindParam(':last', $last);
	$stmt->bindParam(':password', $password);
	$stmt->bindParam(':authid', $authid);
	$stmt->execute();
	$userid = $conn->lastInsertId();
	$this->status = "User record created.";
}

$this->emailFound = $emailFound;

if($emailFound == 0){ //make sure not a duplicate email address before setting authid cookie and authorizing user
	$this->authorizeUser($authid, $email, $userid, true);
}
After that AJAX call returns, a password input field is shown to finalize the signup process.
When the password is submitted, another call is made to the service layer:
window.passwordRegister = function(){
	var passwordInput = $(".password-input");
	var password = passwordInput.val();
	if(password.length > 0){	//#TODO: better pw reqs
		var data = $(".password-register-form").serialize();
		$.ajax({
			url: "/service-layer/user-service?method=passwordRegister",
			type: "POST",
			data: data,
			complete:function(response){
				console.log(response.responseText)
				window.location = "/dashboard";

			}
		});
	}

}
The server hashes the password and updates the account record created in the previous step. Taken from php.net: “password_hash() creates a new password hash using a strong one-way hashing algorithm”
function registerPassword(){
	$number_of_rows = $this->number_of_rows;
	$conn = $this->connection;
	if($number_of_rows == 1){
		$this->emailFound = 1;
		$email = $this->email;
		if(isset($_POST['password']) && !empty($_POST["password"])){
			$password = $_POST['password'];
			$passwordHash = password_hash($password, PASSWORD_DEFAULT);
			$sql = "UPDATE `users` SET password = ? WHERE ID = ?";
			$result = $conn->prepare($sql);
			$result->execute(array($passwordHash, $_SESSION['userid']));
			$this->status = "Password added.";
			$_SESSION['usingPassword'] = true;
		}else{
			$this->status = "No password.";
			die("No password.");
		}

	}else{
		$this->emailFound = 0;
	}
}
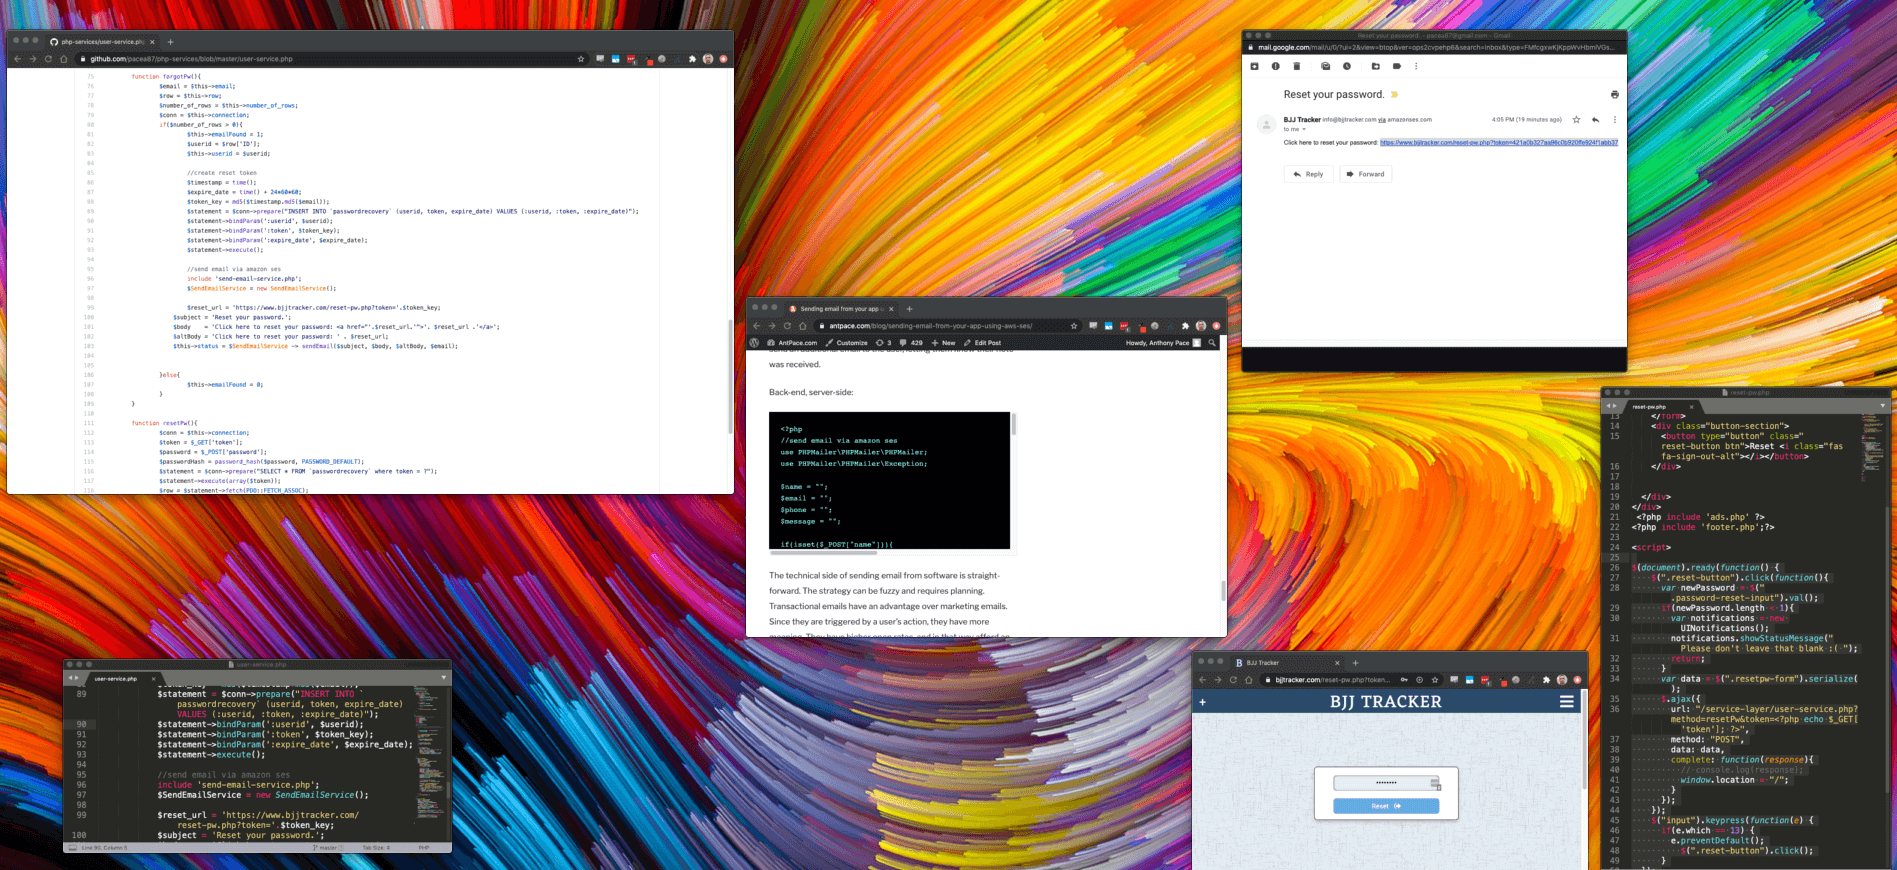
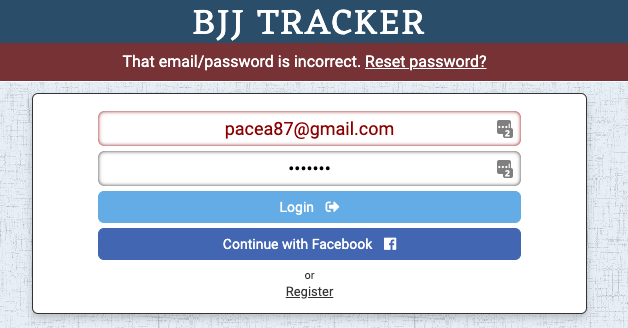
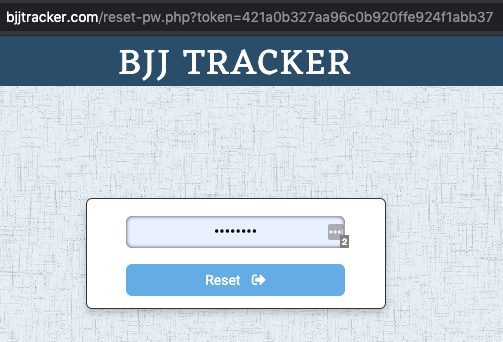
If the user ever forgets their password, they can use the reset flow we have created.
Facebook Login
Using Facebook Login lets visitors quickly create an account without having to set a password. It’s easy, quick, and secure. The first step is creating a Facebook developer account and registering a Facebook app. The official documentation explains the steps of implementing Facebook Login.
Once that is setup, you can implement their JavaScript SDK:
window.fbAsyncInit = function() {
    FB.init({
      appId      : "XXXXX",
      cookie     : true,
      xfbml      : true,
      version    : 'v2.12'
    });

    FB.AppEvents.logPageView();

};

(function(d, s, id){
 var js, fjs = d.getElementsByTagName(s)[0];
 if (d.getElementById(id)) {return;}
 js = d.createElement(s); js.id = id;
 js.src = "https://connect.facebook.net/en_US/sdk.js";
 fjs.parentNode.insertBefore(js, fjs);
}(document, 'script', 'facebook-jssdk'));
Make sure you take your app out of development mode (from your account dashboard), and use the correct production ID in your code.
Now, you’ll be able to call FB api methods to log users in and get their name and email. That information can be passed along to our back-end to create a new account.
$(".facebook-login").click(function(){
    FB.login(function(response) {
      if (response.status === 'connected') {
        // Logged into your app and Facebook.
        FB.api('/me', {fields: 'last_name, first_name, email'}, function(response) {
            console.log(response)
            var first = response.first_name || "";
            var last = response.last_name || "";
            var email = response.email || "";
            if(email.length < 1){
		window.inputError($(".email-input"), "It looks like there is no email address associated with your Facebook account. Sorry, please try registering another way.");
		$(".facebook-login").hide();
		return;
	    }
	    $.ajax({
		url: "/service-layer/user-service?method=thirdPartyAuth&third_party_source=facebook&email="+email+"&first="+first+"&last="+last,
		complete:function(response){
		    var jsonResponse = JSON.parse(response.responseText);

		    window.location = "/projects";
		}
	    });
        });
      } else {
        // The person is not logged into this facebook or we are unable to tell.
        console.log("not logged in")
      }

    }, {scope: 'public_profile,email'});
});
Google Sign-In
Logging in through Google is similar to the Facebook Login flow. It uses a JavaScript SDK to provide “access to many Google APIs”. It leverages the OAuth 2.0 protocol.
You’ll need to link to the JavaScript API SDK and provide a function for it to call once loaded:
<script async defer src="https://apis.google.com/js/api:client.js?onload=onLoadCallback"></script>
The code that fires once the library loads contains three functions . The first instantiates the Google auth2 API. It accepts a client ID, “which can be found and created in the Google Developers Console“. Next, attachSignin() uses the library’s attachClickHandler() method to link to the HTML buttons I created in my registration form UI. Finally, once the user is authorized their name and email are passed along to my back-end service.
<script>
window.onLoadCallback = function(){

  var googleUser = {};

  var continueWithGoogle = function() {
    gapi.load('auth2', function(){
      // Retrieve the singleton for the GoogleAuth library and set up the client.
      auth2 = gapi.auth2.init({
        client_id: 'XXXXXXX',
        cookiepolicy: 'single_host_origin',
        // Request scopes in addition to 'profile' and 'email'
        //scope: 'additional_scope'
      });
      attachSignin(document.getElementById('google-login-button'));
      attachSignin(document.getElementById('google-register-button'));
    });
  };

  function attachSignin(element) {
    auth2.attachClickHandler(element, {},
        function(googleUser) {
            var email = googleUser.getBasicProfile().getEmail();
            var first = googleUser.getBasicProfile().getGivenName();
            var last = googleUser.getBasicProfile().getFamilyName();
            googleAuth(email, first, last);
        }, function(error) {
          console.log(JSON.stringify(error, undefined, 2));
        });
  }
  function googleAuth(email, first, last){

	var first = first || "";
	var last = last || "";
	$.ajax({
		url: "/user-service?method=thirdPartyAuth&third_party_source=google&email="+email+"&first="+first+"&last="+last,
		complete:function(response){
			console.log(response.responseText)
			var jsonResponse = JSON.parse(response.responseText);
			window.location = "/projects";
		}
	});
   }

  continueWithGoogle();

}

</script>
Session authorization
Registering with any one of these mechanisms allows login with any of the others. Once the user has been authorized, all that is left is to set session variables and cookie their ID:
$_SESSION['auth'] = true;
$_SESSION['email'] = $email;
$_SESSION['userid'] = $userid;
setcookie("authid", $authid, time() + (86400 * 60), "/"); // 86400 = 1 day; total 60 days
Welcome email
If this is their first time logging in, we can send them a welcome email using Amazon SES and PHPMailer. Here is the class I use to send emails from my web app:
<?php
// Report all errors
error_reporting(E_ALL);
ini_set("display_errors", 1);

//send email via amazon ses
use PHPMailer\PHPMailer\PHPMailer;
use PHPMailer\PHPMailer\Exception;


class SendEmailService{
	// send email services
	public $connection;
	public $status;
	public $email;


	function __construct()
	{
		if (session_status() == PHP_SESSION_NONE) {
		    session_start();
		}

		include '/var/www/html/db-connection.php';
		$this->connection = $conn;
		$this->status = "None.";

	}

	function sendEmail($subject, $body, $altBody, $email){
		require '/var/www/html/PHPMailer/src/Exception.php';
		require '/var/www/html/PHPMailer/src/PHPMailer.php';
		require '/var/www/html/PHPMailer/src/SMTP.php';

		// Instantiation and passing `true` enables exceptions
		$mail = new PHPMailer(true);
		try {
		    //Server settings
		    $mail->SMTPDebug = 0;
		    $mail->isSMTP();                                            // Set mailer to use SMTP
		    $mail->Host       = 'email-smtp.XXX.amazonaws.com';  // Specify main and backup SMTP servers
		    $mail->SMTPAuth   = true;                                   // Enable SMTP authentication
		    $mail->Username   = 'XXX';                     // SMTP username
		    $mail->Password   = 'XXX';                               // SMTP password
		    $mail->SMTPSecure = 'tls';                                  // Enable TLS encryption, `ssl` also accepted
		    $mail->Port       = 587;                                    // TCP port to connect to

		    //Recipients
		    $mail->setFrom('info@bjjtracker.com', 'BJJ Tracker');
		    $mail->addAddress($email);     // Add a recipient
		    $mail->addReplyTo('info@bjjtracker.com', 'BJJ Tracker');

		    // Content
		    $mail->isHTML(true); // Set email format to HTML

		    $mail->Subject = $subject;
		    $mail->Body    = $body;
		    $mail->AltBody = $altBody;

		    $mail->send();
		    $this->status = 'Message has been sent to: ' . $email;
		} catch (Exception $e) {
		    $this->status = "Message could not be sent. Mailer Error: {$mail->ErrorInfo}";
		}

		// echo $this->status;
		return $this->status;

	}
}

?>
And the implementation to send an email to newly registered users:
function sendWelcomeEmail($email){
	include 'send-email-service.php';
	$SendEmailService = new SendEmailService();

	$subject = 'Welcome to BJJ Tracker';
        $body    = "Thanks for registering with BJJ Tracker.<br><br> Now's your chance to keep track of your grappling workouts and improve!.<br><br><a href='https://www.bjjtracker.com/'><img src='https://www.bjjtracker.com/img/bjjtracker-logo.png'></a>";
        $altBody = "Thanks for registering with BJJ Tracker";
        $SendEmailService -> sendEmail($subject, $body, $altBody, $email);

}
Instead of messaging new registrants immediately, I run a nightly cron job that checks accounts that we created the day previous. Here is the MySql query that I use to select them:
SELECT * FROM `users` WHERE DATE(created_date) = DATE(NOW() - INTERVAL 1 DAY);
You may also want to email users additional resources, at different times, depending on your product. Continue the onboarding process to increase the value of signup conversions.