Custom UI notifications

UI feedback alerts

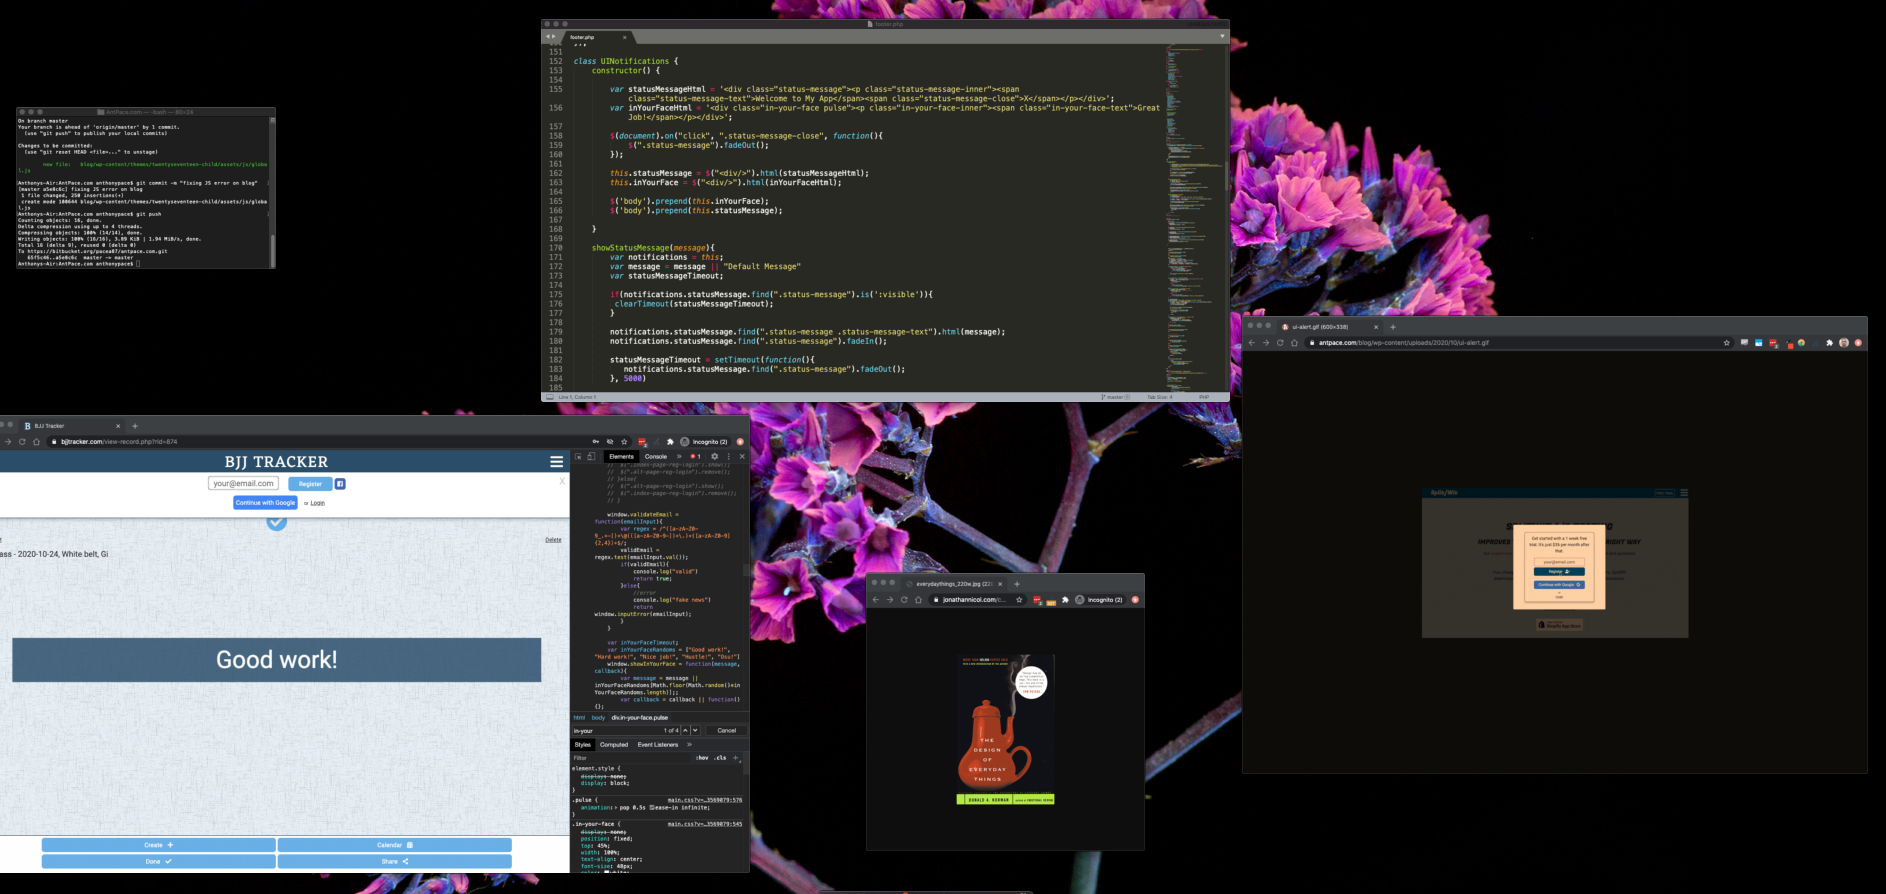
Showing brief notifications to website visitors is an important UI/UX component. They’re useful for providing feedback. They can communicate success, failure, or warnings.

Don Norman (The Design of Everyday Things) mentions that “Feedback is essential, but not when it gets in the way of other things, including a calm and relaxing environment” and goes on to say “Feedback is essential, but it has to be done correctly”.

A common use-case is data validation. Specifically, when logging in or signing up. If the user enters an invalid email address, or wrong login credentials, we need to let them know. The built in browser alert() is clunky and unsophisticated. Plugins are bloated and over-engineered. I wrote some basic HTML, CSS, and JavaScript that gets the job done and looks great.

My code provides two versions of the alert. The first is a basic sticky bar that fades in and out at the top of the page.

example of alert message for an invalid email address

The other flashes in the middle of the screen. I call it “in-your-face” alerts and reserve them for positive success messages.

example of a flashing UI alert to provide positive feedback to users

The CSS adds styles for both versions. Both utilize ‘position: fixed’ to stay in a set location on the page. The “in-your-face” example uses a pulse animation to achieve its effect.

<!-- UI-notifications.css -->
<style>
body{
  margin: 0px;
}
.status-message{
  display: none;
  color: white;
  text-align: center;
  font-size: 16px;
  padding: 8px;
  border-top: 1px solid white;
  border-bottom: 1px solid white;
  position: fixed;
  width: 100%;
  top: 0px;
  padding: 28px 8px;
  background-color: #b12650;
  z-index: 1000;
}
.status-message-inner{
  margin: 0px;
}

.status-message-close{
  cursor: pointer;
  position: fixed;
  right: 10px;
}
.in-your-face{
  display: none;
  position: fixed;
  top: 45%;
  width: 100%;
  text-align: center;
  font-size: 48px;
  color: white;
  z-index: 2;
}
.in-your-face-inner{
    background: #005b96;
    width: 80%;
    margin: 0 auto;
    opacity: .85;
    padding: 10px;
}
@keyframes pulse{
  50%  {transform: scale(1.2);}

}
.pulse{
  animation: pulse 0.5s ease-in infinite;
}
</style>
<!-- end UI-notifications.css -->

The javascript relies on jQuery as a dependency. It is written as a class, with a constructor and two methods. Each method takes message text as a parameter.

class UINotifications {
	constructor() {
		window.jQuery || document.write('<script src="js/vendor/jquery-1.11.2.min.js"><\/script>');
		var statusMessageHtml = '<div class="status-message"><p class="status-message-inner"><span class="status-message-text">Welcome to My App</span><span class="status-message-close">X</span></p></div>';
		var inYourFaceHtml = '<div class="in-your-face pulse"><p class="in-your-face-inner"><span class="in-your-face-text">Great Job!</span></p></div>';

		$(document).on("click", ".status-message-close", function(){
			$(".status-message").fadeOut();
		});

		this.statusMessage = $("<div/>").html(statusMessageHtml);
		this.inYourFace = $("<div/>").html(inYourFaceHtml);
		
		$('body').prepend(this.inYourFace);
		$('body').prepend(this.statusMessage);

	}

 	showStatusMessage(message){
 		var notifications = this;
	  	var message = message || "Default Message"
	  	var statusMessageTimeout;
	  	
		if(notifications.statusMessage.find(".status-message").is(':visible')){
	     clearTimeout(statusMessageTimeout);
	    }

		notifications.statusMessage.find(".status-message .status-message-text").html(message);
		notifications.statusMessage.find(".status-message").fadeIn();
		
	    statusMessageTimeout = setTimeout(function(){
	       notifications.statusMessage.find(".status-message").fadeOut(); 
	    }, 5000)
		
	}
	showInYourFace(message, callback){
		var notifications = this;
		var inYourFaceTimeout;
		var inYourFaceRandoms = ["Good work!", "Hard work!", "Nice job!", "Hustle!"]

		var message = message || inYourFaceRandoms[Math.floor(Math.random()*inYourFaceRandoms.length)];;
		var callback = callback || function(){};

		if(notifications.inYourFace.find(".in-your-face").is(':visible')){
	     clearTimeout(inYourFaceTimeout);
	    }

		notifications.inYourFace.find(".in-your-face .in-your-face-text").html(message);
		notifications.inYourFace.find(".in-your-face").show();
		
	    inYourFaceTimeout = setTimeout(function(){
	       notifications.inYourFace.find(".in-your-face").fadeOut(function(){
	       	callback();
	       }); 

	    }, 1000)
	}
}

This is a simple and lightweight solution to showing web app visitors informative alerts without using a plugin. Please, checkout the code and use it in your next project.

You can find the code on GitHub.

Lazy Load Images and Assets on WordPress with IntersectionObserver

wordpress homepage design

I write online a lot. Adding articles to this blog serves to build a catalog of technical solutions for future reference. Updating the homepage has improved user experience and SEO. The new design displays the most recent articles as clickable cards, rather than listing the entire text of each one. The changes for this were added to index.php file, in the child-theme folder. The theme’s original code already used a While() loop to iterate through the post records. My modification removed the article content, and only kept the title and image:

<div class="doc-item-wrap">
	<?php
	while ( have_posts() ) {
		the_post();
		echo "<div class='doc-item'><a href='". get_the_permalink() ."'><img class='lazy' data-src='".get_the_post_thumbnail_url()."'><h2>" . get_the_title() . "</h2></a></div>";
	} ?>
</div> <!-- doc-item-wrap -->

I used custom CSS, leveraging Flexbox, to style and position the cards:

.doc-item-wrap{
    display: flex;
    flex-wrap: wrap;
    justify-content: center;
}
.doc-item{
    width: 30%;
    padding: 20px;
    border: 3px solid #f0503a;
    margin: 15px;
    background: black;
    flex-grow: 1;
    text-align: center;
}
.doc-item:hover{
    background-color: #34495e;
}
.doc-item p{
    margin: 0px;
    line-height: 40px;
    color: white;
}
.doc-item img{
    display: block;
    margin: 0 auto;
}
.doc-item h2{
    font-size: 22px;
    color: white;

}
@media(max-width: 1000px){
	.doc-item{
		width: 45%
	}
}
@media(max-width: 700px){
	.doc-item{
		width: 100%
	}
}

The media queries adjust the size of the cards (and how many are in a row), based on screen size.

Look and feel of the design

Card layout design is a common way to arrange blog content. It gives visitors a visual overview of what’s available. It also stops the homepage from duplicating content that’s already available on the individual post pages.

You can see this pattern throughout the digital world. Card layout translates well across screen sizes and devices. Since I put much effort into writing, making it organized was a priority. This implementation can be extended to add additional content (such as date, description, etc.) and features (share links, animations, expandability). And, it fits nicely with what WordPress already provides.

Lazy loaded images

Image content can often be the biggest drag to site speed. Lazy loading media defers rendering until it is needed. Since this blog’s homepage has an image for each post, this was essential.

While iterating through post records the image URL is assigned to a custom data-src attribute on the image tag, leaving the normal src blank. This assures the image is not immediately retrieved nor loaded. I wrote a JavaScript function to lazy load the images, relying on the IntersectionObserver API. The card’s image does not load until a user scrolls it into view. This improves the speed of the page, which has a positive effect on SEO and UX.

The code creates a IntersectionObserver object.  It observes each of the image elements, checking to see if they are within the browser viewport. Once the image elements come into view, it takes the image URL from the data-src attribute, and assigns it to the tag’s src – causing the image to load.

document.addEventListener("DOMContentLoaded", function() {
  var lazyImages = [].slice.call(document.querySelectorAll("img.lazy"));
  if ("IntersectionObserver" in window) {
    let lazyImageObserver = new IntersectionObserver(function(entries, observer) {
      entries.forEach(function(entry) {
        if (entry.isIntersecting) {
          let lazyImage = entry.target;
          lazyImage.src = lazyImage.dataset.src;
          // lazyImage.srcset = lazyImage.dataset.srcset;
          lazyImage.classList.remove("lazy");
          lazyImageObserver.unobserve(lazyImage);
        }
      });
    });

    lazyImages.forEach(function(lazyImage) {
      lazyImageObserver.observe(lazyImage);
    });
  } 
});

The original JS code was referenced from a web.dev article. Web.dev is a resource created by Google that provides guidance, best practices, and tools to help web developers build better web experiences.

You can also use this same method for lazy loading videos, backgrounds, and other assets.

IntersectionObserver to lazily load JavaScript assets

I discovered another application for the IntersectionObserver implementation that I used above to load lazy load images. The Google Lighthouse performance score on my homepage was being dinged due to the “impact of third-party code”.

impact of 3rd party js on performance scores

The largest third-party resource was is used for the reCaptcha on a contact form at the bottom of my homepage. It makes sense to not load it until the user scrolls down to that section – especially because the UX expects them to take time to fill out the form before hitting “submit” anyway.

Using the same pattern as above, I created a new `IntersectionObserver` and passed the contact form section as the target:

function captchaLazyLoad(){
	contactCaptchaTarget = document.getElementById('contactSection')
	if (!contactCaptchaTarget) {
        return;
    }
	let contactCaptchaObserver = new IntersectionObserver(function(entries, observer) {
		if (entries[0].isIntersecting) {
            var script = document.createElement('script');
		    script.src = "https://www.google.com/recaptcha/api.js";
		    document.body.appendChild(script);
            contactCaptchaObserver.unobserve(contactCaptchaTarget);
        }
	})
	contactCaptchaObserver.observe(contactCaptchaTarget);
}

I included this function to the already existing `DOMContentLoaded`  event listener just below the loop to observe lazy image elements:

<script>
function captchaLazyLoad(){
	contactCaptchaTarget = document.getElementById('contactSection')
	if (!contactCaptchaTarget) {
        return;
    }
	let contactCaptchaObserver = new IntersectionObserver(function(entries, observer) {
		if (entries[0].isIntersecting) {
            var script = document.createElement('script');
		    script.src = "https://www.google.com/recaptcha/api.js";
		    document.body.appendChild(script);
            contactCaptchaObserver.unobserve(contactCaptchaTarget);
        }
	})
	contactCaptchaObserver.observe(contactCaptchaTarget);
}

document.addEventListener("DOMContentLoaded", function() {
  var lazyImages = [].slice.call(document.querySelectorAll("img.lazy"));
  if ("IntersectionObserver" in window) {
    let lazyImageObserver = new IntersectionObserver(function(entries, observer) {
      entries.forEach(function(entry) {
        if (entry.isIntersecting) {
          let lazyImage = entry.target;
          lazyImage.src = lazyImage.dataset.src;
          // lazyImage.srcset = lazyImage.dataset.srcset;
          lazyImage.classList.remove("lazy");
          lazyImageObserver.unobserve(lazyImage);
        }
      });
    });

    lazyImages.forEach(function(lazyImage) {
      lazyImageObserver.observe(lazyImage);
    });

    //
    captchaLazyLoad()

  } else {
    // Possibly fall back to a more compatible method here if IntersectionObserver does not exist on the browser
  }

});

</script>

This update raised my Lighthouse performance score by fifteen points!

A template for web app startups

code templates

Having a framework in place when you start up will let you hit the ground running. This applies not just to software, but also business, health, fitness, and just about everything else in life. Having the dots ready to connect helps you to draw the right picture.

I recently released BJJ Tracker as a web app. You can read about it here. I built it knowing that I would want to reuse its code, and have it serve as a framework for future projects. I cleaned it up into a GitHub repository, trying to make it as generic as I could. Here is the link: https://github.com/pacea87/ap-template.

BJJ Tracker

I wanted to create a template to rapidly roll out digital products and software. This source code is a starting point. The goal is to be quick and cheap, without sacrificing quality. It runs in a LAMP environment. If you want to run this software on your computer, look into WAMP or MAMP.

This code base provides a front-end that leverages modern web technologies and standard best practices. A basic layout is described, including a header, menu drawer, feature buttons, and detail pages. It uses Bootstrap, jQuery, Font Awesome, Google Fonts, and Google Charts.

The back-end is object oriented, RESTful, and secure. Code that talks to the database, or to 3rd party APIs, has been separated out into *-service.php files. It includes SQL to create a user database. The database interacts with a custom registration and login engine. It allows for anonymous users, so that data can be saved before signing up, and a password is not needed to get started. It provides a reset password mechanism for users. It seamlessly integrates with Mailchimp and Facebook login. Redirects are in place to force SSL and WWW, and to remove file extensions from URLs. Next versions will address technical SEO and new API integrations.

source code

If you’d like to contribute to this repo, feel free to fork it, and make a pull request.

GitHub

UI Component Pattern for a Simple PHP website

PHP UI component patterns

Reusable components are a staple of modern front-end web development. On my simple PHP website, I wanted to build user interface pieces, and reuse them across multiple pages. When I was creating a new page for a newsletter signup form, I realized that I was repeating a lot of code for a contact form section that is displayed on almost every page.

Contact form section

This website is so simple, it does not use any modern framework. The contact form itself is powered by AWS SES.  I created a directory in the root folder of the website called “components”. There, I put files containing HTML, CSS, and JavaScript code that would otherwise be repeated. Implementing this pattern will help my code adhere to the DRY (don’t repeat yourself) principle, and make it quicker and easier to make changes in the future. Centralizing code ensures quality and scalability.

UI component directory

Searching the code base for references to this particular HTML revealed ten instances that could be cleaned up.

searching a code base

In the new component file, I copy and paste my HTML and CSS code.  Then, I go through each of the offending files, and replace the markup with a reference:

<?php include $_SERVER["DOCUMENT_ROOT"] . '/components/contact-section.php'; ?>

I also delete any CSS and JavaScript for this section that’s on the page. At first, I tried adding the JavaScript that controls this form’s functionality to that same file. It failed because it relies on a jQuery reference that is not loaded until lower in the document. Separating the JS code into its own file, similarly named as `contact-section-js.php`, and calling it below the library reference solved the issue. That code is responsible for passing the message along to the back-end, handling UI success/error notifications, and implementing CAPTCHA to thwart bots. Since it was a lot of files were morphed, I ran a quality assurance protocol to ensure nothing broke.