Here, I’ll attempt to expound the code I wrote and what I learned along the way.
Statistical significance implies that the results of an experiment didn’t happen by random chance. SplitWit specifically deals with running A/B experiments (hypothesis testing) to help increase conversion rates. Getting this right is important.
Probability
Statistical significance is determined by calculating a “probability value”. The lower that value is, the more confident we can be that our results are probably not random. Statisticians refer to it as “p-value”. In this field of study, a p-value less than 0.05 is considered good. That translates to a less than 5% chance that the results of an experiment are due to error. Source.
When the probability of a sampling error is that low, we are said to have rejected the “null hypothesis” and affirmed our “alternative hypothesis”. Our alternative hypothesis, in the context of A/B website testing, refers to the experimental UI change we made successfully increasing our conversion rate. The null hypothesis represents the idea that our changes had no true affect on any improvement we may have seen.
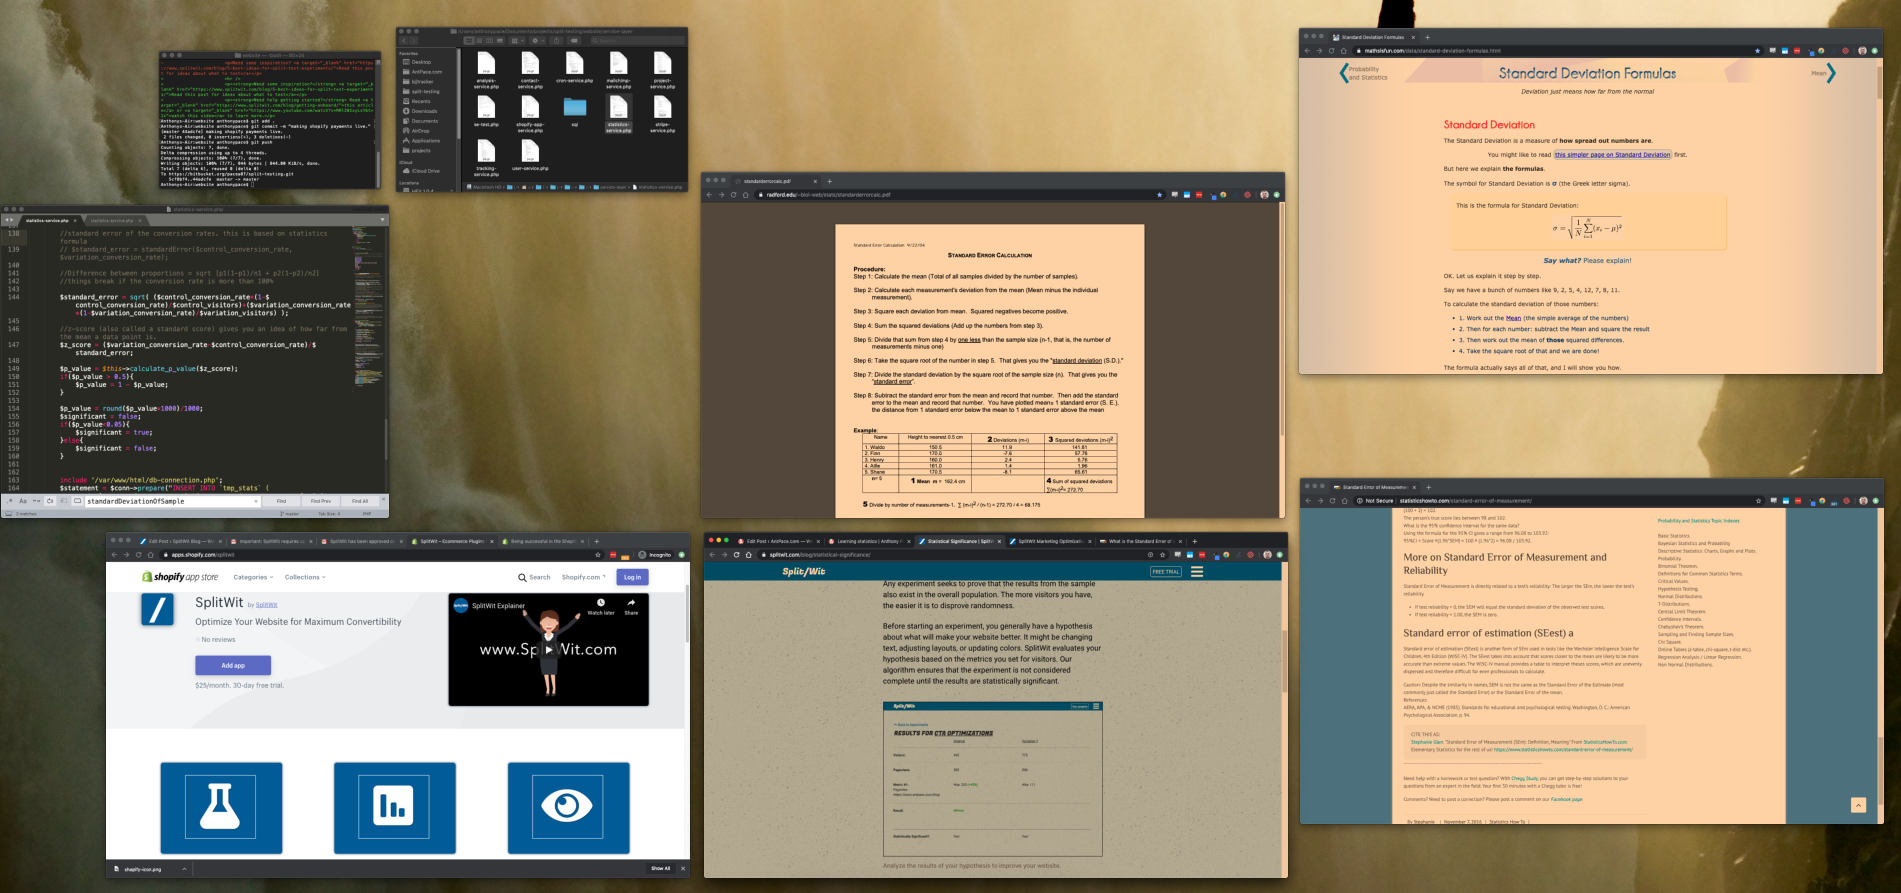
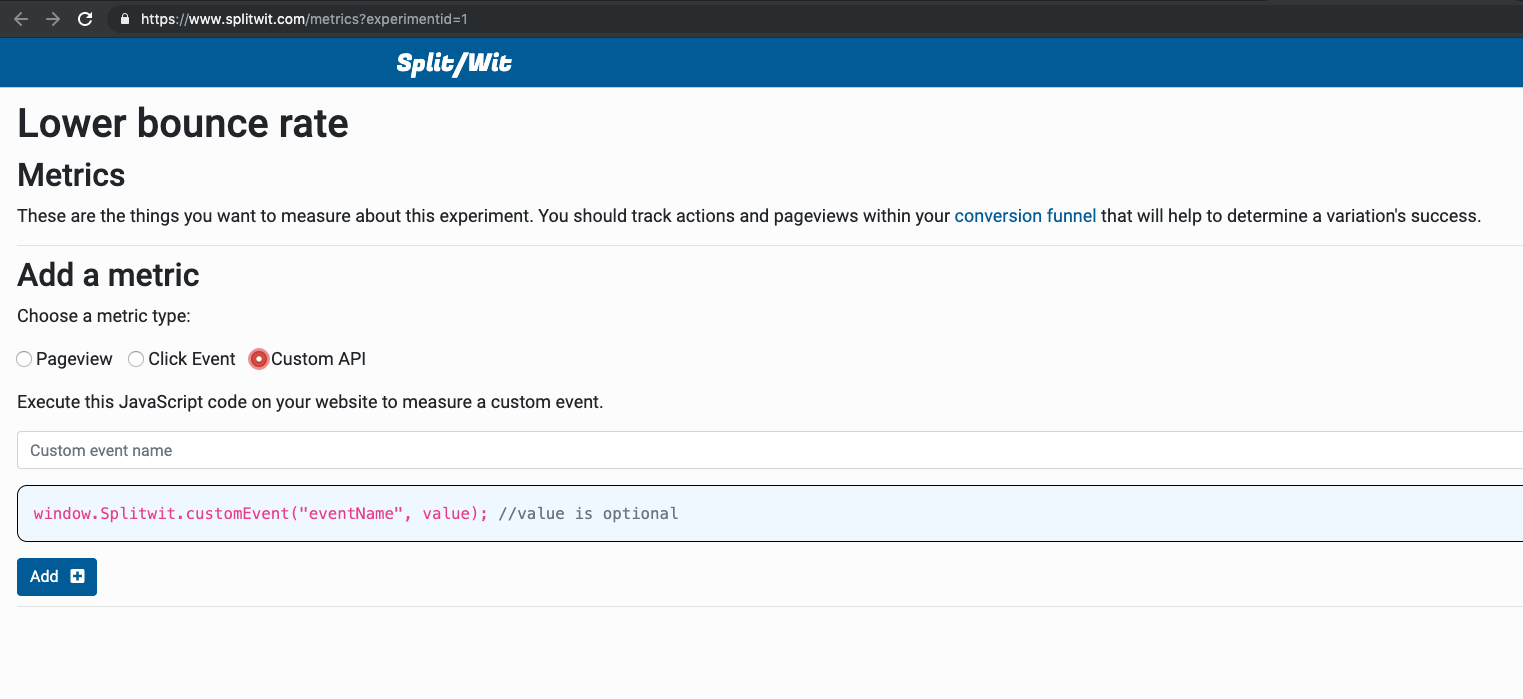
SplitWit lets you set custom metrics to measure conversion rates
How do we calculate our p-value for an A/B split test on a eCommerce website?
Here are the steps to figure out if a hypothesis test is statistically significant:
Determine the conversion rates for the control and variation
Work out the standard error of the difference of those rates
Derive a z-score using the conversion rates and the standard error
Convert that z-score to a p-value
Check if that p-value is below the desired confidence level (<0.05 for 95% confidence)
This recipe is based on a field of study called Bayesian statistics. It attempts to describe a degree of certainty for our experiments.
Conversion rates
The goal of running A/B split tests is to increase your website’s conversion rate. The idea is to make a UI change, show that variation to a portion of users, and then measure conversions against the control version. I calculate conversion rates by dividing the number of conversions by the number of visitors, giving me an average:
Which ever version’s conversion rate is higher is the winner of the experiment. I calculate the winner’s uptick in conversion rate using this formula: (WinningConversionRate – LosingConversionRate) / LosingConversionRate
After researching, I determined that I would calculate my p-value from a “z-score”.
$p_value = calculate_p_value($z_score);
A z-score (also known as a standard score) tells us how far a data point is from the mean. Source.
For the purposes of A/B testing, the data points we are interested in is the conversion rates of our control and variation versions. Consider this code snippet for determining our z-score:
This formula takes the difference between the two conversion rates, and divides it by their “standard error”. The standard error is meant to tell us how spread out our data is (sampling distribution). Source.
Standard error of two means’ difference
A conversion rate is essentially an average (mean). To properly determine our z-score, we’ll want to use the standard error of their difference.
First, we’d want to get the standard error of each of those rates. Source.
This is the formula to use: ( conversion_rate * ( 1 – conversion_rate ) / visitors )1/2
If we skip squaring our values in the 2nd step, we can also skip getting their square root in the first. Then, the code can be cleaned up, and put into a function:
Having considered all of these steps, we can put together a simple method to determine statistical significance. It takes the number of visitors and conversions for the control and the variation.
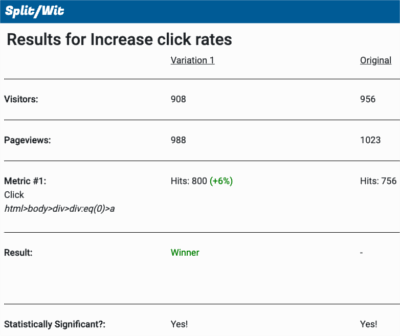
SplitWit is a digital product. It is a “software as a service” platform that helps split test websites and apps. That means it allows us to make changes to a website, that only half of visitors will see, and then determine which version has better results (sales, sign-ups, etc.).
The front-end design utilizes basic principles that focus on user experience. I iterated through various color pallets, and ended with a blue-shaded scheme. Subtle textured patterns applied to background sections help add a finished look. And of course, FontAwesome is my go-to icon set.
https://www.SplitWit.com
I used a CSS rule on the main container of each page to have a minimum height of 100% of the viewport. This ensures that the page footer doesn’t end up in the middle of the screen if there is not enough content.
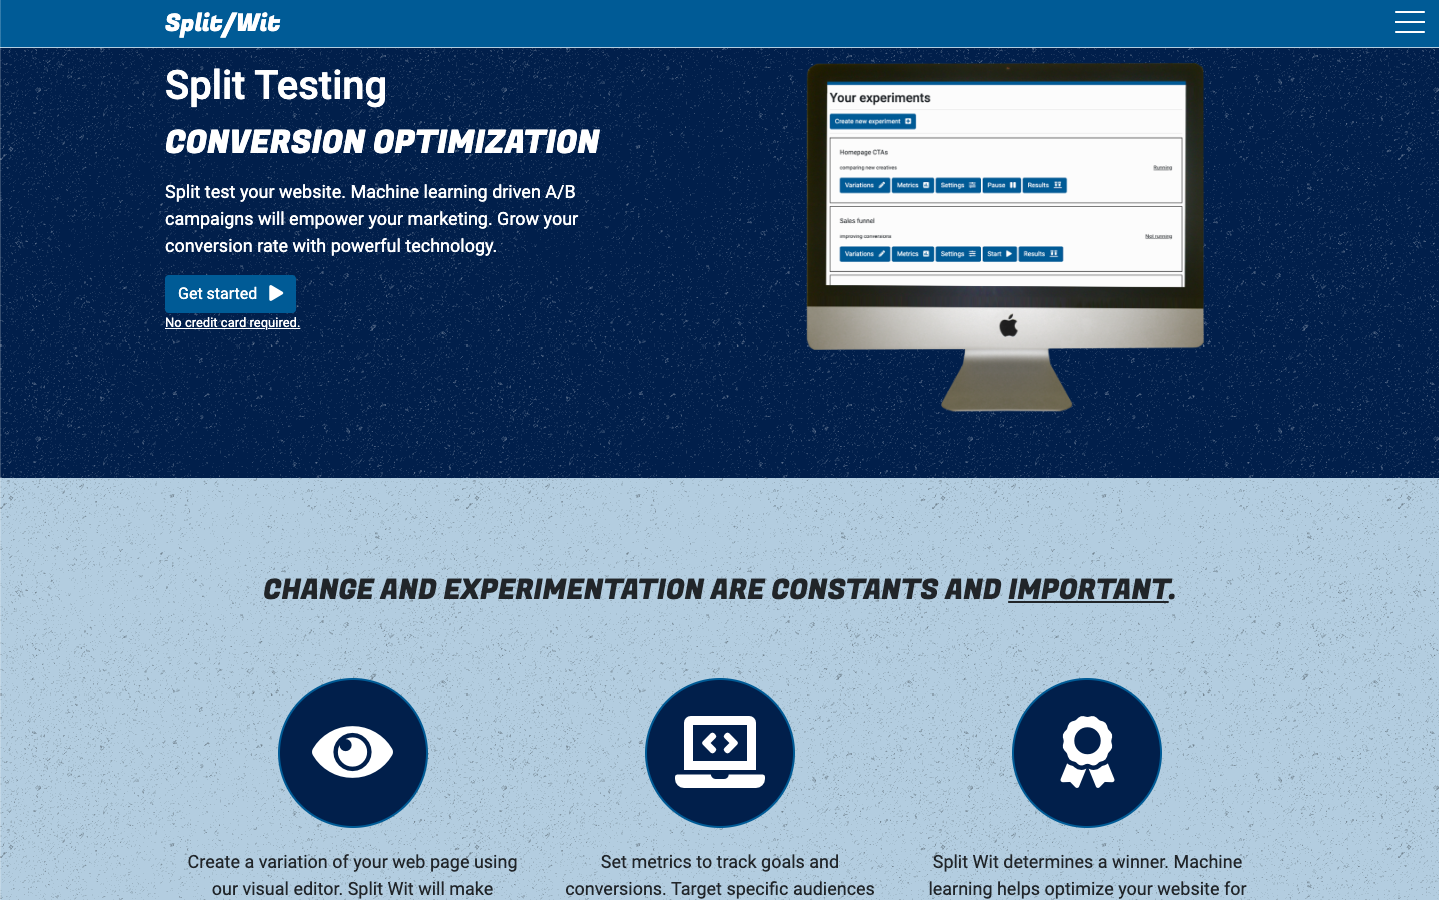
After setting up an account, users can create experiments that target certain pages of a website. The visual optimizer lets changes be made easily between the control and variation versions.
The editor loads up a website as an iFrame on the right side of the page. Once a page is loaded, SplitWit adds an overlay to the iFrame. This way, instead of interacting with the page, clicks can be intercepted. Any elements that get clicked are loaded up as HTML into the “make a change” section of the editor. Any changes made are saved to that variation, and will be displayed to half of visitors.
Here is an example of the code that powers the overlay and connects it to the editor:
The editor has lots of built in options, so users can change the style and behavior of a page without needing to know how to code. A marketer can use this tool without the help of a developer.
Metrics and statistical significance
A key feature of SplitWit is to measure conversion metrics and performance indicators. The platform determines which variation is a winner based on the metrics set. Three types of metrics are offered: page views, click events, and custom API calls.
Algorithms calculate statistical significance based on the number of visitors an experiment receives and the conversion metrics configured. This makes sure that the result is very unlikely to have occurred coincidently.
The code snippet
Each project setup in SplitWit generates a code snippet. Once this snippet is added to a website, SplitWit is able to do its magic. Using JavaScript, it applies variation changes, splits user traffic between versions, and measures key metrics about the experiments running.
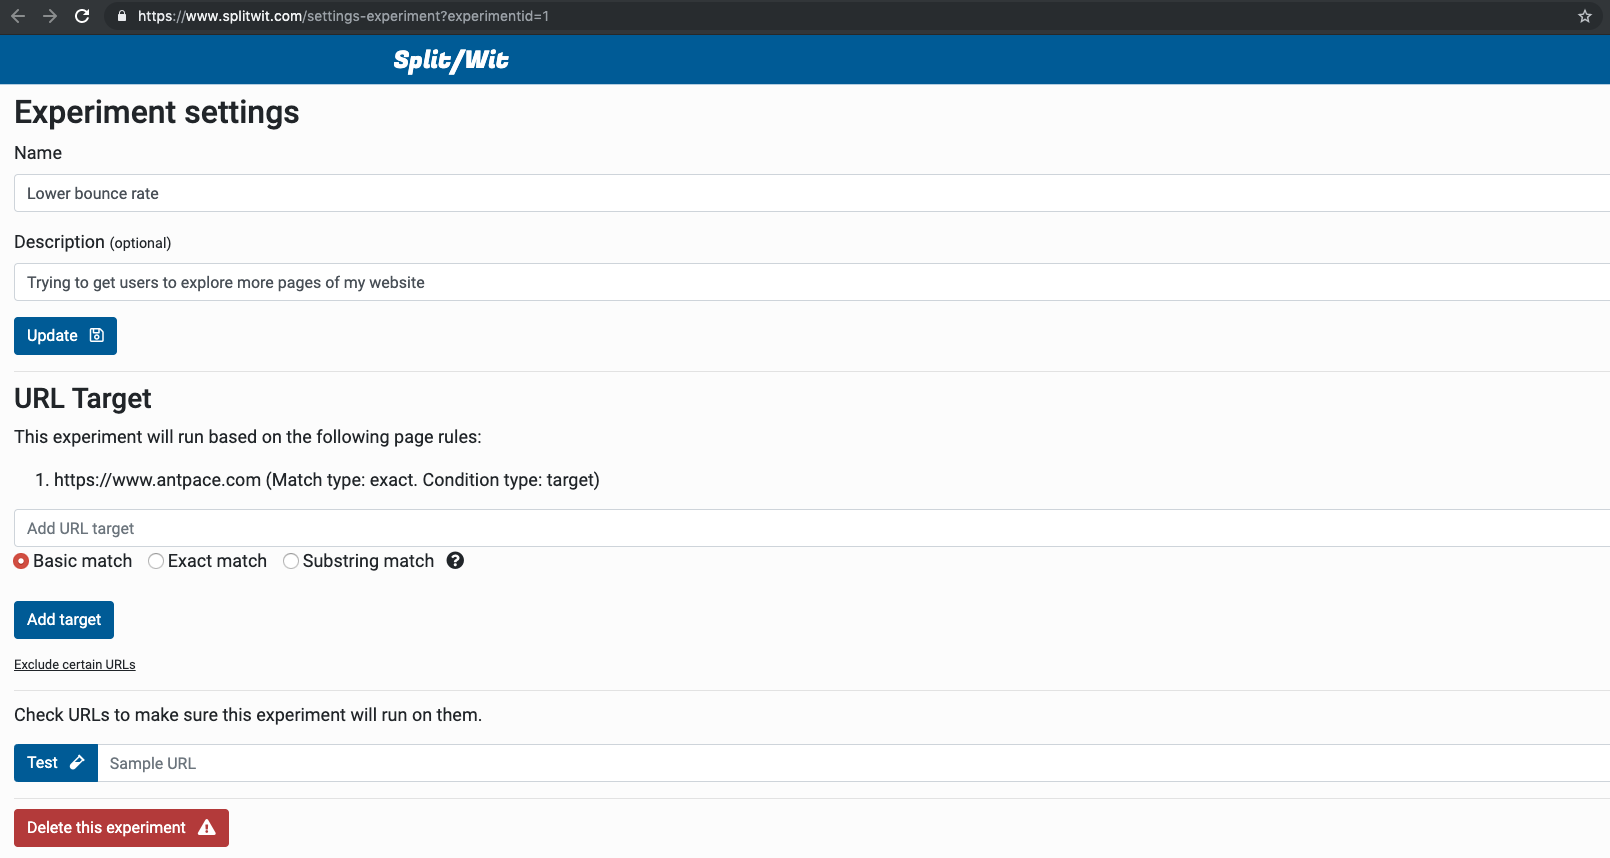
The platform uses a relational database structure. As changes are made to experiments, the details are saved and written to a unique snippet file. When the snippet file loads, the first thing is does is check to see if there are any experiments that should be running on the current page. Each experiment can be configured to run on various URLs. The configuration rules contain three parts: a URL pattern, a type (target or exclude), and a match type (exact, basic, or substring). You can read SplitWit documentation to find an explanation of these match types.
Here is the code used to test a URL against an experiment’s configuration rules:
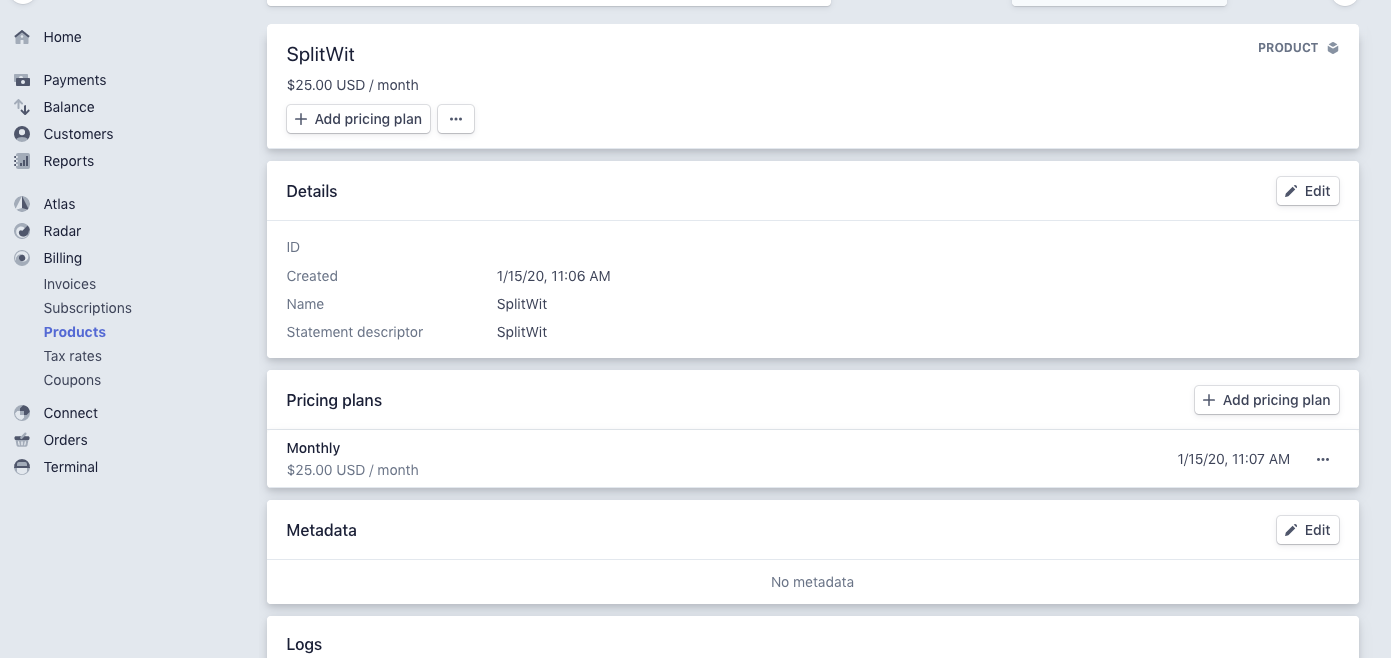
Stripe is used to bill customers. In the billing dashboard we can create a product, and assign it a monthly pricing plan.
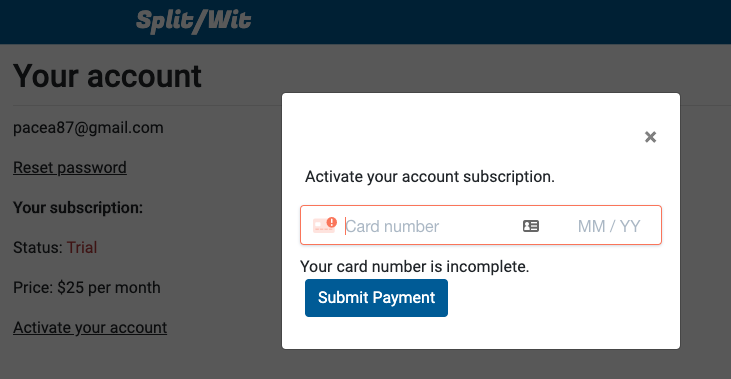
The payment processor handles re-billing customers each month. Our software is responsible for keeping track of each account’s payment status. In the database we record the date of when an account will be considered delinquent. Upon registration each account has this field set to 15 days in the future, affording a two week trial. At this point, users have not entered any credit card information.
Initial payment
Stripe’s JavaScript SDK is used during initial payment to tokenize credit card information before passing it along to the server.
Stripe’s JS library handles card validation and tokenization.
Below is the HTML used for a Stripe payment element:
<div id="stripe-payment-modal" class="modal stripe-payment-modal" style="display: none;">
<!-- Modal content -->
<div class="modal-content">
<p>
<button type="button" class="dismiss-modal close" >×</button>
</p>
<p>Activate your account subscription.</p>
<form id="payment-form">
<div class="form-row">
<!-- <label for="card-element">
Credit or debit card
</label> -->
<div id="card-element">
<!-- A Stripe Element will be inserted here. -->
</div>
<!-- Used to display Element errors. -->
<div id="card-errors" role="alert"></div>
</div>
<button type="button" class="btn submit-payment">Submit Payment</button>
</form>
</div>
</div>
And the JavaScript:
<script src="https://js.stripe.com/v3/"></script>
<script type="text/javascript">
var stripe = Stripe('your-public-key-goes-here');

var elements = stripe.elements();

// Custom styling can be passed to options when creating an Element.
var style = {
  base: {
    color: '#32325d',
    fontFamily: '"Helvetica Neue", Helvetica, sans-serif',
    fontSmoothing: 'antialiased',
    fontSize: '16px',
    '::placeholder': {
      color: '#aab7c4'
    }
  },
  invalid: {
    color: '#fa755a',
    iconColor: '#fa755a'
  }
};

// Create an instance of the card Element.
var card = elements.create('card', {style: style});

// Add an instance of the card Element into the `card-element` div.
card.mount('#card-element');

// Handle real-time validation errors from the card Element.
card.addEventListener('change', function(event) {
  var displayError = document.getElementById('card-errors');
  if (event.error) {
    displayError.textContent = event.error.message;
  } else {
    displayError.textContent = '';
  }
});

// Handle form submission.
var form = document.getElementById('payment-form');
form.addEventListener('submit', function(event) {
  event.preventDefault();

  stripe.createToken(card).then(function(result) {
    if (result.error) {
      // Inform the user if there was an error.
      var errorElement = document.getElementById('card-errors');
      errorElement.textContent = result.error.message;
    } else {
      // Send the token to your server.
      stripeTokenHandler(result.token);
    }
  });
});

// Submit the form with the token ID.
function stripeTokenHandler(token) {
  // Insert the token ID into the form so it gets submitted to the server
  var form = document.getElementById('payment-form');
  var hiddenInput = document.createElement('input');
  hiddenInput.setAttribute('type', 'hidden');
  hiddenInput.setAttribute('name', 'stripeToken');
  hiddenInput.setAttribute('value', token.id);
  form.appendChild(hiddenInput);

  var data = $("#payment-form").serialize();
  $.ajax({
  	url:"stripe-payment-service.php",
  	method: "POST",
  	data: data,
  	complete: function(response){
  		console.log(response);
  		window.location.reload();
  	}
  })
}

$(".submit-payment").click(function(){
	stripe.createToken(card).then(function(result) {
    if (result.error) {
    	// Inform the customer that there was an error.
    	var errorElement = document.getElementById('card-errors');
    	errorElement.textContent = result.error.message;
    } else {
	$(".submit-payment").attr("disabled", "disabled").html('Working...');
      	// Send the token to your server.
      	stripeTokenHandler(result.token);
    }
  });
});
</script>
The above code creates a new Stripe object using a public API key. That object injects a credit card form into our ‘#card-element’ div, with custom styles attached. It listens for any changes, and displays validation errors. When the form is submitted, the Stripe object creates a token from the payment information. That token is passed to our back-end. Stripe’s PHP library is used to finish the transaction:
<?php
function subscribe(){
        require_once('stripe-php-6.43.0/init.php');
        \Stripe\Stripe::setApiKey('sk_XXXX');
	$stripe_token = $_POST['stripeToken'];
	$conn = $this->connection;

	if(isset($_SESSION['email'])){
		$email = $_SESSION['email'];
	}else{
		die("No email found.");
	}

	if(strlen($email)>0){
		$sql = "SELECT * FROM `account` WHERE email = ?";
		$result = $conn->prepare($sql);
		$result->execute(array($email));
		$row = $result->fetch(PDO::FETCH_ASSOC);
	}
	$customer_id = $row['stripe_customer_id'];
	//check if this account already has a stripe_customer_id
	if(strlen($customer_id) < 1){
		//if not, create the customer
		$customer = \Stripe\Customer::create([
		  'email' => $email,
		  'source' => $stripe_token,
		]);
		$customer_id = $customer['id'];
		//write stripe ID to db
		$sql = "UPDATE `account_table` SET stripe_customer_id = ? WHERE email = ?";
		$result = $conn->prepare($sql);
		$result->execute(array($customer_id, $email));
	}

	// Create the subscription
	$subscription = \Stripe\Subscription::create([
	  'customer' => $customer_id,
	  'items' => [
	    [
	      'plan' => 'plan_XXX', //setup in Stripe dashboard.
	    ],
	  ],
	  'expand' => ['latest_invoice.payment_intent'],
	  'billing_cycle_anchor' => time()
	]);
	$subscription_status = $subscription['status'];
	$subscription_id = $subscription['id'];
	if($subscription_status == "active"){
		//set current_period_end to 32 days (1 month plus some leeway) in the future. set past_due as false
		$sql = "UPDATE `account_table` SET stripe_subscription_id = ?, current_period_end = ?, past_due = 0 WHERE email = ?";
		$result = $conn->prepare($sql);
		$past_due = false;
		$current_period_end = new DateTime;
		$current_period_end->modify( '+32 day' );
		$current_period_end = $current_period_end->format('Y-m-d H:i:s');
		$result->execute(array($subscription_id, $current_period_end, $email));
	}

}
?>
On the server side our secret API key is used. A customer record is created in Stripe using the payment token and user’s email. The Stripe customer ID is then used to create a subscription. We record the the customer ID and subscription ID to our database. The account’s new subscription period end is updated to 32 days in the future.
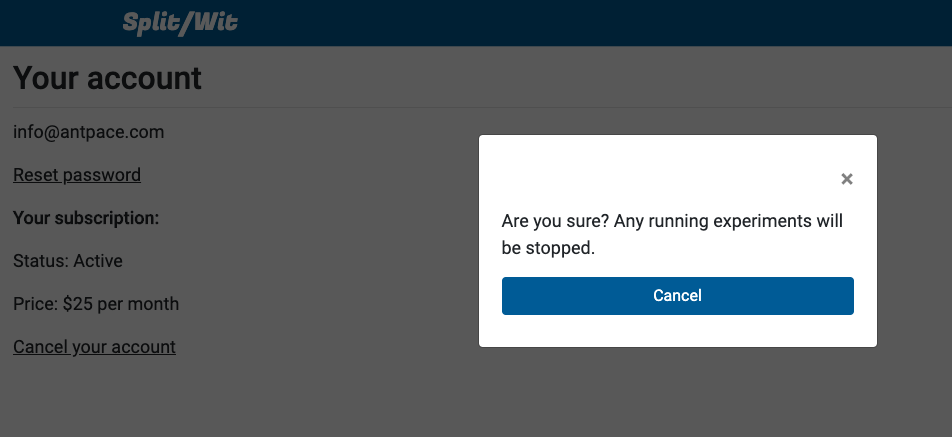
Cancel a subscription
The user is able to cancel their subscription from the SplitWit account dashboard.
We retrieve their subscription from Stripe, and cancel it, using their subscription ID. They will no longer be billed. We update our database to turn off the account’s experiments, delete any Stripe details, mark their subscription as delinquent, and re-write their snippet file.
<?php

function cancelSubscription(){
	require_once('stripe-php-6.43.0/init.php');
        \Stripe\Stripe::setApiKey('sk_XXXX');

	$conn = $this->connection;
	if(isset($_SESSION['userid'])){
		$accountid = $_SESSION['userid'];
	}else{
		die("No userid found.");
	}

	if(strlen($accountid)>0){
		$sql = "SELECT * FROM `account` WHERE accountid = ?";
		$result = $conn->prepare($sql);
		$result->execute(array($accountid));
		$row = $result->fetch(PDO::FETCH_ASSOC);
	}
	$stripe_subscription_id = $row['stripe_subscription_id'];
	$subscription = \Stripe\Subscription::retrieve($stripe_subscription_id);
	$subscription->cancel();

	//turn off experiments and update snippets. clear stripe IDs. set current_period_end to yesterday. set past_due = 1
	$current_period_end   = new DateTime;
	$current_period_end->modify( '-1 day' );
	$current_period_end = $current_period_end->format('Y-m-d H:i:s');
	$sql = "UPDATE `account` SET stripe_customer_id = '', stripe_subscription_id = '', past_due = 1, current_period_end = ? WHERE accountid = ?";
	$result = $conn->prepare($sql);
	$result->execute(array($current_period_end, $accountid));

	//turn off all experiments
	$status = "Not running";
	$sql = "UPDATE `experiment` set status = ? where accountid = ?";
	$result2 = $conn->prepare($sql);
	$result2->execute(array($status, $accountid));

	//update all snippets for this account (1 snippet per project)
	$sql = "SELECT * FROM `project` WHERE accountid = ?";
	$result3 = $conn->prepare($sql);
	$result3->execute(array($accountid));
	$rows3 = $result3->fetchAll(PDO::FETCH_ASSOC);
	foreach ($rows3 as $key3 => $value3) {
		$projectid = $value3['projectid'];
    	        $databaseProjectService = new DatabaseProjectService();
		$databaseProjectService -> writeSnippetFile(false, false, $projectid);
	}

	$this->status = "complete";
}

?>
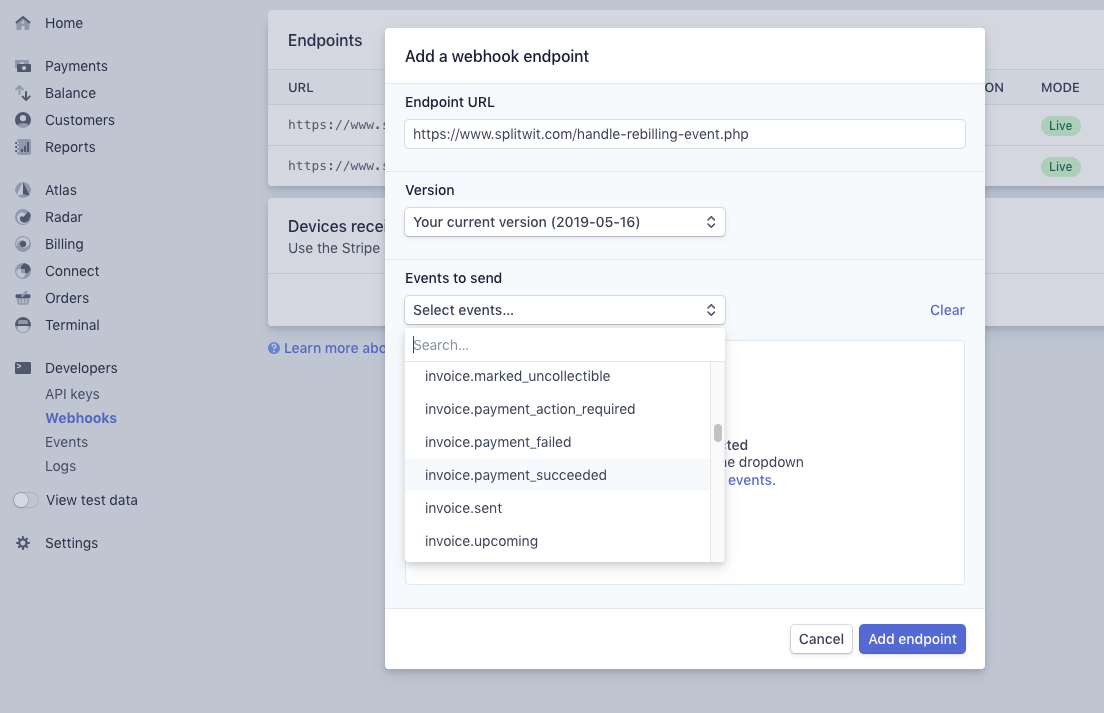
Re-billing subscriptions
As long as an account has an active subscription in Stripe, they will be automatically re-billed each month. When this event takes place, Stripe can deliver data about it to an end-point of our choice (commonly known as a webhook).
SplitWit listens for an event called “invoice.payment_succeeded”, which occurs when a customer’s monthly payment is successful. When that happens the account’s subscription period end is updated to 32 days in the future.
What if payment fails or never happens? The account’s subscription period end never gets updated.
A daily scheduled task checks each active account’s subscription period end date. If that date is in the past, we mark the account as past due, turn off all experiments, and update its snippet files.
The value of experimentation
Driving digital conversions is a science. Experimentation should be a constant exercise in this respect. Take any field and we can benefit from testing the waters and adjusting our sail. Our ability to interpret that data is the bottle neck to making good decisions. The best lesson I’ve learned is that intuition is usually not enough. It’s better to look at the numbers and trust data.
Influencing users through a funnel of action, finally leading to a conversion, is a challenge. Optimizing conversions, sales, and leads can be broken down into a system based approach. SplitWit focuses on that point.