I’ve been heads-down on systems work this month: tightening my technical workflow, pressure-testing AI tools, and connecting those decisions to real business outcomes.
What I’ve been working
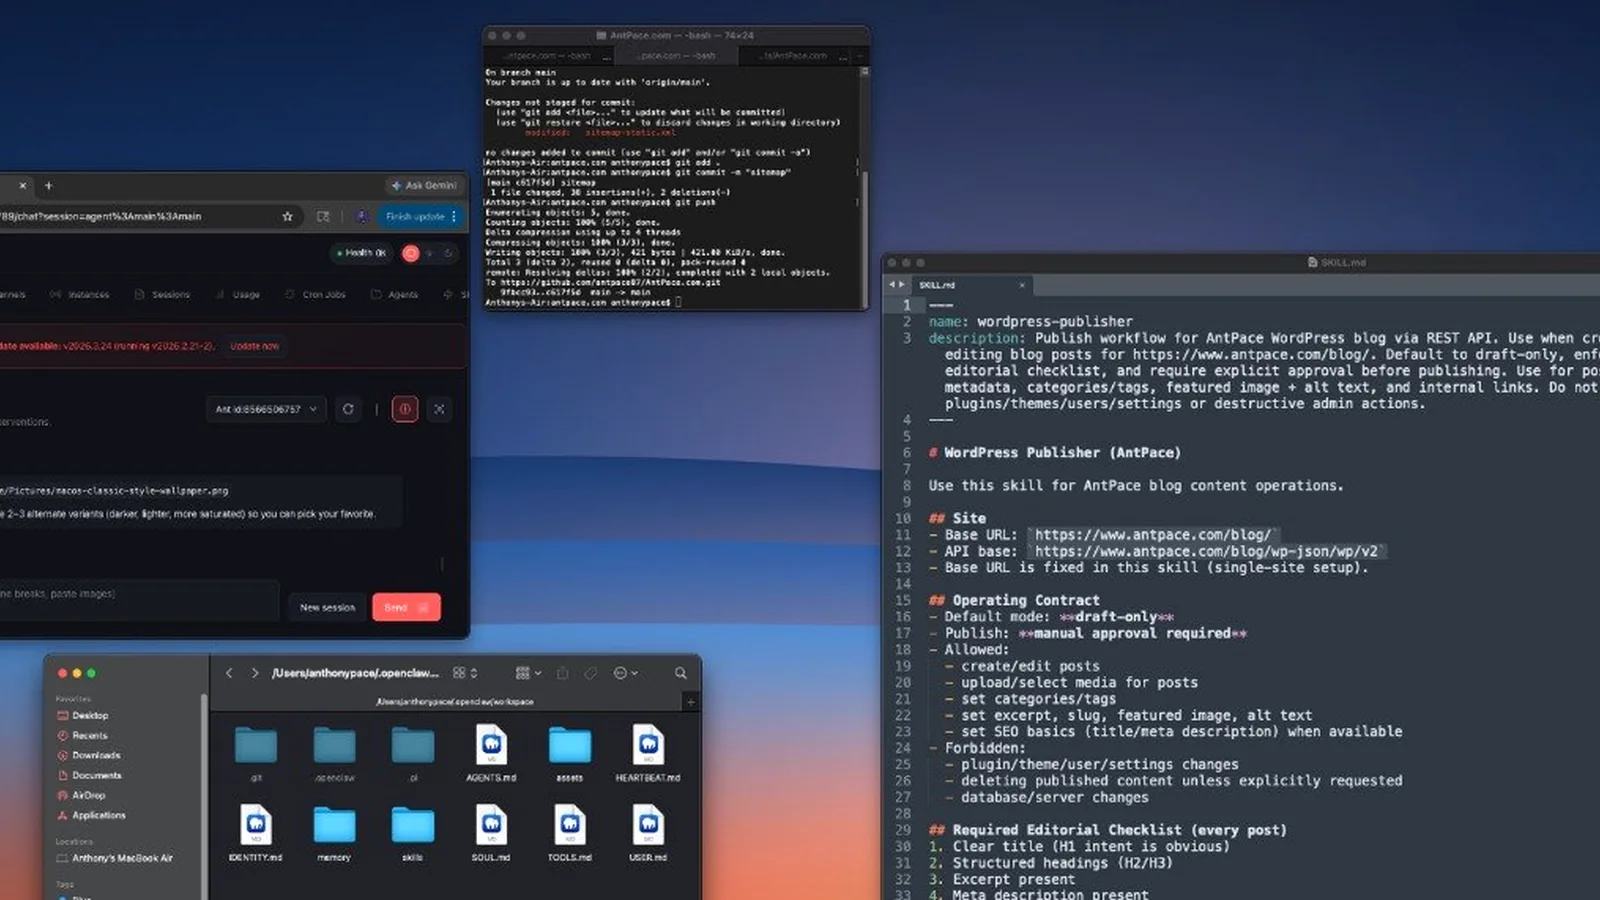
OpenClaw setup and debugging: resolving gateway/session friction, token/auth issues, and execution reliability.
Local development workflow: running my site locally with MAMP, fixing PHP path/version mismatches, handling localhost port conflicts, and cleaning up stuck terminal processes.
WordPress + publishing automation: improving draft workflows, troubleshooting environment overrides, and tightening a cleaner “write/edit/publish” path.
TypeScript migration: moving a private NPM utility package toward TypeScript. I use it in a personal React project.
OpenClaw-assisted builds: using agents to spin up practical outputs fast, including game clones (like Wordle-style projects) and a macOS AI-terms screensaver for exam study.
Site quality improvements: refining page structure, visual polish, and sitemap/indexing hygiene.
What I’ve been learning
Intelligence vs harnesses: getting clearer on the difference between foundation model capability and orchestration layers like Codex CLI, OpenClaw, and Claude Code.
How agent systems actually work: context files, skills, Markdown-based operating memory, sub-agents, and execution boundaries.
OpenClaw feature mechanics: understanding patterns like heartbeats, session behavior, and where proactive workflows help versus where they add noise.
AI fundamentals in practice: token economics, temperature, context limits, and where reliability breaks.
Tool architecture reality checks: identifying what is true product capability versus a thin wrapper around models/APIs.
One notable signal this month: at a local WordPress meetup in New Jersey, AI was a major topic across conversations. The major focus was on practical implementation and workflow impact.
What I’m thinking about next
Building a repeatable monthly cadence for technical updates and lessons learned.
Applying AI where it improves real execution speed and quality, not just novelty.
Continuing AWS AI Practitioner exam prep with practical reinforcement (including custom study tooling).
Expanding practical AI support in web, content, and automation workflows without adding unnecessary complexity.
If you’re interested in the execution side of technology, automation, and practical AI adoption, I’ll be sharing this format regularly.
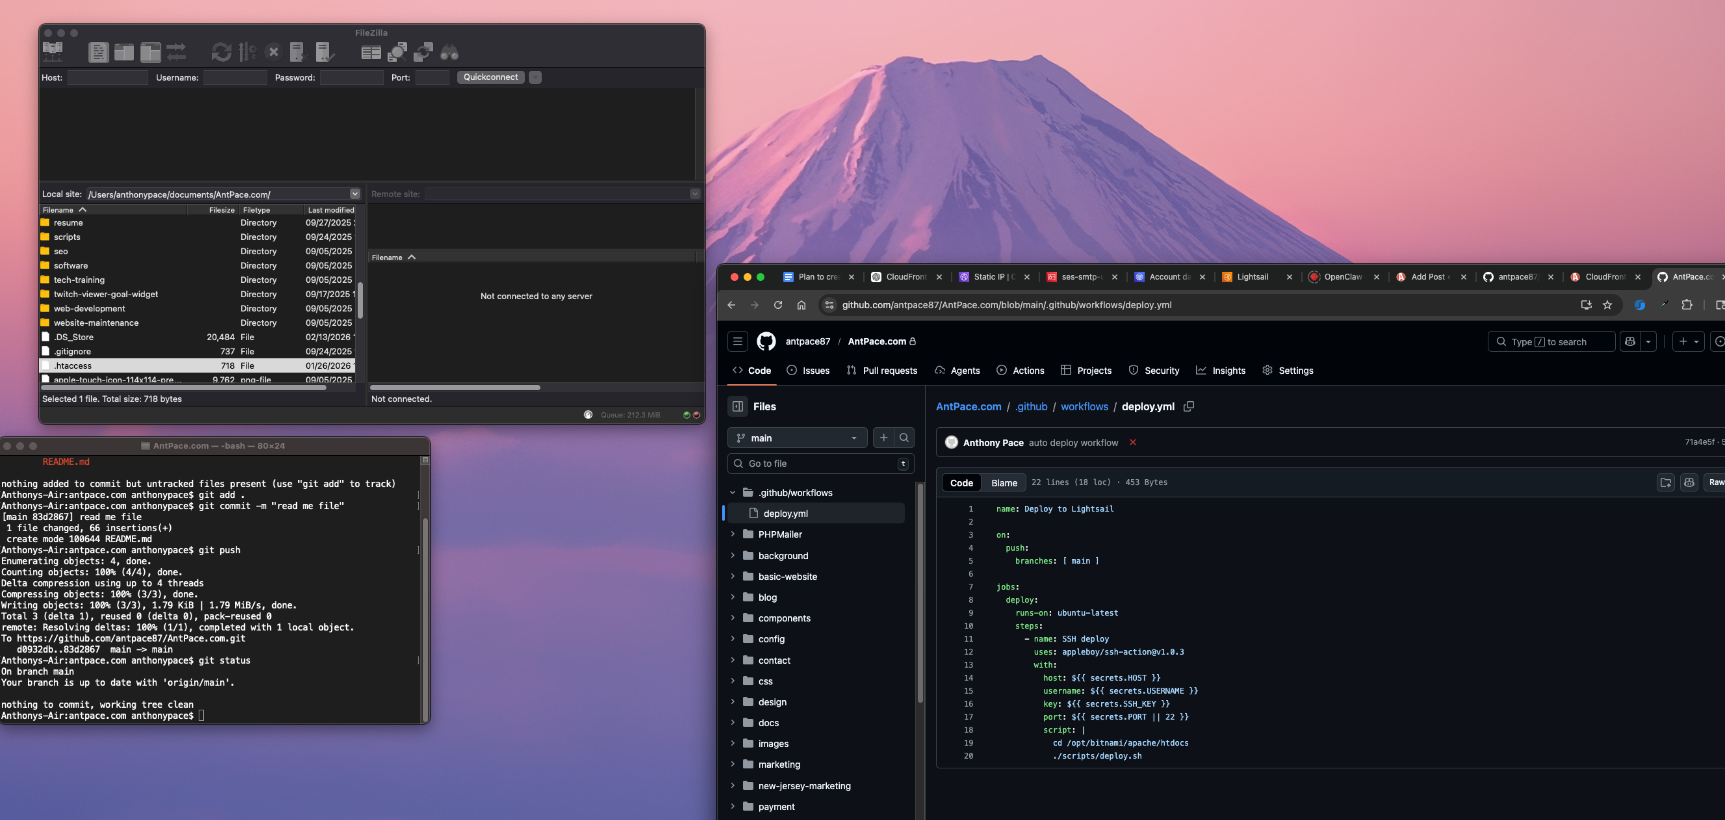
My original deploy flow was the classic “freelancer special”:
Make changes locally, open FileZilla, SFTP into the server, drag files over, hope I didn’t miss anything, refresh the site, repeat.
It worked, but it was slow and it always felt a little fragile. So we switched to auto-deploys with GitHub Actions. Now whenever I push to main, GitHub connects to the server and runs a deploy script automatically.
Push code → live site updates. No more FileZilla sessions.
And here’s a bonus I didn’t fully appreciate until I started using it: it also makes it ridiculously easy to make small static page edits from my phone using the GitHub.com editor. Change a line of HTML, fix a typo, update a link, commit to main, and it deploys the same way as if I did it from my laptop.
What We Set Up
Trigger: A push to main runs the workflow.
Action: The workflow SSHs into the server (in our case, an AWS Lightsail instance), goes to the site’s document root, and runs a small deploy script.
Result: Every push to main updates the live site without manual SFTP, SSH, or FTP.
appleboy/ssh-action runs the given script on your server over SSH.
host, username, key, and optionally port come from GitHub Secrets so you never put credentials in the repo.
Adjust the cd path to your actual document root.
2. The Deploy Script on the Server
On the server, we keep the deploy logic in a script (e.g. scripts/deploy.sh) that the workflow runs:
#!/bin/bash
set -euo pipefail
git pull origin main
set -euo pipefail makes the script exit on errors and on use of unset variables.
The only “deploy” step is pulling the latest main. You can expand this later (build steps, dependency installs, cache clears, service restarts, etc.).
Make sure:
The script is executable: chmod +x scripts/deploy.sh
The directory you’re deploying from is a git clone of your repo, with origin pointing to the same GitHub repo you push to.
3. GitHub Secrets
In your repo: Settings → Secrets and variables → Actions. Add:
HOST – Your server’s hostname or IP (example: origin.antpace.com)
USERNAME – SSH user (Bitnami stacks often use bitnami)
SSH_KEY – Private key content that can log in as that user (paste the whole key including the BEGIN/END lines)
PORT (optional) – SSH port if not 22
Now the runner can SSH in and deploy without you storing credentials in the repo.
4. The Underrated Win: Editing From Your Phone
This is the part that feels almost unfair once you have it.
Because deploys are tied to main, you can make simple static changes directly in the GitHub.com editor on mobile:
Fix a typo
Update a phone number
Swap a link
Change a headline
Add a quick announcement banner
Commit to main, and the same workflow runs. No laptop required. No FileZilla. No “I’ll do it later when I’m home.”
5. One More Thing: Cache Invalidation
If you sit behind a CDN (like CloudFront), you may need to invalidate cache after deploy so you actually see your changes immediately.
You can:
Add a workflow step that uses the AWS CLI to create a CloudFront invalidation, or
Run it inside the same SSH script (if the AWS CLI is installed on the server)
That’s it.
The whole goal here is to stop “deploying” and start “pushing.” Once this is in place, you’re not moving files around anymore. You’re making changes in one place (your repo), and production stays in sync automatically.
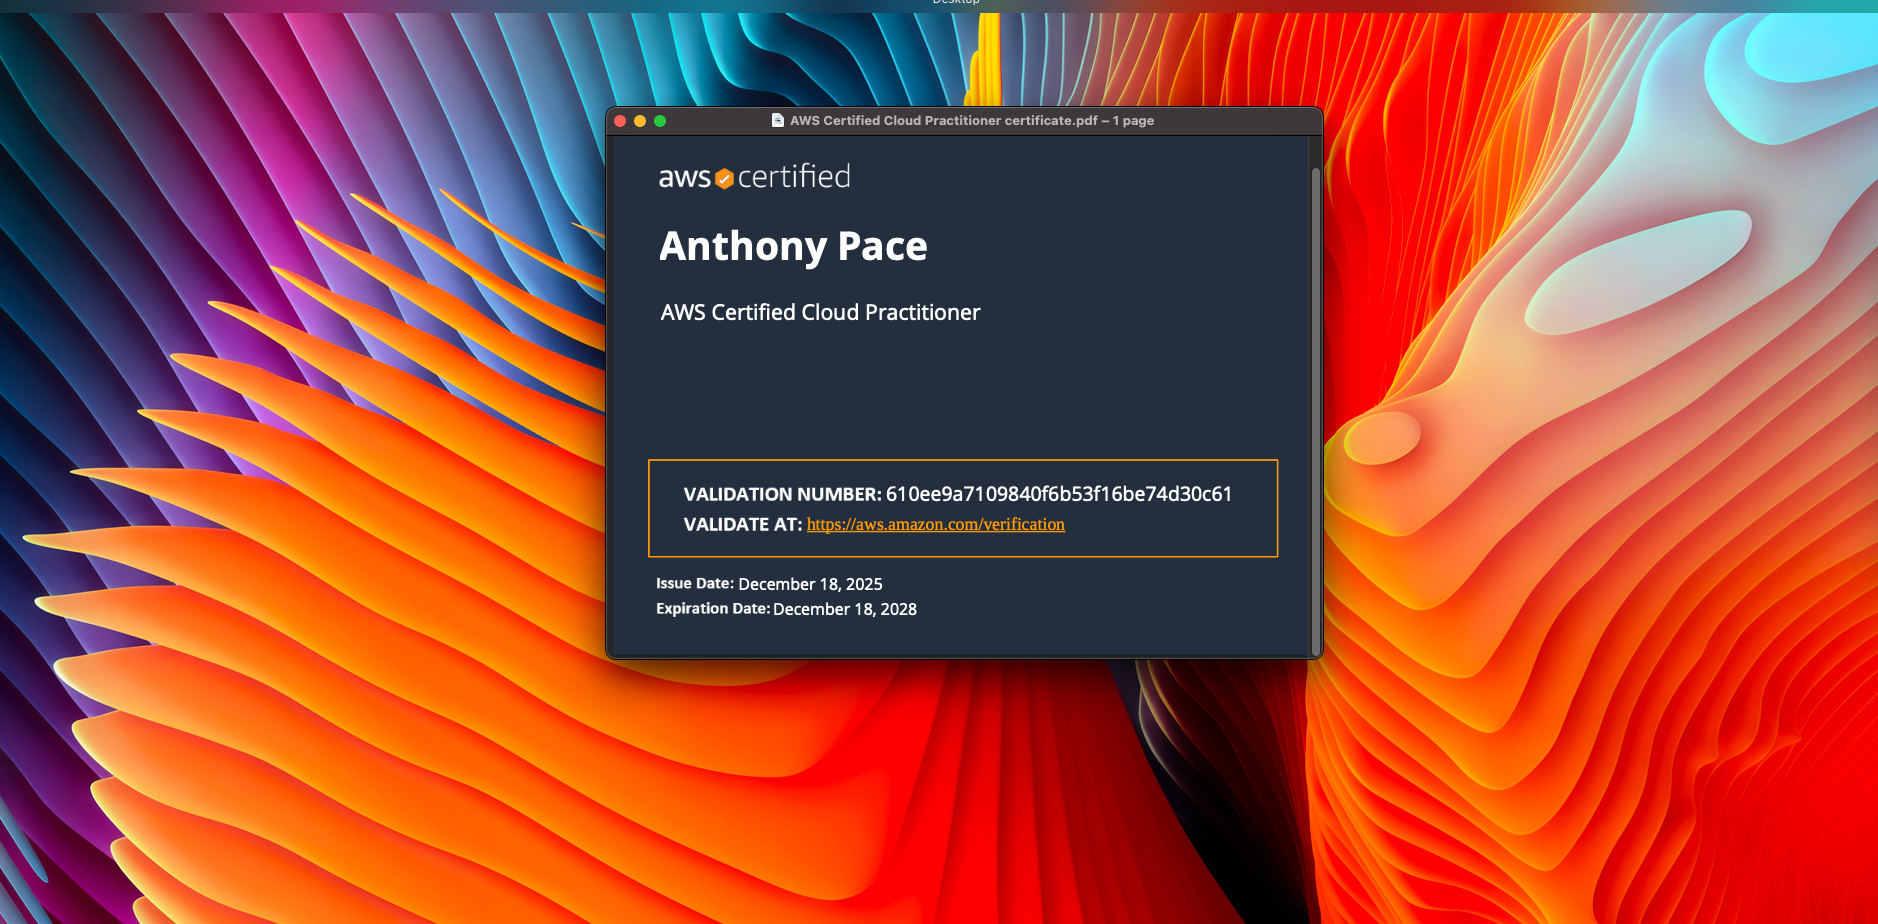
I wanted an easy win on this exam, without turning it into a long project.
Cloud Practitioner is not a deep technical test. It is mostly about understanding AWS at a high level, knowing what the core services do, and being comfortable with billing, support plans, and the shared responsibility model.
Here is how I prepared.
Step 1: I used the exam guide as my checklist
Before I watched anything, I pulled up the official exam guide and treated it like a scope document.
If something was on the guide, I studied it. If it was not on the guide, I did not go down the rabbit hole.
That one decision saved me a lot of time.
Step 2: I learned AWS in “service groups”
Trying to memorize individual services is painful. It clicked for me when I grouped things by category and learned the role each category plays.
My main buckets were:
Compute: EC2, Lambda
Storage: S3, EBS, EFS
Databases: RDS, DynamoDB
Networking: VPC, Route 53, CloudFront
Security: IAM, KMS, shared responsibility model
Monitoring: CloudWatch
Billing: pricing models, free tier, Cost Explorer, support plans
Once you can explain these things, most questions stop feeling tricky.
Step 3: Practice questions became the real study plan
After I had the basics, I moved to practice exams earlier than I expected.
I did not use them to “see my score.” I used them to find my weak spots.
Every wrong answer turned into a quick note:
What was the correct answer?
Why was my answer wrong?
What is the simple rule that would help me next time?
That loop is where most of my improvement came from.
I used ChatGPT to generate practice exams, one question at a time. I could answer by typing in a letter choice. I would then ask it to explain each answer options, whether I got it wrong or correct.
Step 4: I focused hard on billing and security
If you ignore billing and security, you can feel confident and still miss a lot of easy points.
I made sure I was solid on:
Shared responsibility model
IAM basics (users, groups, roles, policies, least privilege, MFA)
Pricing basics (On Demand vs Reserved Instances vs Savings Plans)
What is included in the free tier
Support plan differences
Step 5: I made exam day simple
I did some boring preparation the day of the exam. Clean desk, quiet room, testing software working, ID ready, no weird tech surprises. A few days before, I had to borrow a laptop because my ten-year-old MacBook was too old to run the testing software. The goal was to spend my energy on the questions, not on setup problems. I was worried about losing internet (that happened once before, years ago), but it turned out fine.
The digital proctor had me spin my laptop camera around to check the room. He had me move a few things from my mostly empty desk, like a pack of tissues
If you are studying now
Do not overcomplicate it. Learn the high level purpose of the services, drill practice questions, and tighten up billing and security.
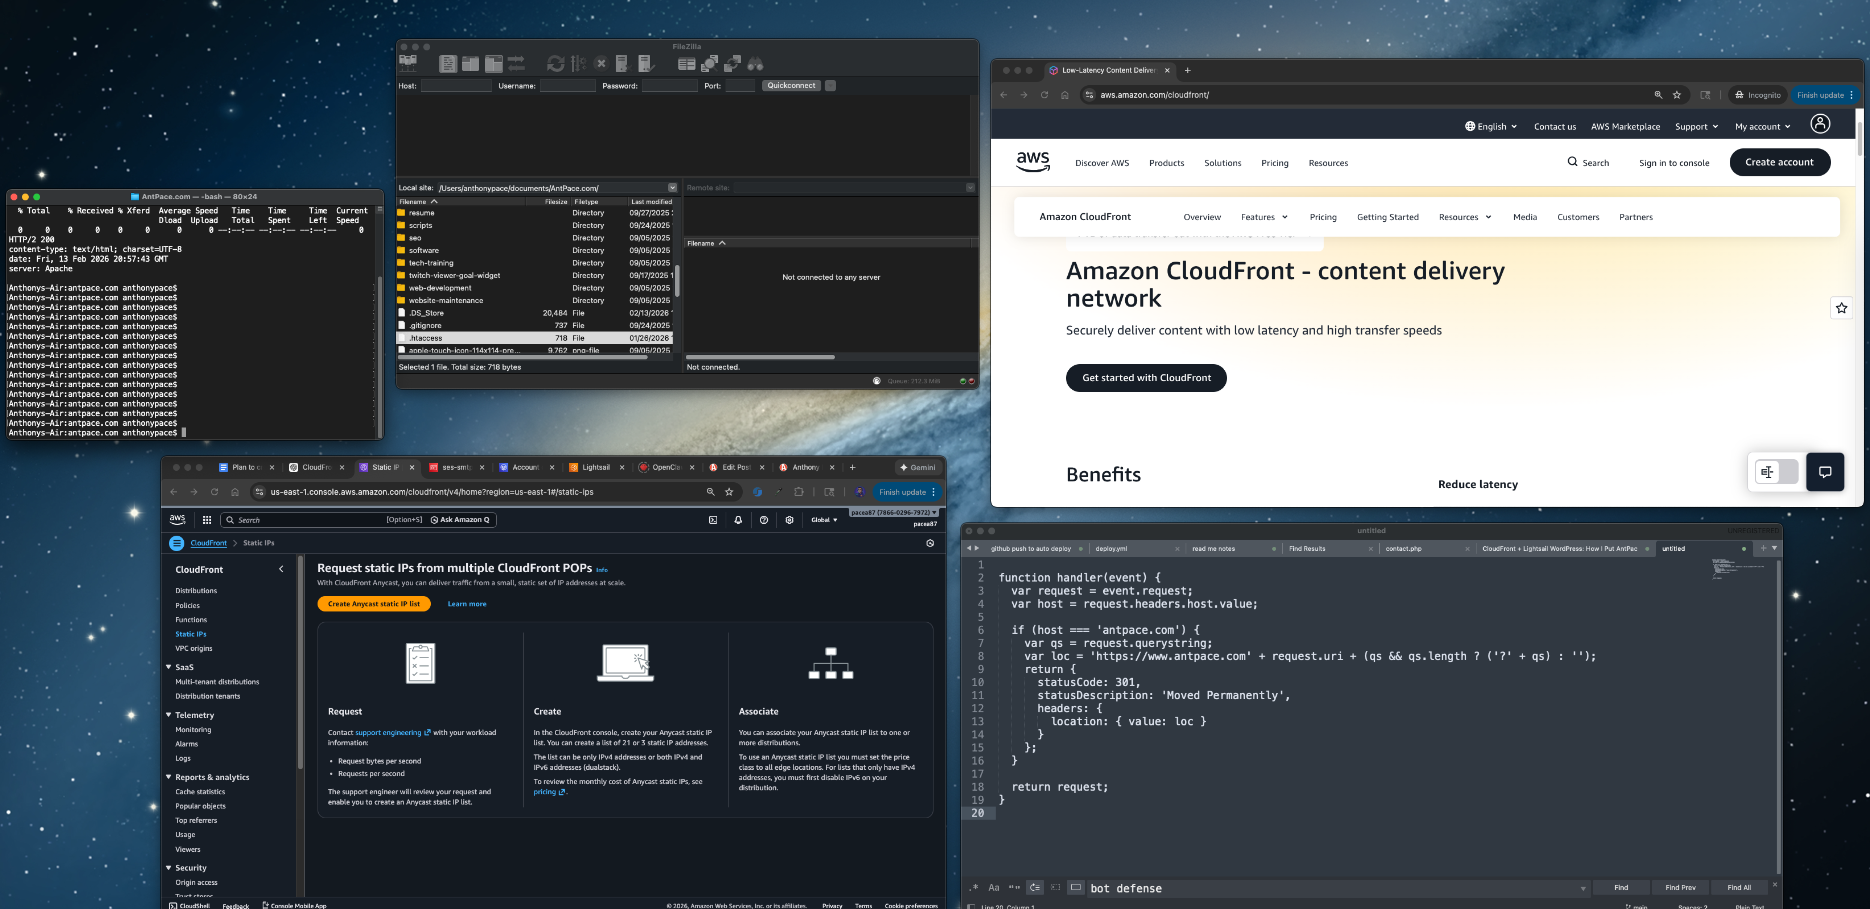
I put CloudFront in front of my Lightsail site for a few reasons: faster load times globally, less load on my instance, and better options for defending against bot traffic at the edge. I also wanted a setup where Lightsail is just the origin and CloudFront is the public front door, which makes future changes easier.
This is what I did, what broke, and what fixed it.
What I started with
A Lightsail Linux instance running Apache
The main site is mostly PHP pages plus CSS/JS/images
The blog lives at antpace.com/blog (WordPress)
DNS already in Route 53
HTTPS already working on the instance using Certbot
The mental model
CloudFront is the front door. Lightsail becomes the origin behind it.
That means two separate HTTPS concerns:
Visitors hitting antpace.com need a certificate attached to CloudFront (ACM)
CloudFront talking to the origin also needs HTTPS on an origin hostname
Setting up the origin hostname
CloudFront won’t accept an IP address as an origin. It needs a domain name. So the first move was creating:
backdoor.antpace.com → Lightsail static IP (Route 53 A record)
Then I made sure the origin worked over HTTPS using the same mechanism I already had on the instance.
To confirm what I was actually using:
sudo certbot certificates
sudo sed -n '1,200p' /etc/letsencrypt/renewal/antpace.com.conf
That confirmed Certbot and showed the exact webroot path being used for renewals.
Route 53 record for backdoor.antpace.com
certbot certificates output
Getting the CloudFront certificate (ACM)
CloudFront requires an ACM certificate in us-east-1, even if your origin is in a different region.
So I requested a cert in ACM for:
antpace.com
www.antpace.com
Then validated it through Route 53.
ACM certificate request page showing the domains and DNS validation records
Creating the distribution and choosing policies
This is where the setup becomes worth it, but it’s also where you need to treat the main site and WordPress differently.
My main site is basically “static-ish” content, but /blog is WordPress. So I split behaviors and used different policies.
First request was a Miss, second request was a Hit with an age header.
CloudFront distribution details page
Behaviors tab showing Default (*)
Blog behaviors for WordPress (/blog/*)
I kept WordPress safe by disabling caching on the blog paths and forwarding what WordPress needs.
Behaviors I added:
/blog/wp-admin/*
/blog/wp-login.php
/blog/*
I know the above is redundant, but in the future I may allow some cacheing on the blog post pages, but always keep the other two routes disabled.
For all three:
Viewer protocol policy: Redirect HTTP to HTTPS
Allowed methods: All
Cache policy: CachingDisabled
Origin request policy: AllViewer
This is the “don’t get fancy yet” setup. It keeps logins/admin sane and avoids CloudFront caching anything dynamic.
Behaviors list showing the /blog/* paths and policies
Bot defense at the edge
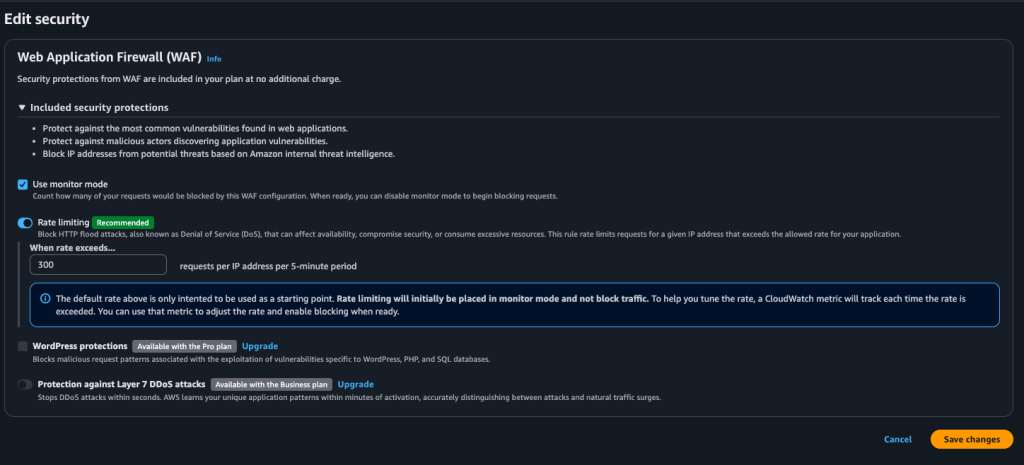
One of the underrated reasons to do this is that CloudFront gives you an edge layer for basic bot defense. Even on the free plan, you can enable rate limiting/monitoring so random traffic is handled earlier, instead of everything slamming your Apache box directly.
I turned on the recommended rate limiting settings (it starts in monitor mode), then I can tighten it later if I need to.
Security / rate limiting settings screen
The redirect loop issue (and why it happened)
After switching DNS, browsers started throwing “too many redirects.”
The fastest way to see what was happening:
curl -IL https://www.antpace.com | head -n 40
It was an endless chain of 301s. The cause was not CloudFront. It was my origin.
I had unconditional Apache redirects living in two configs:
/opt/bitnami/apache/conf/bitnami/bitnami.conf
/opt/bitnami/apache/conf/bitnami/bitnami-ssl.conf
And the line was:
Redirect permanent / https://www.antpace.com/
That redirect is too blunt once CloudFront is in front. CloudFront can cache the redirect and then you’ve got a fast global redirect loop.
grep output showing the redirect line in both files
browser redirect error page
Canonical redirect at the edge (CloudFront Function)
I still wanted apex → www, but I didn’t want Apache doing it anymore.
So I created a CloudFront Function and attached it to the Default behavior on Viewer request:
function handler(event) {
  var request = event.request;
  var host = request.headers.host.value;

  if (host === 'antpace.com') {
    var qs = request.querystring;
    var loc = 'https://www.antpace.com' + request.uri + (qs && qs.length ? ('?' + qs) : '');
    return {
      statusCode: 301,
      statusDescription: 'Moved Permanently',
      headers: {
        location: { value: loc }
      }
    };
  }

  return request;
}
This makes the redirect logic obvious and centralized, and it keeps the origin hostname out of the equation.
CloudFront Function code + association on the behavior
Invalidate CloudFront cache on deploy (GitHub Actions)
My deploy process is GitHub Actions. It SSHes into Lightsail and runs my deploy script. With caching enabled, I wanted updates to show up immediately after a push.
So I added a CloudFront invalidation step after deploy:
That’s the simple version. I can narrow it later, but /* makes “deploy means live” true.
GitHub Actions run showing the invalidation step
CloudFront invalidations tab
What I got out of this
Faster global delivery of the main site via edge caching
Less load on Lightsail
WordPress stays safe because /blog/* is not cached and forwards the right stuff
Better options for bot defense at the edge
Canonical redirects handled at CloudFront instead of server config files
Automated deploy invalidation so changes show up right away
If you’re doing this on a mixed site (static-ish pages plus WordPress), the split behaviors are the whole thing. Treating everything the same is how you end up caching logins or debugging redirects at 2am.
When I went to save this post in WordPress, it kept failing with the classic editor error: “Updating failed. The response is not a valid JSON response.” At first it looked like a WordPress problem, but the actual response coming back was a CloudFront-generated 403 “Request blocked” HTML page, which meant the request never made it to WordPress at all. The weird part was it only happened with certain content. Normal edits saved fine, but as soon as I pasted in code-heavy sections (Apache config blocks, rewrite rules, YAML, JS), CloudFront’s built-in WAF protections flagged the request body as suspicious and blocked it. The fix was simple once we knew what was happening: I enabled WAF “monitor mode” on the CloudFront distribution so it would log potential blocks instead of enforcing them, and after the change finished deploying across CloudFront, saves started working again. I kept rate limiting on for bot defense, but left the common-threat protection in monitor mode until I eventually switch to a full WAF Web ACL where I can add exceptions for WordPress editor endpoints.
One extra thing I did on the WordPress side was add a tiny mu-plugin as a guardrail. I like mu-plugins for infrastructure-style fixes because they always load and they cannot be accidentally disabled in the admin UI. I did not put anything “in wp-admin” because the block editor issue is really about REST requests and editor endpoints, and WordPress updates can overwrite admin code anyway. Also, I don’t track that file in version control.The mu-plugin lives in wp-content/mu-plugins/ and keeps the behavior consistent no matter what theme or normal plugins are doing.
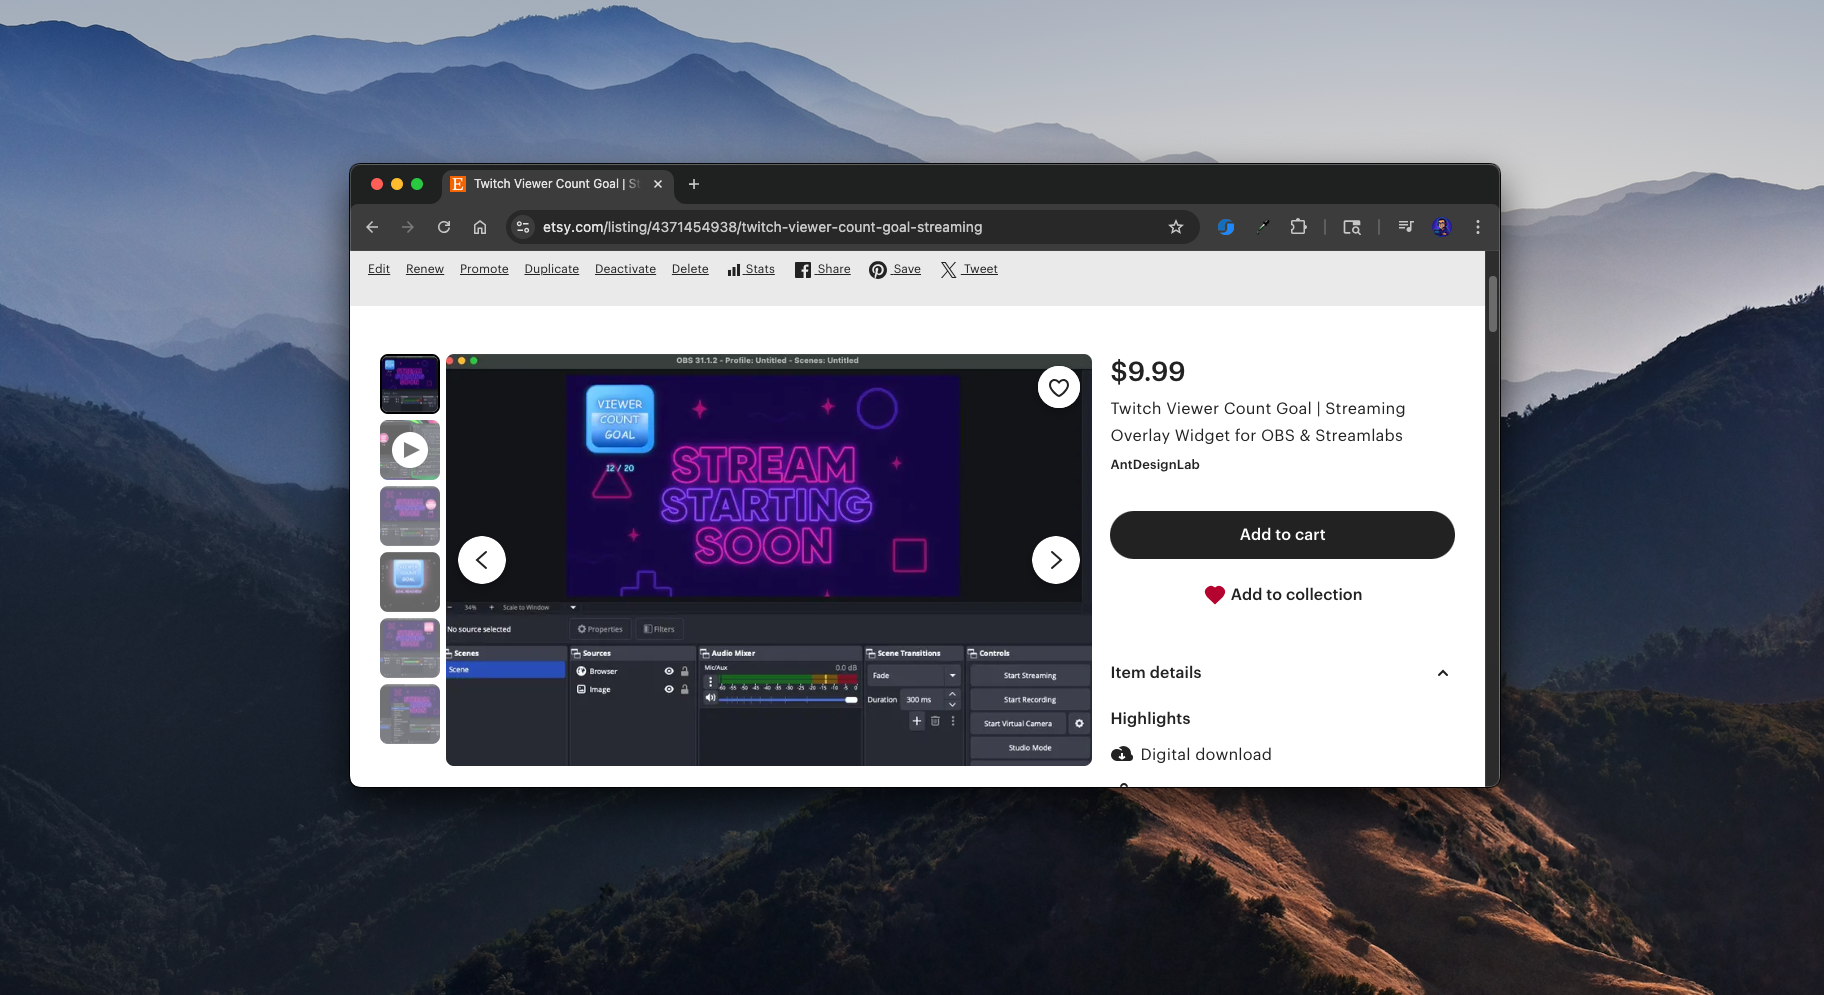
I enjoy side projects like this. A popular streamer was looking for a widget that would show a viewer count goal on Twitch. She couldn’t find anything like it on Etsy, so I thought I’d give it a try.
The First Approach: Server-Side
At first, I built a version that hit the Twitch API from a Node.js back-end. I spun up an Express server on an AWS Lightsail Node.js blueprint and vibe-coded the whole thing. It worked, but it came with major problems.
The Twitch Helix API requires authentication with both a client ID and a token. These credentials are essentially as sensitive as a password. Running the widget from my own server meant I would have to host those credentials. That made the project impossible to sell as a single-download file on Etsy. To cover costs, I’d need to charge a subscription fee, and I even risked losing money if nobody paid.
The experience wasn’t wasted, though. Configuring SSL on Lightsail was tricky but rewarding. I also had to hunt down a race condition in the server.js file that taught me a lot about debugging async code in Node. Even though I scrapped this approach, it might come in handy for future projects.
Here server file I ran to fetch the user count from Twitch’s Helix API:
The real breakthrough came when I decided to cut out the server entirely. Instead of me hosting credentials, I let users generate their own. They paste their Twitch token and client ID directly into the widget’s settings. To do this, I relied on a third-party website (twitchtokengenerator.com) that safely walks them through the process.
This meant I had no recurring costs. My only investment is my time. That’s a big win.
I also moved the widget’s settings out of query parameters and into a simple configuration block inside the file. That made things cleaner and easier for users to customize.
Product Features
When I packaged the widget for release, I wanted to make sure it wasn’t just functional but also customizable and fun to use. Here are some of the features that made it into the final version:
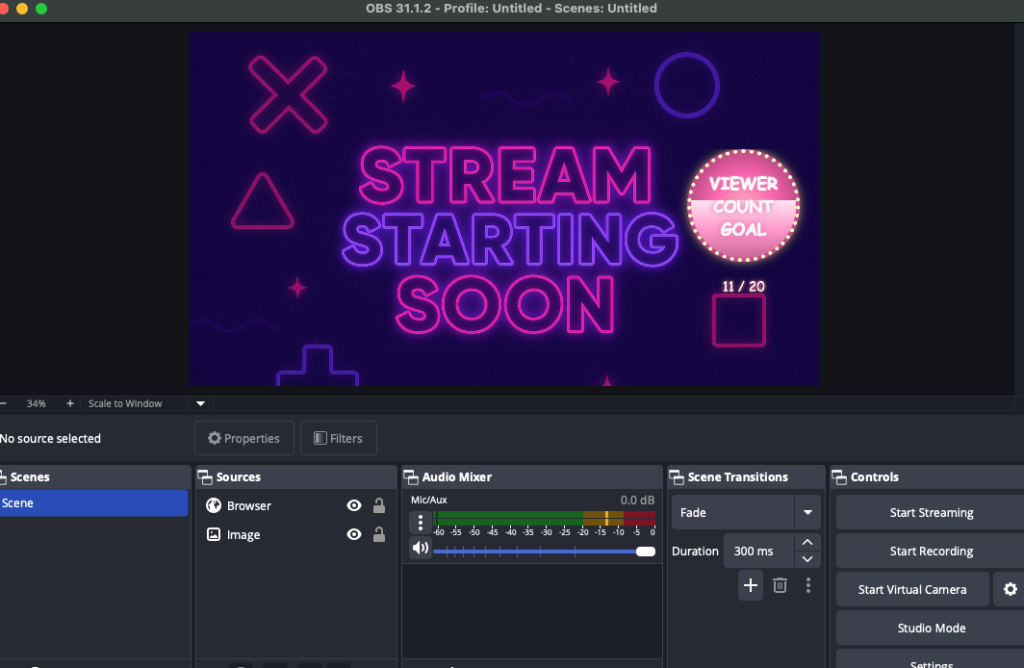
Viewer Goal Tracking – The widget dynamically displays your current Twitch viewer count and progress toward a goal you set.
Customizable Goals – Streamers can easily edit the settings inside the file to choose their own goal number, username, and other preferences.
Visual Themes – I experimented with playful themes like bananas, moons, and fire, giving streamers a way to match the widget’s style to their stream vibe.
Animated Progress Fill – As the viewer count grows, the widget smoothly fills up with color, creating a clear and engaging visual effect for the audience.
Celebration Triggers – When the goal is reached, the widget can display a celebratory effect to highlight the achievement live on stream.
Easy Setup Instructions – To make onboarding painless, I provided a PDF guide and demo video, along with clear links to generate a Twitch token.
No Server Required – Because the widget runs completely client-side, there are no recurring costs or subscriptions. Streamers own the file outright after purchase.
These features make the widget simple enough for beginners to set up, but flexible enough for experienced streamers to customize and show off during their broadcasts.
User Testing and Iterations
Once I had a working prototype, I shared it for testing. Immediately, we hit friction.
The instructions had a broken URL.
The token generation process was confusing.
People weren’t sure how to edit the file. Some tried to open it without unzipping first. Others used the wrong text editor.
Luckily, my first tester was already familiar with Twitch widgets and gave me some great feedback. For example, instead of providing instructions as a .txt file, I switched to a clean PDF guide.
These details matter. If users can’t get through setup, they’ll abandon the product.
Selling the Widget
I decided to sell the widget as a digital download. At first, I planned to use Etsy for its built-in marketplace and discoverability. But I also set up direct sales on my own website with Stripe. That way I control the checkout experience and don’t have to rely on a third party.
Reach out to small streamers and influencers who might find it useful
Optimize listings on marketplaces like Etsy
The idea is to start simple and see where it goes.
Looking Back
This project taught me a lot about balancing technical decisions with business models. Building a server-side widget was fun and educational, but not sustainable. The stand-alone approach keeps things lightweight, low-cost, and sellable.
Most of all, I had fun building something useful. And who knows? Maybe it will grow into a steady digital product line.
I’ve created blog content for a long time, here and other places. I’ve also contributed to the collective cloud called social media throughout my so-far short life. These posts have ranged from philosophical to instructional, and woven with stories and real experiences.
Over the years, this website has worn many hats: a personal site, a freelance portfolio, a solo agency brand, a resume, a place to try stuff. It’s always been experimental. I write about programming, about writing, and about my experiences. Some non-blog pages on this website feel very “marketing” but dually have helped me to more clearly define what services I can help people with.
I really want to make a shift to emphasize that this is a “personal brand” website, and not necessarily a commercial one. My consulting services are provided as a sole-proprietorship under my personal brand. Launching a consulting agency brand to present a more “business-first” appearance to potential clients is a possibility, but is not what this website is.
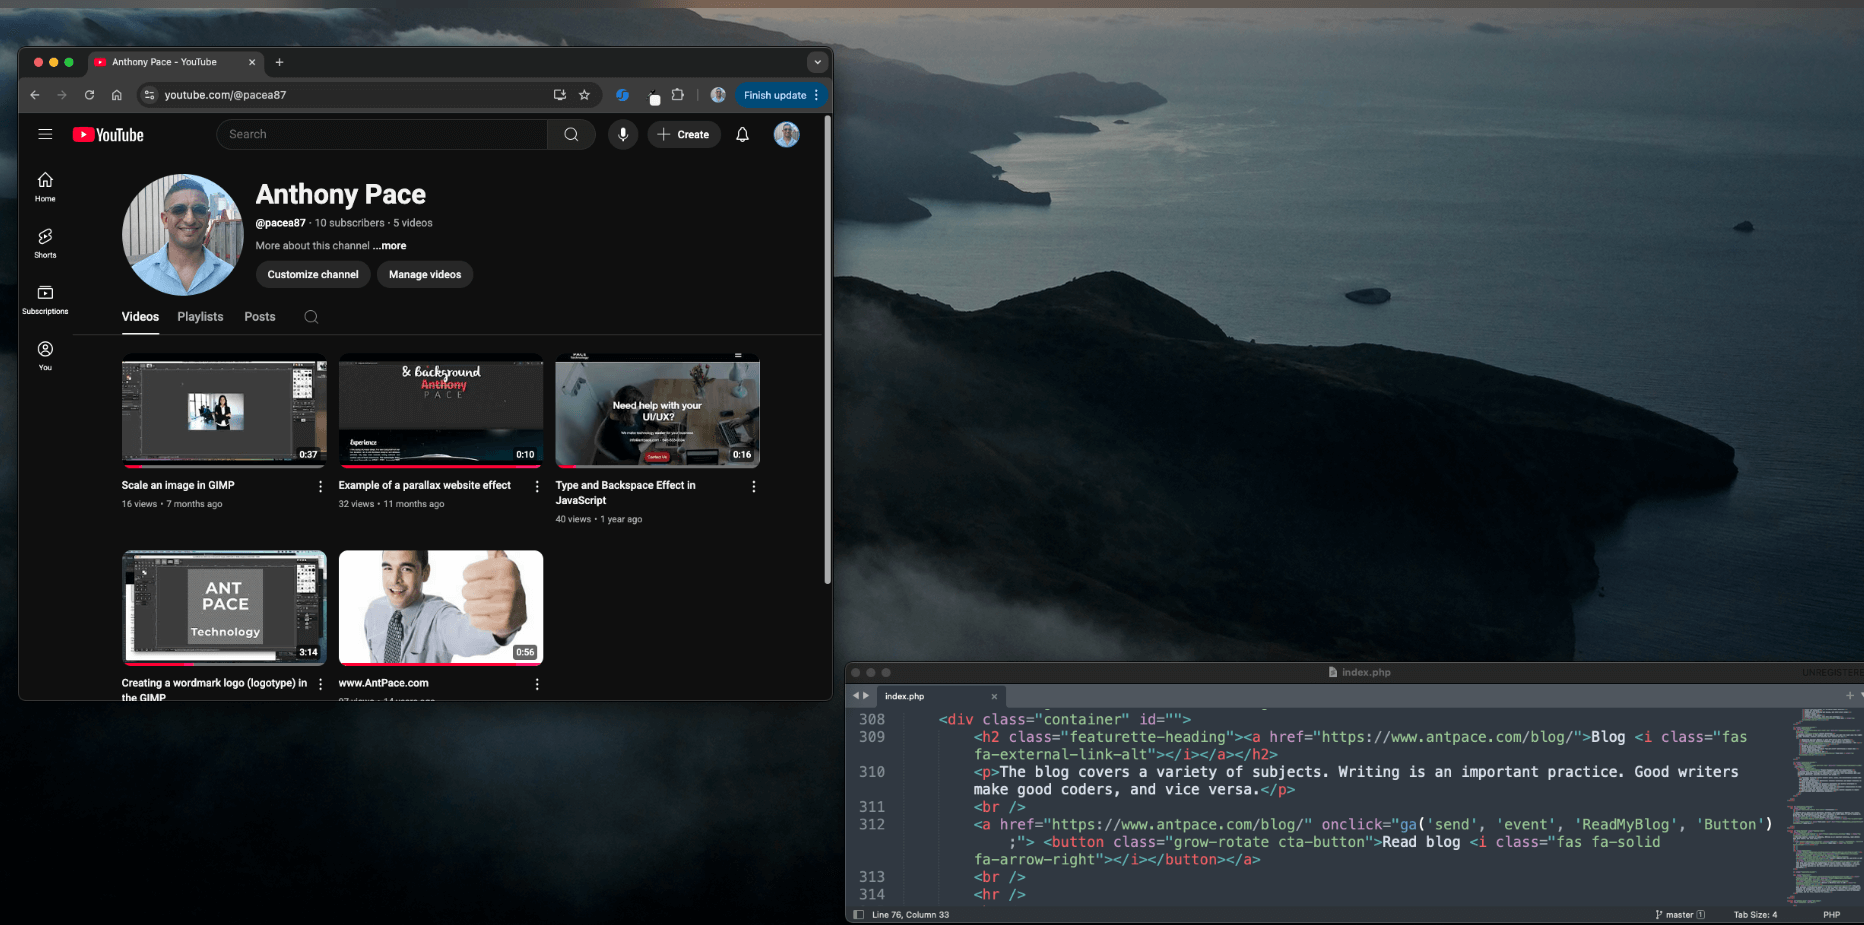
Video
I’ve published some YouTube content, for instructional blogs and product tutorials. I haven’t done much vlog or podcast style talking videos. Instead of strictly writing, I think adding video companions to make these posts more multi-media is a step in the right directions. I’ve thought about going back to existing posts and adding a companion video as a way to get started. I’m especially interested in streaming on a platform like Twitch. I could record myself doing computer projects and yapping about it. Then, blog posts like these could be “show notes” for each VOD.
Community
The great thing about publishing content is the community it can build. In a lot of ways, building a brand is building a community around it. I think that is even true for a personal brand. I’d like the content I create to be a launch pad for community.
This site is a sandbox, a signal, and a snapshot. It changes with me. I just want to document what I’m learning, thinking, and building in real time. Whether it’s code, ideas, personal growth, or experiments with new formats, this is where it all lands. If any of it resonates with you, I hope you’ll stick around, and say “hi”.
If you’re running an online store and want to improve how it performs, whether that’s through better product pages, paid ads, or SEO, here’s a clear look at what I help with.
This is the same kind of breakdown I send to new clients. If you’re curious about what working together would look like, or you’re just trying to understand where your store could improve, this will give you a solid starting point.
Product Page Improvements
I’ve helped a lot of stores clean up their product pages. It’s rarely about fancy design or trendy layouts. It’s usually just making things clearer, more helpful, and easier to buy.
That might mean rewriting the title to actually say what the product is, or adding a quick summary near the top so people know what they’re looking at. Sometimes it’s just moving important info higher up the page, or fixing how size options and color swatches work.
I’ll also go through the product description, make it easier to skim, and add any missing details that help someone make a decision. We might talk about reviews, delivery times, return policies — all the little things that build trust and reduce hesitation.
Most of this work doesn’t require a new theme. It’s just about getting the important stuff in the right place and written in a way people actually understand.
I don’t believe in over-complicating SEO. I focus on the basics, the stuff that matters.
I look at how your product or category pages are written. I clean up titles and descriptions. I find what your customers are actually searching for, and make sure your pages match that.
If your site has a bunch of technical issues slowing it down or confusing Google, I’ll help fix that too. But for most stores, the biggest wins come from getting the content right.
This is SEO that’s built to last, not just keep up with the latest trend.
Paid Ads on Meta and Google
If you’re not running ads yet, or you’re running them but not getting much out of it, I can help set up a simple, smart ad strategy that actually fits your business.
I work with both Meta (Facebook and Instagram) and Google Ads. That includes creating the campaigns, setting up tracking, writing the copy, and making sure the right people are seeing the right product.
This isn’t about dumping money into ads and hoping for the best. I usually recommend starting with a modest budget — around three hundred dollars a month — so we can test what works, make adjustments, and grow from there.
If you’ve tried ads before and gave up because it felt too complicated or expensive, I get it. My job is to keep it clear, lean, and focused on what helps you sell.
Strategy Sessions and General Support
Some clients also use me as a sounding board. You can book time to talk through decisions, plan a launch, or review performance. These sessions are useful for:
Reviewing analytics and sales trends
Planning out content or campaigns
Brainstorming new product ideas
Getting feedback on design or structure
Solving a specific issue with your site or tools
You can use your time however you want. I’m not just here to check boxes. I’m here to help your store grow.
How I Charge
You can book time in flexible blocks. This price are current as of June 2025.
One hour at one hundred fifty dollars
Five hours at one hundred twenty five per hour
Ten hours at one hundred per hour
Time is tracked clearly and shared with you. You can use it across any of the services above. Once purchased, hours never expire. There are no refunds, but I make sure everything is clear before we begin.
Interested in Working Together?
If you’re ready to improve your store, or just want to talk through some ideas, feel free to reach out. We can start with a small block of hours and go from there.
If you’re running an online store and getting traffic but not many sales, there’s a good chance the problem is on your product pages.
The good news is that you don’t need a whole new website or a big redesign. Over the years, I’ve worked with clients on both Shopify and WooCommerce, and I’ve seen how a few small changes like layout, copy, or clarity can make a real difference.
Here are the areas I usually focus on.
1. Make the product title more useful
Most product titles are just names. That’s fine internally, but not always helpful to your customer. It helps to add a short description right in the title. Something that makes it clearer what the product is or why it matters. Even a small phrase like “great for everyday use” or “lightweight and durable” can help.
2. Add a quick summary near the top
The top of the page is where people decide whether to keep scrolling. A short line that sums up what the product is and why it’s useful can give people the confidence to keep going. Without it, the page can feel unfinished, even if the design is clean.
3. Make sizing or variant selection easier
If your product comes in sizes or formats, that info needs to be clear and easy to find. I usually recommend a visual chart, or a short note like “most customers choose Medium.” You want to remove friction wherever possible.
4. Label your color or style options clearly
If you use color swatches or variant buttons, make sure each one is clearly labeled. Tiny dots with no text don’t always translate well, especially on mobile. If something is out of stock, show that visually so customers don’t get frustrated trying to pick it.
5. Rewrite the description in a way people can skim
A lot of product pages either say too little or too much. I try to keep it simple. Start with a short intro, then break out the rest into bullet points or short sections with clear headings. Don’t just list specs. Tell people why those features actually matter.
6. Add a little trust
If you have reviews, use them. If you don’t, that’s okay. You can still add small trust builders like “over 1,000 sold,” or “used by professionals,” or a simple return policy. It gives people confidence to buy from you.
7. Be clear about shipping
If someone is about to buy, they shouldn’t have to click through a bunch of tabs to find out when the item will arrive. I usually suggest adding a short line near the price or Add to Cart button. Something like “ships in 1 to 2 business days” or “free shipping over $50.”
8. Make sure it works well on mobile
If most of your traffic is on mobile, test your product page on your phone. Are the buttons easy to tap? Is the Add to Cart button visible without scrolling too much? Small changes here can make a big difference.
You probably don’t need a new theme
Most of the time, product pages don’t need a full redesign. They just need to be clearer, easier to read, and more helpful. The goal is to remove confusion and help people feel confident about what they’re buying.
If you want help figuring out what to change on your own site, I offer one-time strategy sessions and ongoing optimization work. Get in touch if that’s something you’re interested in.
I first explored reCAPTCHA for this website’s contact form. After getting too many spam messages, I decided to add some protection. It is Google’s implementation of CAPTCHA (reimagined) and has a long history.
The Turing Test is a concept introduced by the British mathematician and computer scientist Alan Turing in 1950 as a way to evaluate a machine’s ability to exhibit intelligent behavior indistinguishable from that of a human. The test is named after Alan Turing, who proposed it in his paper titled “Computing Machinery and Intelligence.” The history of CAPTCHA (Completely Automated Public Turing test to tell Computers and Humans Apart) traces back to the late 1990s when researchers began exploring ways to distinguish between humans and automated scripts or bots online.
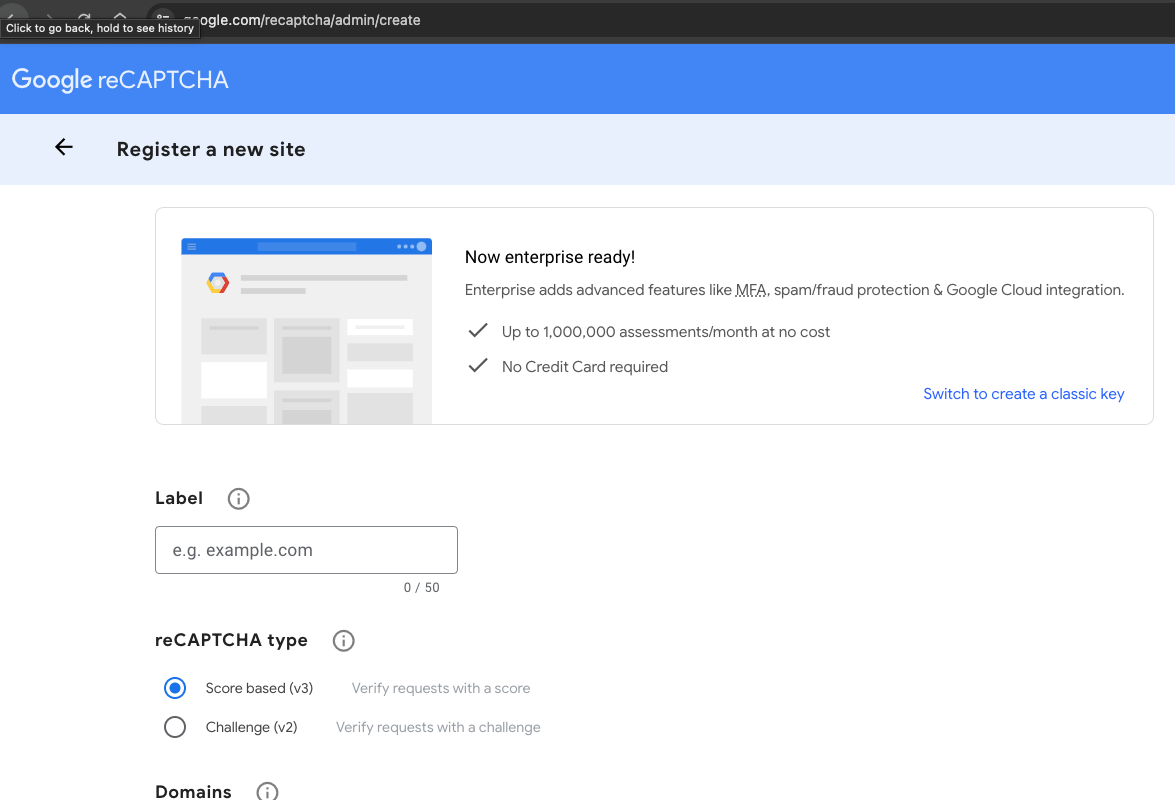
Google’s reCAPTCHA service requires you to register the website you’re going to use it on:
It provides “Up to 1,000,000 assessments/month at no cost”. Once registered you’ll get a site key (for the client side) and a secret key (for the server side).
PHP & JavaScript Implementation
You can use the keys to implement the Google reCAPTCHA service on a vanilla website. In your HTML contact form, you need to add the site key as an empty `<div> element’s `sitekey` data attribute:
The `.g-recaptcha` is transformed to a hidden input and visible user interface by Google’s JavaScript API. The UI is a checkbox that humans can click, but bots will miss. CAPTCHA mechanisms typically present users with tasks that are easy for humans to solve but difficult for automated scripts or bots.
CAPTCHA challenges can take various forms, such as:
Text-based CAPTCHA: Users are asked to transcribe distorted or obscured text displayed in an image.
Image-based CAPTCHA: Users are prompted to identify objects, animals, or characters within a series of images.
Checkbox CAPTCHA: This is what our example here is using. Users are asked to check a box to confirm that they are not a robot. This can be combined with additional checks, such as analyzing mouse movements or browsing patterns, to verify user authenticity.
Interactive CAPTCHA: Users are presented with interactive puzzles or challenges, such as rotating objects or dragging and dropping items into specific locations.
function captchaLazyLoad(){
	contactCaptchaTarget = document.getElementById('contactSection')
	if (!contactCaptchaTarget) {
        return;
    }
	let contactCaptchaObserver = new IntersectionObserver(function(entries, observer) {
		if (entries[0].isIntersecting) {
            var script = document.createElement('script');
		    script.src = "https://www.google.com/recaptcha/api.js";
		    document.body.appendChild(script);
            contactCaptchaObserver.unobserve(contactCaptchaTarget);
        }
	})
	contactCaptchaObserver.observe(contactCaptchaTarget);
}
captchaLazyLoad();
The assessment value is serialized with the form data and passed along via a RESTful AJAX POST request to the back-end service:
var notifications = new UINotifications();
$("#contactMe").click(function(){
	var contactMessage = $("#contactMessage").val();
	if(contactMessage.length < 1){
		notifications.showStatusMessage("Don't leave the message area empty.");
		return;
	}
	var data = $("#contactForm").serialize();
	$.ajax({
		type:"POST",
		data:data,
		url:"/contact.php",
		success:function(response){
			console.log(response)
			if(response === "bot"){
				notifications.showStatusMessage("Please confirm your humanity.");
				return;
			}
			notifications.showStatusMessage("Thank you for your message.");
			$("form input, form textarea").val("");
		}

	});
});
The receiving PHP file takes the reCAPTCHA assessment value, combined with our secret key, and passes them along to Google’s “site verify” service:
In 2018, Google introduced reCAPTCHA v3, a version of CAPTCHA that works invisibly in the background to assess the risk of user interactions on websites. reCAPTCHA v3 assigns a risk score to each user action, allowing website owners to take appropriate action based on the perceived risk level.
A recent WordPress client messaged me “is there anyway NOT to receive anywhere from 5-10 of these a day. ” He was referencing spam messages coming from his website’s contact form. His contact page uses Contact Form 7, a popular WordPress plugin that allows website owners to easily create and manage contact forms.
I was able to easily integrate reCAPTCHA v3 by installing a 3rd party plugin. After installation, I was able to enter the site and secret keys into the WordPress dashboard. Version 3 does not require users to check any boxes or solve any challenges – it is seamless and invisible.
Most small business owners skip the privacy policy when launching a website. It seems like something only big companies need. I used to think that too. But even if you’re just using a basic contact form, you’re collecting personal data, and you’re expected to tell people how you handle it.
Why It Matters
It’s legally required If you collect names, emails, or anything else that can identify someone, privacy laws like GDPR (Europe) and CCPA (California) apply to you. These laws don’t just apply to big businesses.
Platforms expect it If you ever want to run Google Ads, Facebook Ads, they’ll technically require your site to have a published privacy policy. No policy, no approval. I worked with a client last year that needed to add a privacy policy to their website before they could work with a certain marketing platform (I helped them with that).
It builds trust People are more likely to contact you if you’re upfront about how you handle their info. A basic privacy policy shows you take your business seriously and respect your visitors.
What Counts as Personal Data
Even if you don’t store anything in a database, collecting names and emails through a contact form still qualifies as handling personal data.
Other things that count:
IP addresses (via analytics)
Form submissions
Embedded chat or contact widgets
If your site does any of that, it needs a privacy policy.
How I Wrote Mine
I kept it simple and honest. My site only collects what someone types into the contact form. I don’t track anything beyond that except through Google Analytics.
Here’s how I structured it:
What I collect: Name, email, and message via the contact form
What I use it for: To reply. Nothing else
How I store it: I don’t. The message just gets sent to my email inbox
Third parties: I mention Google Analytics, if I’m using it
User rights: I let people know they can ask me to delete their message if they want
After writing it, I had a lawyer review the policy to make sure it was solid. That’s something I recommend for every site, and it’s a service I include when I help clients launch or clean up their websites. You can find mind in the footer of this website
Takeaways for Other Business Websites
If you have a contact form or use analytics, write a simple privacy policy. Don’t wait until you’re setting up ads or working with a client who asks about compliance.
You don’t need a lawyer to write it, but you should have one look it over. Better to catch issues early than deal with problems later.
Want Help?
If you’re building or improving your website, I include privacy policy guidance and legal review as part of my setup service. I’ll help you get a site that’s fast, clean, and compliant — so you can focus on running your business.