I’ve been heads-down on systems work this month: tightening my technical workflow, pressure-testing AI tools, and connecting those decisions to real business outcomes.
What I’ve been working
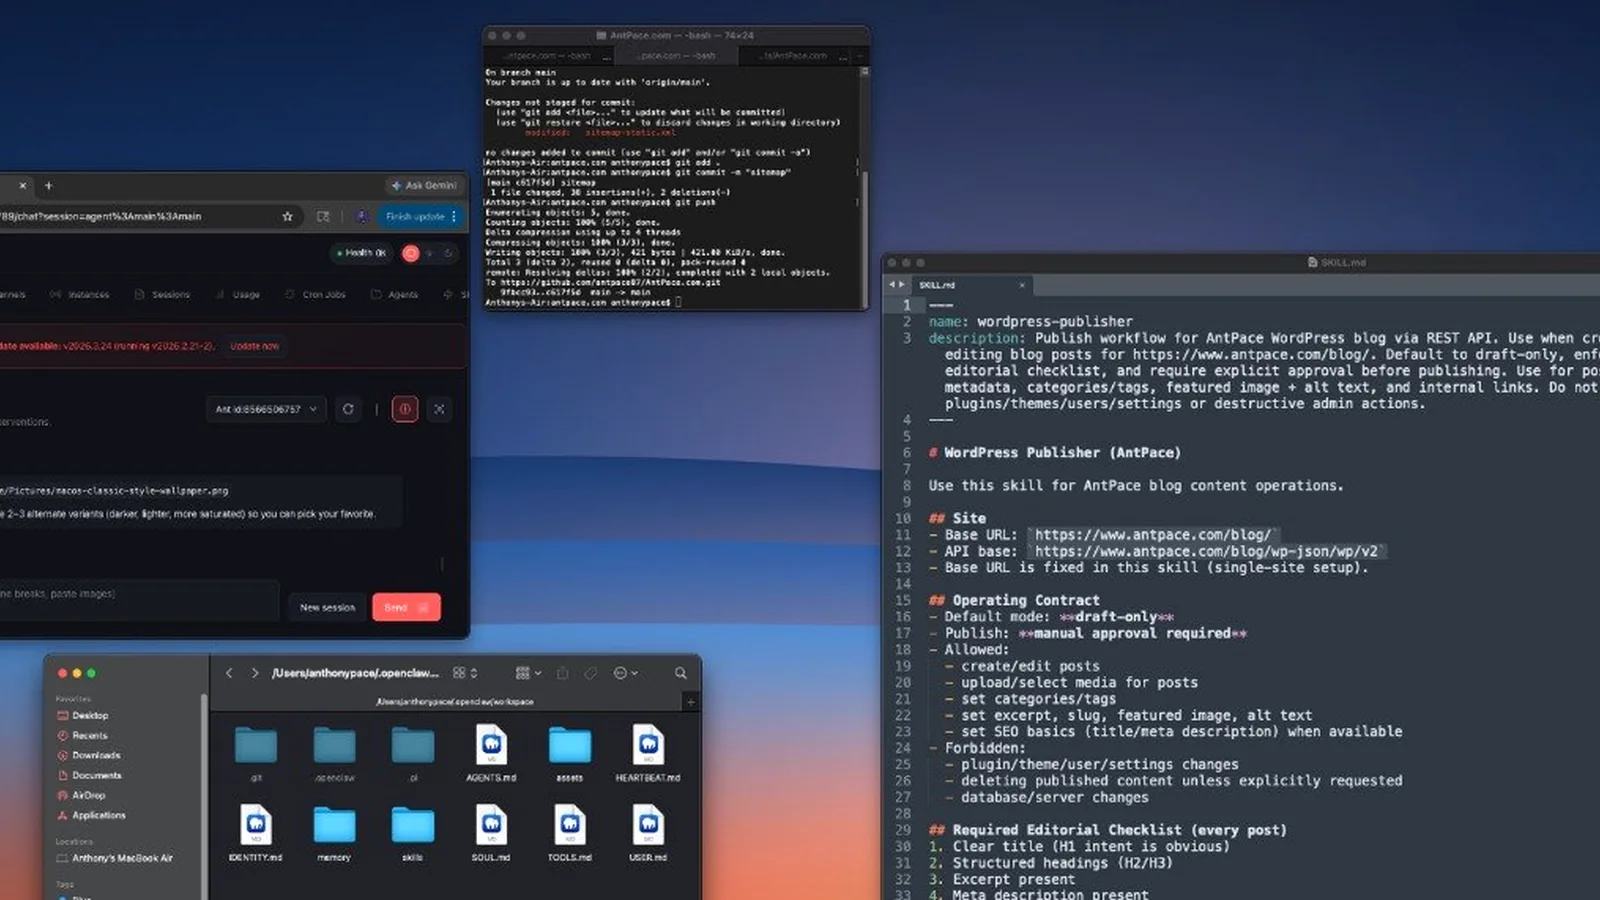
OpenClaw setup and debugging: resolving gateway/session friction, token/auth issues, and execution reliability.
Local development workflow: running my site locally with MAMP, fixing PHP path/version mismatches, handling localhost port conflicts, and cleaning up stuck terminal processes.
WordPress + publishing automation: improving draft workflows, troubleshooting environment overrides, and tightening a cleaner “write/edit/publish” path.
TypeScript migration: moving a private NPM utility package toward TypeScript. I use it in a personal React project.
OpenClaw-assisted builds: using agents to spin up practical outputs fast, including game clones (like Wordle-style projects) and a macOS AI-terms screensaver for exam study.
Site quality improvements: refining page structure, visual polish, and sitemap/indexing hygiene.
What I’ve been learning
Intelligence vs harnesses: getting clearer on the difference between foundation model capability and orchestration layers like Codex CLI, OpenClaw, and Claude Code.
How agent systems actually work: context files, skills, Markdown-based operating memory, sub-agents, and execution boundaries.
OpenClaw feature mechanics: understanding patterns like heartbeats, session behavior, and where proactive workflows help versus where they add noise.
AI fundamentals in practice: token economics, temperature, context limits, and where reliability breaks.
Tool architecture reality checks: identifying what is true product capability versus a thin wrapper around models/APIs.
One notable signal this month: at a local WordPress meetup in New Jersey, AI was a major topic across conversations. The major focus was on practical implementation and workflow impact.
What I’m thinking about next
Building a repeatable monthly cadence for technical updates and lessons learned.
Applying AI where it improves real execution speed and quality, not just novelty.
Continuing AWS AI Practitioner exam prep with practical reinforcement (including custom study tooling).
Expanding practical AI support in web, content, and automation workflows without adding unnecessary complexity.
If you’re interested in the execution side of technology, automation, and practical AI adoption, I’ll be sharing this format regularly.
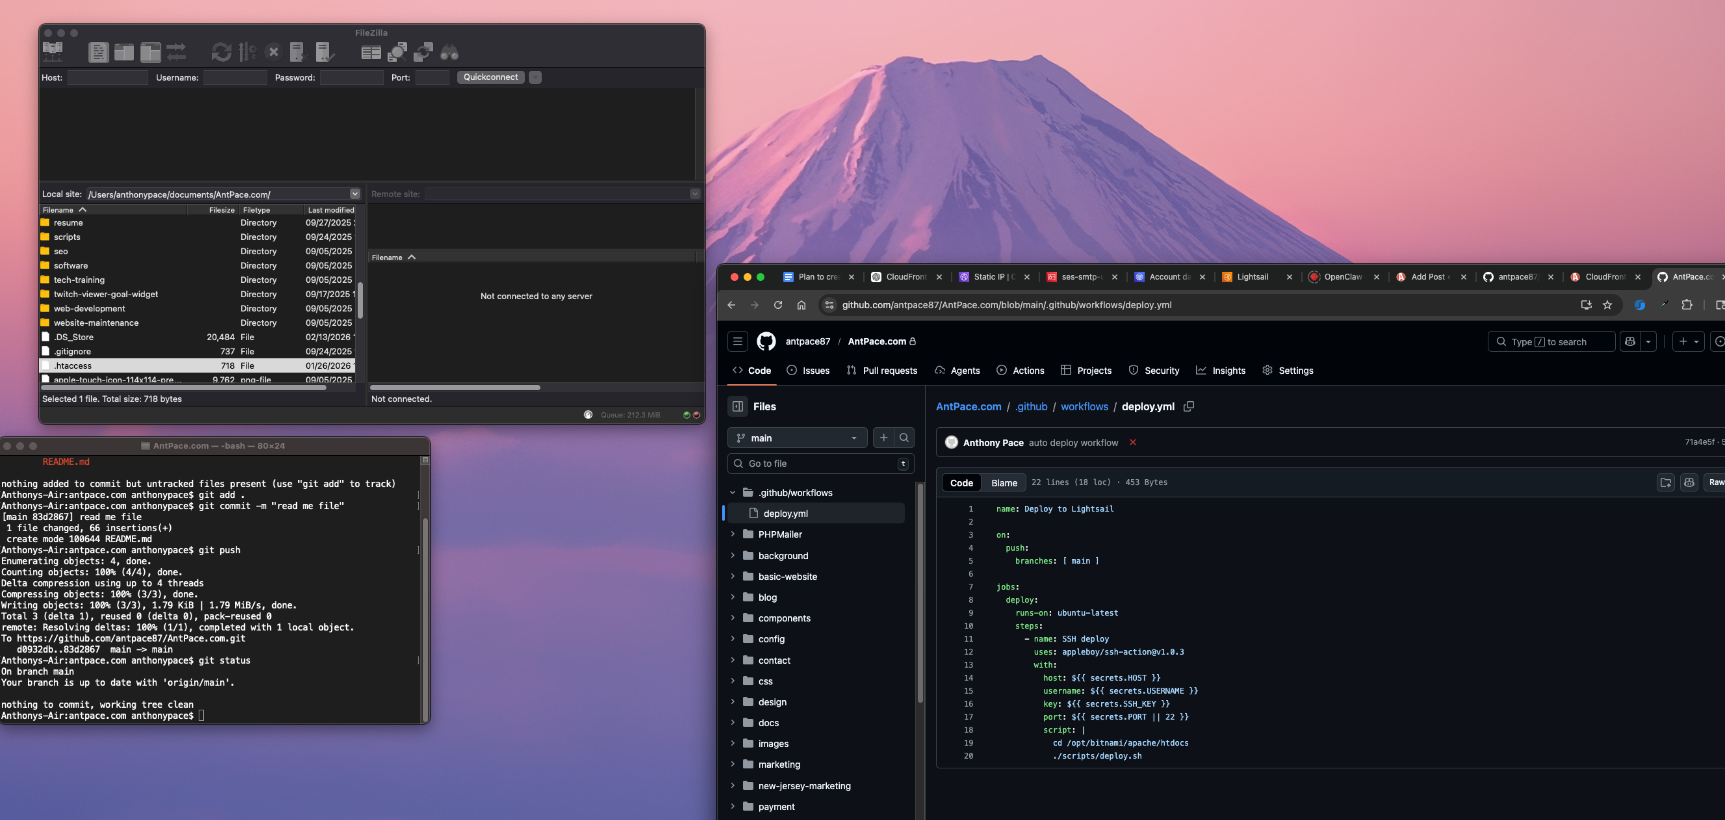
My original deploy flow was the classic “freelancer special”:
Make changes locally, open FileZilla, SFTP into the server, drag files over, hope I didn’t miss anything, refresh the site, repeat.
It worked, but it was slow and it always felt a little fragile. So we switched to auto-deploys with GitHub Actions. Now whenever I push to main, GitHub connects to the server and runs a deploy script automatically.
Push code → live site updates. No more FileZilla sessions.
And here’s a bonus I didn’t fully appreciate until I started using it: it also makes it ridiculously easy to make small static page edits from my phone using the GitHub.com editor. Change a line of HTML, fix a typo, update a link, commit to main, and it deploys the same way as if I did it from my laptop.
What We Set Up
Trigger: A push to main runs the workflow.
Action: The workflow SSHs into the server (in our case, an AWS Lightsail instance), goes to the site’s document root, and runs a small deploy script.
Result: Every push to main updates the live site without manual SFTP, SSH, or FTP.
appleboy/ssh-action runs the given script on your server over SSH.
host, username, key, and optionally port come from GitHub Secrets so you never put credentials in the repo.
Adjust the cd path to your actual document root.
2. The Deploy Script on the Server
On the server, we keep the deploy logic in a script (e.g. scripts/deploy.sh) that the workflow runs:
#!/bin/bash
set -euo pipefail
git pull origin main
set -euo pipefail makes the script exit on errors and on use of unset variables.
The only “deploy” step is pulling the latest main. You can expand this later (build steps, dependency installs, cache clears, service restarts, etc.).
Make sure:
The script is executable: chmod +x scripts/deploy.sh
The directory you’re deploying from is a git clone of your repo, with origin pointing to the same GitHub repo you push to.
3. GitHub Secrets
In your repo: Settings → Secrets and variables → Actions. Add:
HOST – Your server’s hostname or IP (example: origin.antpace.com)
USERNAME – SSH user (Bitnami stacks often use bitnami)
SSH_KEY – Private key content that can log in as that user (paste the whole key including the BEGIN/END lines)
PORT (optional) – SSH port if not 22
Now the runner can SSH in and deploy without you storing credentials in the repo.
4. The Underrated Win: Editing From Your Phone
This is the part that feels almost unfair once you have it.
Because deploys are tied to main, you can make simple static changes directly in the GitHub.com editor on mobile:
Fix a typo
Update a phone number
Swap a link
Change a headline
Add a quick announcement banner
Commit to main, and the same workflow runs. No laptop required. No FileZilla. No “I’ll do it later when I’m home.”
5. One More Thing: Cache Invalidation
If you sit behind a CDN (like CloudFront), you may need to invalidate cache after deploy so you actually see your changes immediately.
You can:
Add a workflow step that uses the AWS CLI to create a CloudFront invalidation, or
Run it inside the same SSH script (if the AWS CLI is installed on the server)
That’s it.
The whole goal here is to stop “deploying” and start “pushing.” Once this is in place, you’re not moving files around anymore. You’re making changes in one place (your repo), and production stays in sync automatically.
I wanted an easy win on this exam, without turning it into a long project.
Cloud Practitioner is not a deep technical test. It is mostly about understanding AWS at a high level, knowing what the core services do, and being comfortable with billing, support plans, and the shared responsibility model.
Here is how I prepared.
Step 1: I used the exam guide as my checklist
Before I watched anything, I pulled up the official exam guide and treated it like a scope document.
If something was on the guide, I studied it. If it was not on the guide, I did not go down the rabbit hole.
That one decision saved me a lot of time.
Step 2: I learned AWS in “service groups”
Trying to memorize individual services is painful. It clicked for me when I grouped things by category and learned the role each category plays.
My main buckets were:
Compute: EC2, Lambda
Storage: S3, EBS, EFS
Databases: RDS, DynamoDB
Networking: VPC, Route 53, CloudFront
Security: IAM, KMS, shared responsibility model
Monitoring: CloudWatch
Billing: pricing models, free tier, Cost Explorer, support plans
Once you can explain these things, most questions stop feeling tricky.
Step 3: Practice questions became the real study plan
After I had the basics, I moved to practice exams earlier than I expected.
I did not use them to “see my score.” I used them to find my weak spots.
Every wrong answer turned into a quick note:
What was the correct answer?
Why was my answer wrong?
What is the simple rule that would help me next time?
That loop is where most of my improvement came from.
I used ChatGPT to generate practice exams, one question at a time. I could answer by typing in a letter choice. I would then ask it to explain each answer options, whether I got it wrong or correct.
Step 4: I focused hard on billing and security
If you ignore billing and security, you can feel confident and still miss a lot of easy points.
I made sure I was solid on:
Shared responsibility model
IAM basics (users, groups, roles, policies, least privilege, MFA)
Pricing basics (On Demand vs Reserved Instances vs Savings Plans)
What is included in the free tier
Support plan differences
Step 5: I made exam day simple
I did some boring preparation the day of the exam. Clean desk, quiet room, testing software working, ID ready, no weird tech surprises. A few days before, I had to borrow a laptop because my ten-year-old MacBook was too old to run the testing software. The goal was to spend my energy on the questions, not on setup problems. I was worried about losing internet (that happened once before, years ago), but it turned out fine.
The digital proctor had me spin my laptop camera around to check the room. He had me move a few things from my mostly empty desk, like a pack of tissues
If you are studying now
Do not overcomplicate it. Learn the high level purpose of the services, drill practice questions, and tighten up billing and security.
I put CloudFront in front of my Lightsail site for a few reasons: faster load times globally, less load on my instance, and better options for defending against bot traffic at the edge. I also wanted a setup where Lightsail is just the origin and CloudFront is the public front door, which makes future changes easier.
This is what I did, what broke, and what fixed it.
What I started with
A Lightsail Linux instance running Apache
The main site is mostly PHP pages plus CSS/JS/images
The blog lives at antpace.com/blog (WordPress)
DNS already in Route 53
HTTPS already working on the instance using Certbot
The mental model
CloudFront is the front door. Lightsail becomes the origin behind it.
That means two separate HTTPS concerns:
Visitors hitting antpace.com need a certificate attached to CloudFront (ACM)
CloudFront talking to the origin also needs HTTPS on an origin hostname
Setting up the origin hostname
CloudFront won’t accept an IP address as an origin. It needs a domain name. So the first move was creating:
backdoor.antpace.com → Lightsail static IP (Route 53 A record)
Then I made sure the origin worked over HTTPS using the same mechanism I already had on the instance.
To confirm what I was actually using:
sudo certbot certificates
sudo sed -n '1,200p' /etc/letsencrypt/renewal/antpace.com.conf
That confirmed Certbot and showed the exact webroot path being used for renewals.
Route 53 record for backdoor.antpace.com
certbot certificates output
Getting the CloudFront certificate (ACM)
CloudFront requires an ACM certificate in us-east-1, even if your origin is in a different region.
So I requested a cert in ACM for:
antpace.com
www.antpace.com
Then validated it through Route 53.
ACM certificate request page showing the domains and DNS validation records
Creating the distribution and choosing policies
This is where the setup becomes worth it, but it’s also where you need to treat the main site and WordPress differently.
My main site is basically “static-ish” content, but /blog is WordPress. So I split behaviors and used different policies.
First request was a Miss, second request was a Hit with an age header.
CloudFront distribution details page
Behaviors tab showing Default (*)
Blog behaviors for WordPress (/blog/*)
I kept WordPress safe by disabling caching on the blog paths and forwarding what WordPress needs.
Behaviors I added:
/blog/wp-admin/*
/blog/wp-login.php
/blog/*
I know the above is redundant, but in the future I may allow some cacheing on the blog post pages, but always keep the other two routes disabled.
For all three:
Viewer protocol policy: Redirect HTTP to HTTPS
Allowed methods: All
Cache policy: CachingDisabled
Origin request policy: AllViewer
This is the “don’t get fancy yet” setup. It keeps logins/admin sane and avoids CloudFront caching anything dynamic.
Behaviors list showing the /blog/* paths and policies
Bot defense at the edge
One of the underrated reasons to do this is that CloudFront gives you an edge layer for basic bot defense. Even on the free plan, you can enable rate limiting/monitoring so random traffic is handled earlier, instead of everything slamming your Apache box directly.
I turned on the recommended rate limiting settings (it starts in monitor mode), then I can tighten it later if I need to.
Security / rate limiting settings screen
The redirect loop issue (and why it happened)
After switching DNS, browsers started throwing “too many redirects.”
The fastest way to see what was happening:
curl -IL https://www.antpace.com | head -n 40
It was an endless chain of 301s. The cause was not CloudFront. It was my origin.
I had unconditional Apache redirects living in two configs:
/opt/bitnami/apache/conf/bitnami/bitnami.conf
/opt/bitnami/apache/conf/bitnami/bitnami-ssl.conf
And the line was:
Redirect permanent / https://www.antpace.com/
That redirect is too blunt once CloudFront is in front. CloudFront can cache the redirect and then you’ve got a fast global redirect loop.
grep output showing the redirect line in both files
browser redirect error page
Canonical redirect at the edge (CloudFront Function)
I still wanted apex → www, but I didn’t want Apache doing it anymore.
So I created a CloudFront Function and attached it to the Default behavior on Viewer request:
function handler(event) {
  var request = event.request;
  var host = request.headers.host.value;

  if (host === 'antpace.com') {
    var qs = request.querystring;
    var loc = 'https://www.antpace.com' + request.uri + (qs && qs.length ? ('?' + qs) : '');
    return {
      statusCode: 301,
      statusDescription: 'Moved Permanently',
      headers: {
        location: { value: loc }
      }
    };
  }

  return request;
}
This makes the redirect logic obvious and centralized, and it keeps the origin hostname out of the equation.
CloudFront Function code + association on the behavior
Invalidate CloudFront cache on deploy (GitHub Actions)
My deploy process is GitHub Actions. It SSHes into Lightsail and runs my deploy script. With caching enabled, I wanted updates to show up immediately after a push.
So I added a CloudFront invalidation step after deploy:
That’s the simple version. I can narrow it later, but /* makes “deploy means live” true.
GitHub Actions run showing the invalidation step
CloudFront invalidations tab
What I got out of this
Faster global delivery of the main site via edge caching
Less load on Lightsail
WordPress stays safe because /blog/* is not cached and forwards the right stuff
Better options for bot defense at the edge
Canonical redirects handled at CloudFront instead of server config files
Automated deploy invalidation so changes show up right away
If you’re doing this on a mixed site (static-ish pages plus WordPress), the split behaviors are the whole thing. Treating everything the same is how you end up caching logins or debugging redirects at 2am.
When I went to save this post in WordPress, it kept failing with the classic editor error: “Updating failed. The response is not a valid JSON response.” At first it looked like a WordPress problem, but the actual response coming back was a CloudFront-generated 403 “Request blocked” HTML page, which meant the request never made it to WordPress at all. The weird part was it only happened with certain content. Normal edits saved fine, but as soon as I pasted in code-heavy sections (Apache config blocks, rewrite rules, YAML, JS), CloudFront’s built-in WAF protections flagged the request body as suspicious and blocked it. The fix was simple once we knew what was happening: I enabled WAF “monitor mode” on the CloudFront distribution so it would log potential blocks instead of enforcing them, and after the change finished deploying across CloudFront, saves started working again. I kept rate limiting on for bot defense, but left the common-threat protection in monitor mode until I eventually switch to a full WAF Web ACL where I can add exceptions for WordPress editor endpoints.
One extra thing I did on the WordPress side was add a tiny mu-plugin as a guardrail. I like mu-plugins for infrastructure-style fixes because they always load and they cannot be accidentally disabled in the admin UI. I did not put anything “in wp-admin” because the block editor issue is really about REST requests and editor endpoints, and WordPress updates can overwrite admin code anyway. Also, I don’t track that file in version control.The mu-plugin lives in wp-content/mu-plugins/ and keeps the behavior consistent no matter what theme or normal plugins are doing.
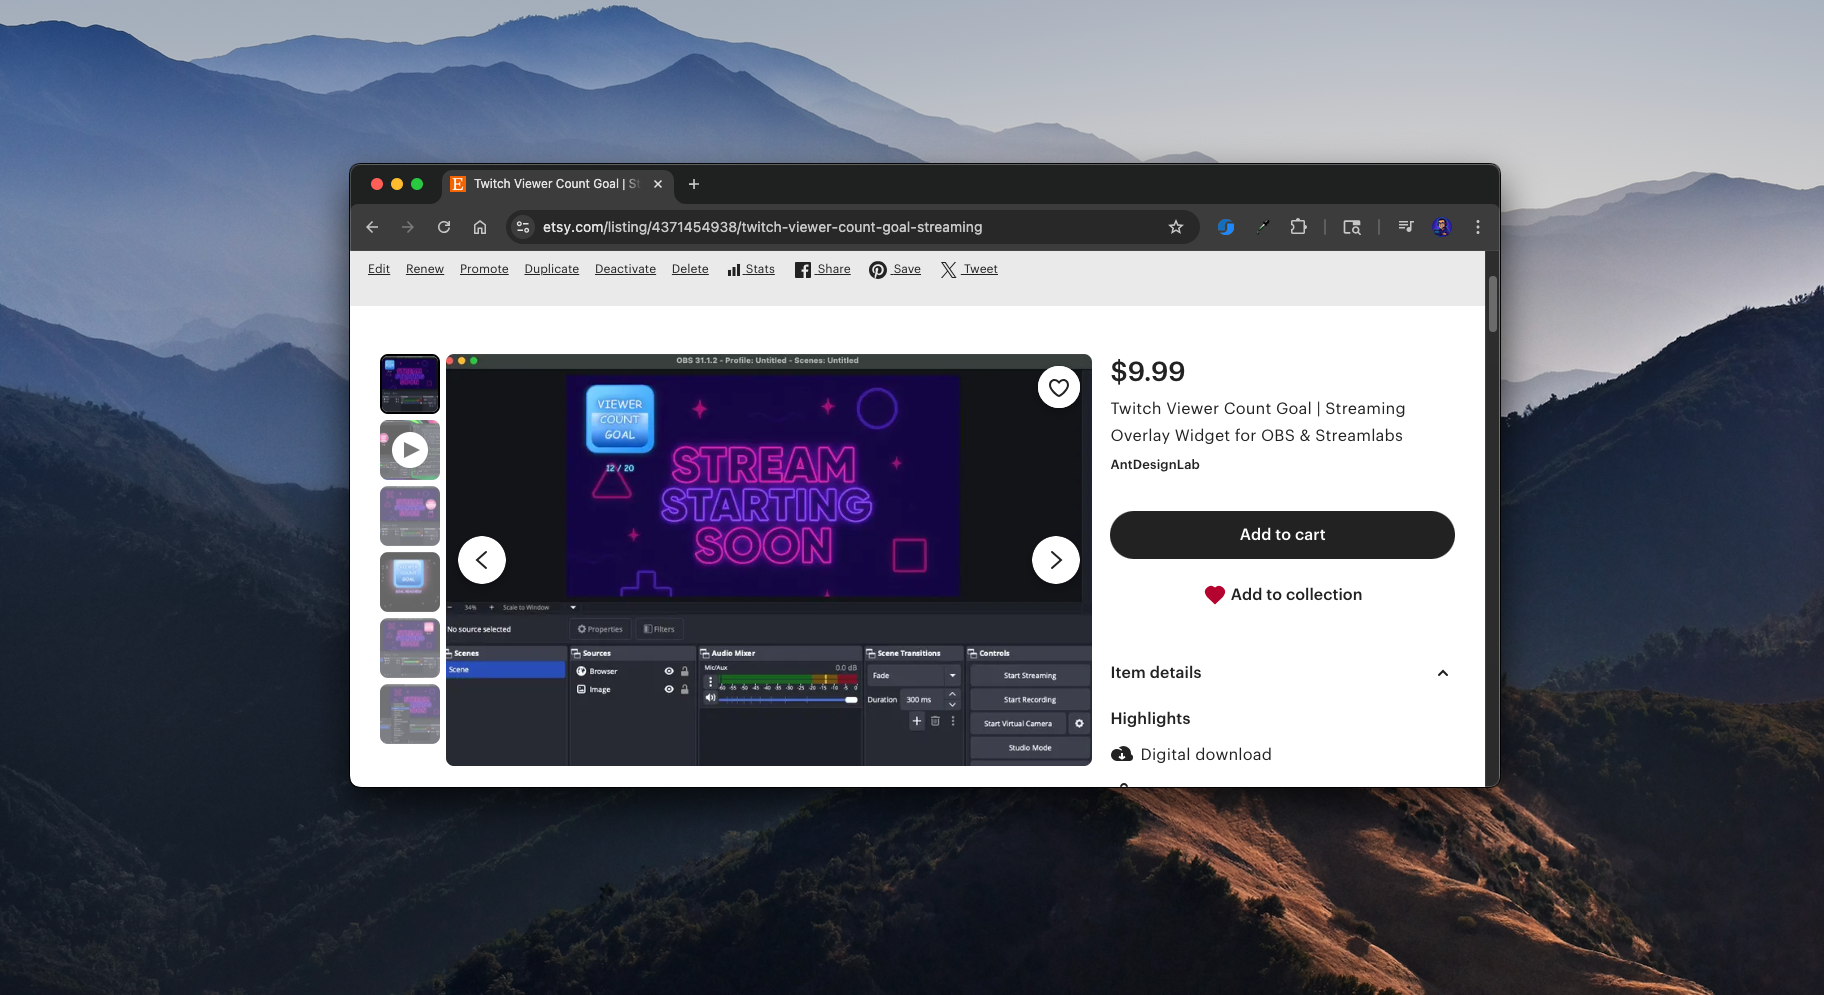
I enjoy side projects like this. A popular streamer was looking for a widget that would show a viewer count goal on Twitch. She couldn’t find anything like it on Etsy, so I thought I’d give it a try.
The First Approach: Server-Side
At first, I built a version that hit the Twitch API from a Node.js back-end. I spun up an Express server on an AWS Lightsail Node.js blueprint and vibe-coded the whole thing. It worked, but it came with major problems.
The Twitch Helix API requires authentication with both a client ID and a token. These credentials are essentially as sensitive as a password. Running the widget from my own server meant I would have to host those credentials. That made the project impossible to sell as a single-download file on Etsy. To cover costs, I’d need to charge a subscription fee, and I even risked losing money if nobody paid.
The experience wasn’t wasted, though. Configuring SSL on Lightsail was tricky but rewarding. I also had to hunt down a race condition in the server.js file that taught me a lot about debugging async code in Node. Even though I scrapped this approach, it might come in handy for future projects.
Here server file I ran to fetch the user count from Twitch’s Helix API:
The real breakthrough came when I decided to cut out the server entirely. Instead of me hosting credentials, I let users generate their own. They paste their Twitch token and client ID directly into the widget’s settings. To do this, I relied on a third-party website (twitchtokengenerator.com) that safely walks them through the process.
This meant I had no recurring costs. My only investment is my time. That’s a big win.
I also moved the widget’s settings out of query parameters and into a simple configuration block inside the file. That made things cleaner and easier for users to customize.
Product Features
When I packaged the widget for release, I wanted to make sure it wasn’t just functional but also customizable and fun to use. Here are some of the features that made it into the final version:
Viewer Goal Tracking – The widget dynamically displays your current Twitch viewer count and progress toward a goal you set.
Customizable Goals – Streamers can easily edit the settings inside the file to choose their own goal number, username, and other preferences.
Visual Themes – I experimented with playful themes like bananas, moons, and fire, giving streamers a way to match the widget’s style to their stream vibe.
Animated Progress Fill – As the viewer count grows, the widget smoothly fills up with color, creating a clear and engaging visual effect for the audience.
Celebration Triggers – When the goal is reached, the widget can display a celebratory effect to highlight the achievement live on stream.
Easy Setup Instructions – To make onboarding painless, I provided a PDF guide and demo video, along with clear links to generate a Twitch token.
No Server Required – Because the widget runs completely client-side, there are no recurring costs or subscriptions. Streamers own the file outright after purchase.
These features make the widget simple enough for beginners to set up, but flexible enough for experienced streamers to customize and show off during their broadcasts.
User Testing and Iterations
Once I had a working prototype, I shared it for testing. Immediately, we hit friction.
The instructions had a broken URL.
The token generation process was confusing.
People weren’t sure how to edit the file. Some tried to open it without unzipping first. Others used the wrong text editor.
Luckily, my first tester was already familiar with Twitch widgets and gave me some great feedback. For example, instead of providing instructions as a .txt file, I switched to a clean PDF guide.
These details matter. If users can’t get through setup, they’ll abandon the product.
Selling the Widget
I decided to sell the widget as a digital download. At first, I planned to use Etsy for its built-in marketplace and discoverability. But I also set up direct sales on my own website with Stripe. That way I control the checkout experience and don’t have to rely on a third party.
Reach out to small streamers and influencers who might find it useful
Optimize listings on marketplaces like Etsy
The idea is to start simple and see where it goes.
Looking Back
This project taught me a lot about balancing technical decisions with business models. Building a server-side widget was fun and educational, but not sustainable. The stand-alone approach keeps things lightweight, low-cost, and sellable.
Most of all, I had fun building something useful. And who knows? Maybe it will grow into a steady digital product line.
The look-and-say sequence is a series of integers. It can grow indefinitely. It is generated by reciting a number phonetically, and writing what you spoke numerically. Its popularity is attributed to famed cryptographer Robert Morris. It was introduced by mathematician John Conway. It looks like this:
1
11
21
1211
111221
312211
13112221
The first line would be pronounced as “one 1”, and then written as “11” on the second line. That record would be spoken as “two 1’s”, giving us the third line “21”. The greatest individual symbol you’ll ever find in this consecution is a 3.
This topic has lots of trivia, variations, and history that could be dug up and expounded upon. Here, I’ll explain a solution written in PHP to produce this chain of numerals. The input will be the count of how many lines, or iterations, in the series to generate. Below is the code:
<?php

echo "Count And Say: \n";

function countAndSay($count=0){
	$value = 1; // initial seed
	for($i=1;$i<=$count;$i++){
		echo $value . "\n";
		$value = calcOutput($value);
	}
}
function calcOutput($value){
	$value = "$value";  // change it into a string, so we can iterate over each character
	$current = $value[0]; // first character
	$count = 1;
        $return = '';
	for ($i = 1; $i <= strlen($value); $i++) { // keep going until we get through the whole string
		if ($current != $value[$i] || $i == strlen($value)) { // found a different character, or end of the input string
			$return .= "$count$current";
			$count = 1; // reset count
			$current = $value[$i]; // set new current character
		} else {
			$count++;
		}
	}
	return $return;
}

countAndSay(7);

echo "\n\n";

?>
I separated my code into two functions. I think this is the best approach. As an exercise, see if you can figure out how to refactor it into one. This could help you to internalize the logic as you write it out for yourself.
The initial seed value is “1”, and that is hard-coded at the top. The for-loop iterates based on the count input parameter. That means the code circles back and re-runs, with updated values, until its internal count (represented by the variable $i ) matches the $count variable passed into countAndSay($count).
The code that we loop over outputs the current sequence value (starting with 1) as its own line (“\n” will output a new line in most programming languages) , and then calculates the next. The function that determines the next line of output, calcOutput($value), takes the current value as an argument.
The first thing we do is cast the integer value passed along into a string. This lets us refer to each character by index – starting at zero – and save it to a variable $current. We start a new $count, to keep track of how many times we see the same digit.
The next for-loop executes for the length of the $value string. On each loop, we check if the $current character we saved matches the subsequent one in that $value string. It is again referenced by index, this time based on the for-loop’s iteration count represented by the variable $i.
If it does match, one is added to the $count variable that is keeping track of how many times we see the same character is a row. If it doesn’t match (or we’ve reached the end of the input), the $count and $current number are concatenated to the $return element. At that point, the $count is reset to 1, and the $current value is updated.
Writing an algorithm to generate the look-and-say (also known as, count-and-say) sequence is a common coding puzzle. You might run into it during a job interview as a software engineer. As practice, see if you can simplify my example code, or even write it in a different programming language than PHP.
Throughout philosophical discussions concerning technology the concept of “human nature,” and its influence, are often referenced. Upon examining consciousness within a technological context the idea of a loss of humanity or individuality continually arises. Curiously, this seems to imply something very strange – specifically that the major trends of human nature are ultimately leading to its own demise. The abstraction of human characteristics and qualities, such as talent and emotion, which emerges from the influence of human nature on technology, causes a reasonable sense of fear and unnaturalness in most people. It’s clear and obvious that the world is rapidly changing in a way that history has never felt before. Socially, environmentally, and even spiritually, humankind is experiencing a metamorphosis. Issues that have stirred the minds of fanatics and dreamers for centuries are finally coming to a boil. Despite this, we may find consolation in the idea that perhaps human beings are simply a stepping-stone in the bigger picture, and that quality which we refer to as ‘humanity,’ actually derives from the whole of the cosmos and will be survived regardless of the fate of the 46 chromosomed machines that claim it as their exclusive birthright.
The twenty-first century is understood to be a pivotal moment in the history of humankind. Through technology human nature is being altered and we begin to face issues that never before existed. In a talk given by Sir Martin Rees, it is argued that this may be our last century on Earth (1). Discussing the immense future lying ahead of us, Rees explains that complexity and intelligence have far to go even here still on earth, not to mention into the depths of space. A main tenet of his argument entails that for the first time humans are able to materially change themselves, and the planet on a global scale. With the arrival of the internet, complexity and abundance of information has sky-rocketed. Slowly, digital information is becoming more important than material things (consider cash versus electronic banking, etc.). Perhaps this transition is also affecting humanity itself. Our own ability, and desire, to change ourselves may in the end result in the loss of ourselves. Bioengineering and bionics aside, I assert that most vital role will be played by the systems we create in this ‘infinite game.’ Humanity itself is based on information systems, in various regards. Our physical selves result from genetic information. Our minds, our consciousness, are all essentially information processed through a system. Everything that defines humanity seems to be compatible.
Interestingly enough, there is already a website that is devoted to “the putative future process of copying one’s mind from the natural substrate of the brain into an artificial one, manufactured by humans.” “The Mind Uploading Webpage, (2)” also details a list of various issues and questions that seem to arise from the concept, including personal identities, brain enhancements, and artificial realities. What future does a website like this promise in the developing context of web 3.0 and beyond? Imagine once something like this invades our everyday lifestyle – the explicit and intentional outsourcing of the human brains. The reason why I have focused so much on this mental outsourcing and expansion of humanity is because it points to result in something even more complex than the sum of its parts. The various digital systems that humanity has begun to embrace, interconnected within a system itself (which will ultimately be a descendant of today’s internet), will itself eventually develop into a conscious, sentiment being. As described in an article from the New York Times by Jim Holt, something as simple as a rock may “be viewed as an all-purpose information processor.”
I recently enjoyed a cartoon strip by Scott Adams that maintains great relevance to the topic (3). Its title, “Supreme Being: Our Future, Not Our Origin,” accurately describes its argument. Its initial four slides explain how complex things result from the combination of simpler, less capable components. Its sixth slide then says: “What if ‘God,’ is the consciousness that will be created when enough of us are connected by the internet?!!” Interestingly, I feel that this idea generally pointing in the right direction. A ubiquitous, unseen entity that connects everything, huh. Not that I’m trying to bring up a theological argument (perhaps God does exist, and what the cartoon refers to would simply be a manifestation of such), but the idea does seem remarkable.
This post was originally written for my first blog that has since been discontinued.
In today’s world it is conventional wisdom that a college education is necessary to excel as a professional. Times are said to have changed, and without proper schooling one is doomed to a life of either hard labor or low-paying pencil pushing. And if you’re planning on paying for an education there is no escaping the fact that college costs are rising. Besides the hefty price tag, traditional schooling is consuming, socially and mentally, forcing a particular lifestyle upon the student. Further, the relationship between the educator and the educated maintains a certain depravity, as a professor holds a figurative gun to the student’s head (any false moves may lead to a career crippling F). But is there an alternative?
In a recent editorial featured in the New York Post (April 23, 2008) Thomas Sowell attributes the high cost of college to two reasons: “People will pay what the colleges charge, and colleges have little incentive to reduce tuition.” He explains that unlike most markets, where lowering prices attracts business, in the academic world the government is ready to step in to pick up the slack. A university would loose millions per year in government money if they lowered tuition. Considering the position that today’s young people are placed, where the arduous task of completing a degree is coupled with unfair prices and a dire necessity, which will affect the rest of their life, it is fair to say that they have us by the proverbial balls.
In an article which I recently compiled I attempt to imagine the direction of coming educational paradigms. It quickly becomes obvious how the talent of great minds may be ignored due to lack of proper credentials. Our current scholastic system bespeaks the Tory elitism representative of Western culture. Perhaps the stereotypical role of an experimental, bohemian college student is effected by the sharp contrast of the academic organization. While it is clear that the classroom is continuing to evolve, it will be necessary for the vintage activist spirit of the student to lend guidance to new educational trends that shifts to a liberal method of intellectual maturation.
So where is the classroom going? I can say with a great deal of confidence that virtual technology will play a leading role in the future of education. Already most colleges and universities offer distance learning programs (online classes). Some colleges, such as the University of Phoenix offer completely virtual degrees. Hybrid courses, in which physical meetings compose only a third of the course time, are also becoming popular. This model moves the educator from the head of the classroom, handing knowledge down, to a guiding medium. This new role forces a teacher to not merely present knowledge, but to be sympathetic in facilitating its acquisition.
Despite the advantages of a virtual classroom, the heavy price still lingers overhead. In overcoming this obstacle towards an open, intellectually progressive society we must embrace the idea of autodidactism.
Being self-educated sounds harder than it is. Some of the most important figures in history have been non-traditionally educated (including Socrates, Benjamin Franklin, Alan Watts, and Mark Twain). It means having a choice in subject matter, moving at your own pace, and it’s free. Its relevance towards the shifting educational paradigm can be attributed to the dawn of the information age, coupled with the open content movement. Considering resources available today, it has never been easier to be self taught. Wikipedia alone serves as an ocean of open knowledge. Various colleges, including MIT, offer ‘open-courseware,’ which include lectures, videos, and notes for entire courses for free. E-books, language courses, podcasts, and dictionaries have all become openly available in a spectrum wide enough to cover anyone’s interests. Even aspiring musicians can learn basics of instruments, theory, and entire songs through online tablatures, sheet music, and video lessons. Rather than growing around current structures, we should move to evolve the system to fit our needs and goals.
Additional Resources:
“I have never let school interfere with my education”
-Mark Twain
“In the first place God made idiots. This was for practice. Then He made school boards.”
-Mark Twain
“It is interesting to imagine the direction of the classroom and forthcoming educational paradigms. I imagine that within the next twenty years the physical classroom will become obsolete, only to be replaced by an autodidactic virtual environment. The role of the teacher will shift from dictating at the head of the class, to more of a supervising librarian that directs the flow of the program in a very yang manner.”
Sometime during the 1950’s television sets had begun to become widely available and fairly affordable. Noting this point as the advent of entertainment focused telecommunications; art had begun to be understood as a trivial distraction to conservative intellectuals. The vegetating trance of the television, typically allowing the mind to enter a state of ‘cruise control,’ could be attributed to the public’s low level of input towards programming. Although the Internet seems to descend from this legacy of infotainment, something quite different is going on. While television preaches endless forms of false happiness through consumerism, the design of the contemporary web aims to facilitate “creativity, information sharing, and, most notably, collaboration among users (Wikipedia – Web 2.0)” This arrangement comprises the core methodology of the Open Source Revolution that is beginning to reshape our traditions and lead us towards a new renaissance of gnosis.
Philosopher Terence McKenna, reminding us that “culture is not your friend (1999),” advises to resist the epistemological disease of autocratic content by creating our own art. Through venues such as Youtube and MySpace, music, art, film, and photography, even mildly entertaining, is now able to draw large audiences and develop into a well received meme. Further, the Wiki archetype has effectively turned the amateur into the expert. McKenna often refers to a revival of the archaic, which is set to take place as a reaction to the patriarchal model of the elite handing knowledge down, and forsaking personal revelation. The proliferation of open source programs, granting users the ability to freely edit and redistribute computer software, manifests the artistic position towards which society must move. The world is shrinking in to a global village thru mass media, and the common majority must take direct control in order to reconnect and reconcile into cosmic consciousness.
The term ‘global village’ is often used metaphorically to describe the internet and World Wide Web. Philosopher Marshall McLuhan predicted that a global village would be tribal in character. The open source operating system Ubuntu, a distribution of Linux (a prime example of free software and open source development), derives its name from the South African philosophical notion of humanitarianism. Interestingly, this juxtaposition of concept and utility represents the new archetype of culture towards which the Open Source Revolution is driving. Projects such as Wikipedia, an open content encyclopedia, are able to maintain their integrity, accuracy, and scope through an effort of community and collaboration. The Open Source Revolution lends new drive to innovation, epistemology, peer support, and ultimately an altruism that trumps the capitalist agenda of elitism. I feel that we must adopt the concept of Open Source as a new organizational model for society.
Should the open source paradigm stay confined to computer software and the internet, or should we move to adopt it as a new model for social organization?
“In a global village where we have instant access to innumerable beliefs around the world, we have come to realize the relativity of what we think”