As programmers, we are creators and innovators. Design should mean more to us than just software architecture and “API design.” Graphic design, UI and user experience play a role in what we deliver as digital creators
The importance of typography cannot be understated in design.
Readability – cursive and serifs for headings; san-serif for body text
Choosing font pairs is essential to ensure consistency and visual appeal.
When I first started doing freelance work (circa 2007) I was mostly a programmer, and had a hard learning curve for design. I made the mistake of randomly selecting unrelated fonts and slapping them together. One time, I designed ugly (in retrospect; at the time, I thought they were amazing) looking business cards for myself. I order 10,000 of them! I remember I ordered them from GotPrint.net after watching a YouTube video recommendation.
AntPace.com business cards from 2008
I got through maybe one thousand of them, ever. Until recently, I still had boxes of them stored in my parent’s basement, back in the Bronx. I keep a few in my archives just for memories.
Subtle background patterns can enhance a design. For an example, checkout this website’s homepage.
A subtle background pattern
Using an image as a background, especially if it’s blurred or darkened and turned black & white, can create a stunning visual effect.
Adding icons to a heading is a way to make a design look more “finished”
Using a white font with a semi-transparent black layer on top of the image background can make the text pop out and increase readability.
I can achieve this effect using the GIMP. Once I have an image open, I add a new layer on top. I fill that layer all black. Finally, I lower the opacity of that layer to about 50%. You can see examples of this on www.SplitWit.com
I can use CSS to add a transparent shadow to a div that has a background image (that is what I use on my portfolio page):
When considering a logo, decide between using just text or incorporating an image for branding. Consider the “Anthony Pace” logo on this website.
When design my own textual logo, the techniques I found most useful: kearning (letter spacing), drop shadows, and lighting effects.
Using apps such as Canva makes it fun and easy. Is AI and automatic tooling replacing designers?
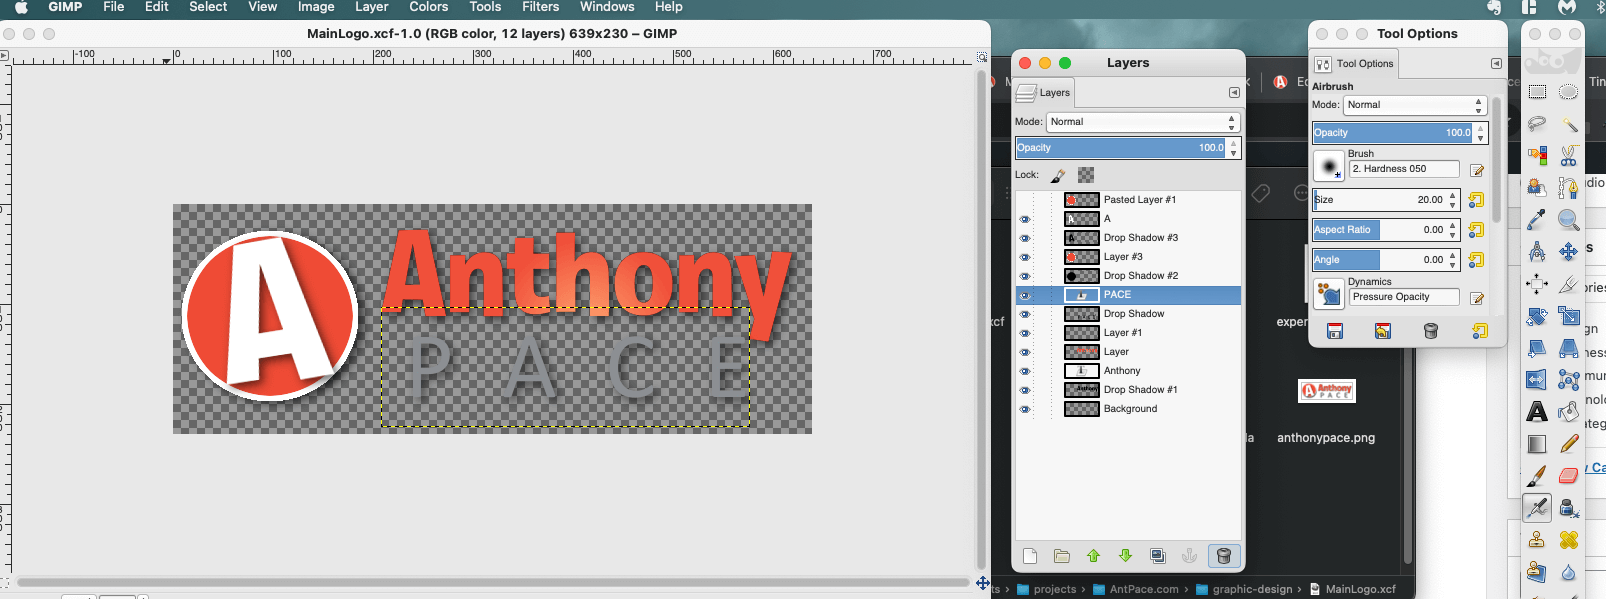
The logo that I use for this website (check the top-left menu, or my homepage’s hero space) has went through numerous iterations. I built it using the GIMP (which has been my tool of choice for over twenty years. I first started using it around 2002- and that’s when I learned that opacity is the opposite of transparency).
#todo: Add GIMP tutorials for techniques I often use. ie, Images with Text on top; The importance of padding.
An important typography technique I leveraged was kearning. I adjusted the spacing between the letters in my last name “PACE” to make it wider, and I used all capital letters. This gave it a sturdy feeling (something which I meant to convey). This formed a strong base for “Anthony” to balance on top of.
Each letter has a subtle drop-shadow, just barely noticeable, giving a *pop*. And the text center (check the “h” in “Anthony”) has a lighting effect (in GIMP, “Filters” -> “Light and Shadow” -> “Lighting effects…”) that draws attention.
Originally, the text logo (referred to as “wordmark” or “logotype”) I use today (circa 2024) was displayed next to a circled “A” (that I now use as the site’s favicon). Separating those two elements was a simplification that added a feeling of professionalism to my brand.
Pro-tip: Padding and whitespace is your friend. Avoid letting things look cramped – give your UI elements plenty of space to breathe.
You can see me employ some of these ideas on the YouTube screen recording embedded below. You’ll notice that in this version of GIMP (2024) to access the “alignment tool”, I need to first select the “move” tool, and then press “q” on the keyboard.
This same concept was stylized into many other renditions (see below). The fonts I used: Pacifico, Exo, Roboto. You can find artifacts of this throughout www.AntPace.com
A legacy logo design from this websiteA design asset for my freelance businessI enjoy the outer space theme throughout AntPace.comThis was originally created in the GIMP and used stock imageryAt first, I wasn’t sure if my blog and main site should have different brand identities
1) Using an existing CSS feature to deliver a better or unique user experience. When applying animations and effects, the possibilities seem limitless.
2) A doctor prescribing a drug, off label, to treat a problem for which it wasn’t originally intended.
3) A trained athlete combining existing techniques into a unique style.
Although creative, these examples aren’t innovative. Innovation creates something new and moves the world forward. It creates new products, new industries, and new markets. It takes existing concepts and rearranges them to fit a unique pattern.
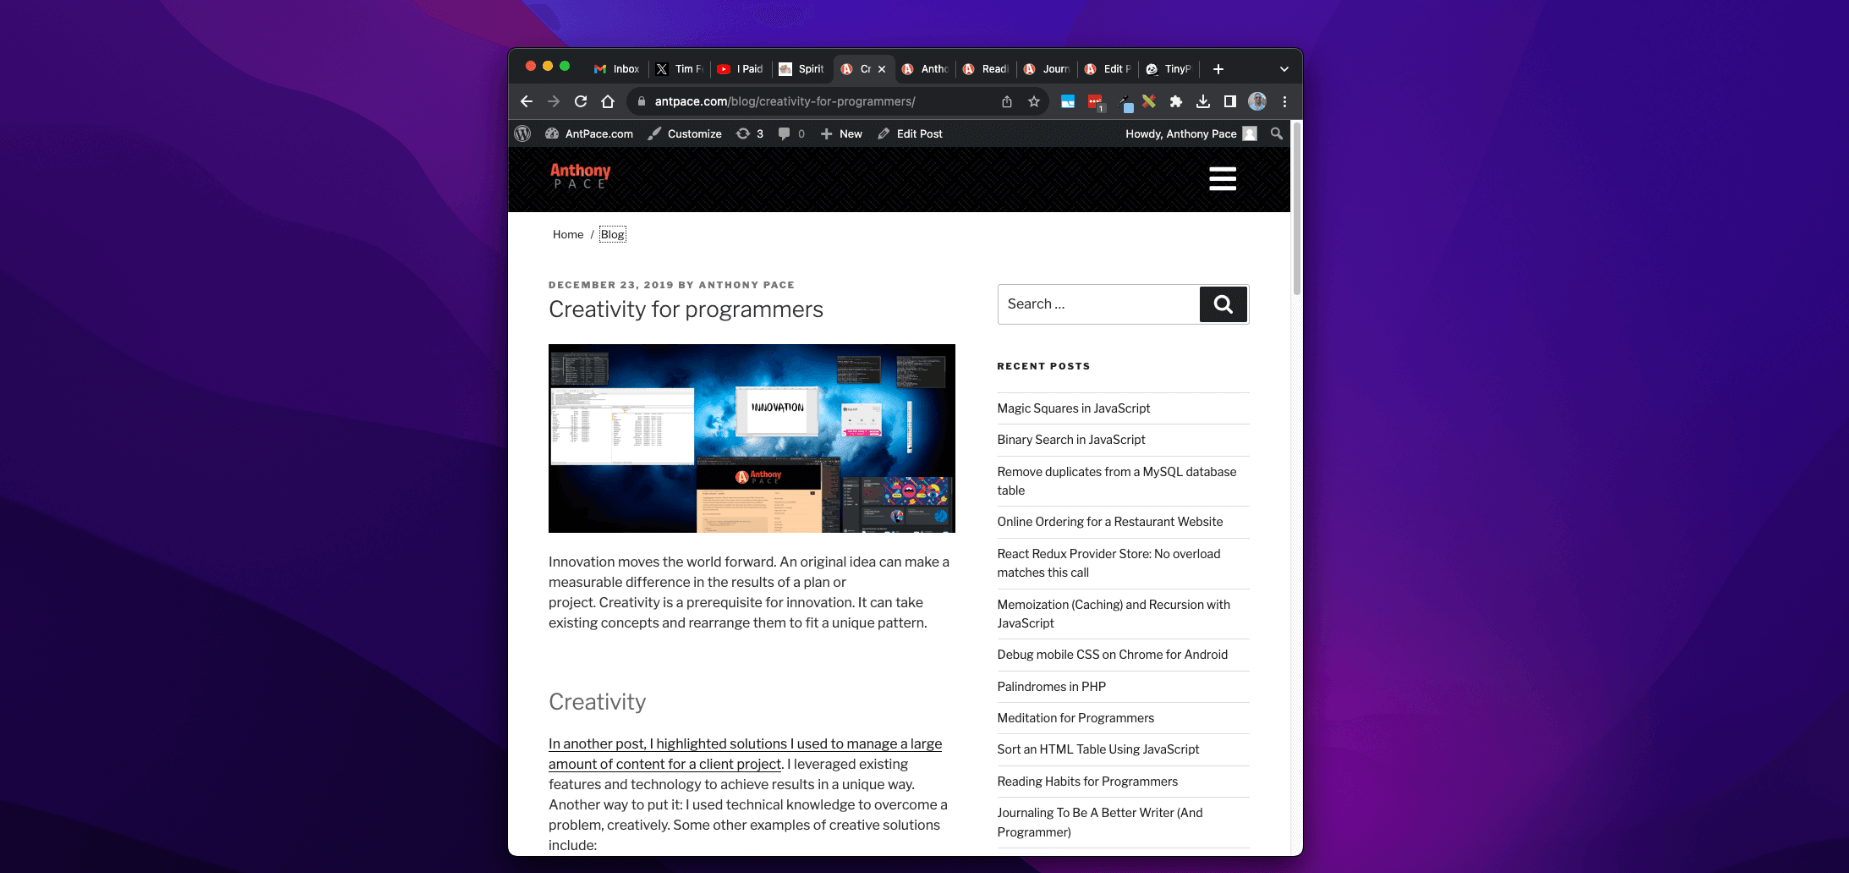
An outlet for my design creativity is the featured images used for each of my blog posts. Take a minute to scroll through them on my blog’s homepage. I usually take existing screenshots relevant to a piece’s subject matter, and juxtapose them against a desktop background. Sometimes, I create collages from random camera photos saved from old phones too.
Innovation
Innovation changes the space in which you’re working. In the next decade I will focus on that kind of growth, and expand past client-specific work. As a broad stroke, this means building digital products. Specifically, I’ll be taking the opportunity to solve problems in certain areas. Luckily, there are many exciting problems that need solving.
Innovative solutions require energy – and here are some places I’d like to spend mine.
1) Digital accessibility, and solving technology problems for people with disabilities. This will include software, as well as physical products. I’d like to explore how IOT, wearables, and augmented/virtual reality can be leveraged.
2) Privacy. This issue also seems to include homelessness, the justice system, and personal identity.
3) Business and marketing. These solutions are important, because I can re-use them as tools in other ventures. They can be leveraged to solve other important problems.
Working with Designers (as a programmer)
Receiving designs that don’t scale. Not having explicit designs for CSS break-points. Working with Figma. Using your best judgment as a front-end engineer.
* This post, like all of my blog entries, is a work-in-progress.
Any product, experience, or artwork – anything you build – is made up of pieces. And content always sits at the center. Content is the fleshy part of media.
The other pieces include structure, style, and functionality. These parts layout a skeleton, decorates the aesthetic, and adds usefulness. This model translates well to modern web development. HTML defines the structure. CSS describes the style. JavaScript adds interactivity. But always, content is King.
That’s why a robust content management system (CMS) is critical. Most clients prefer to have one. It makes updates easy. WordPress is the modern choice. It’s what this blog is built on.
WordPress Website
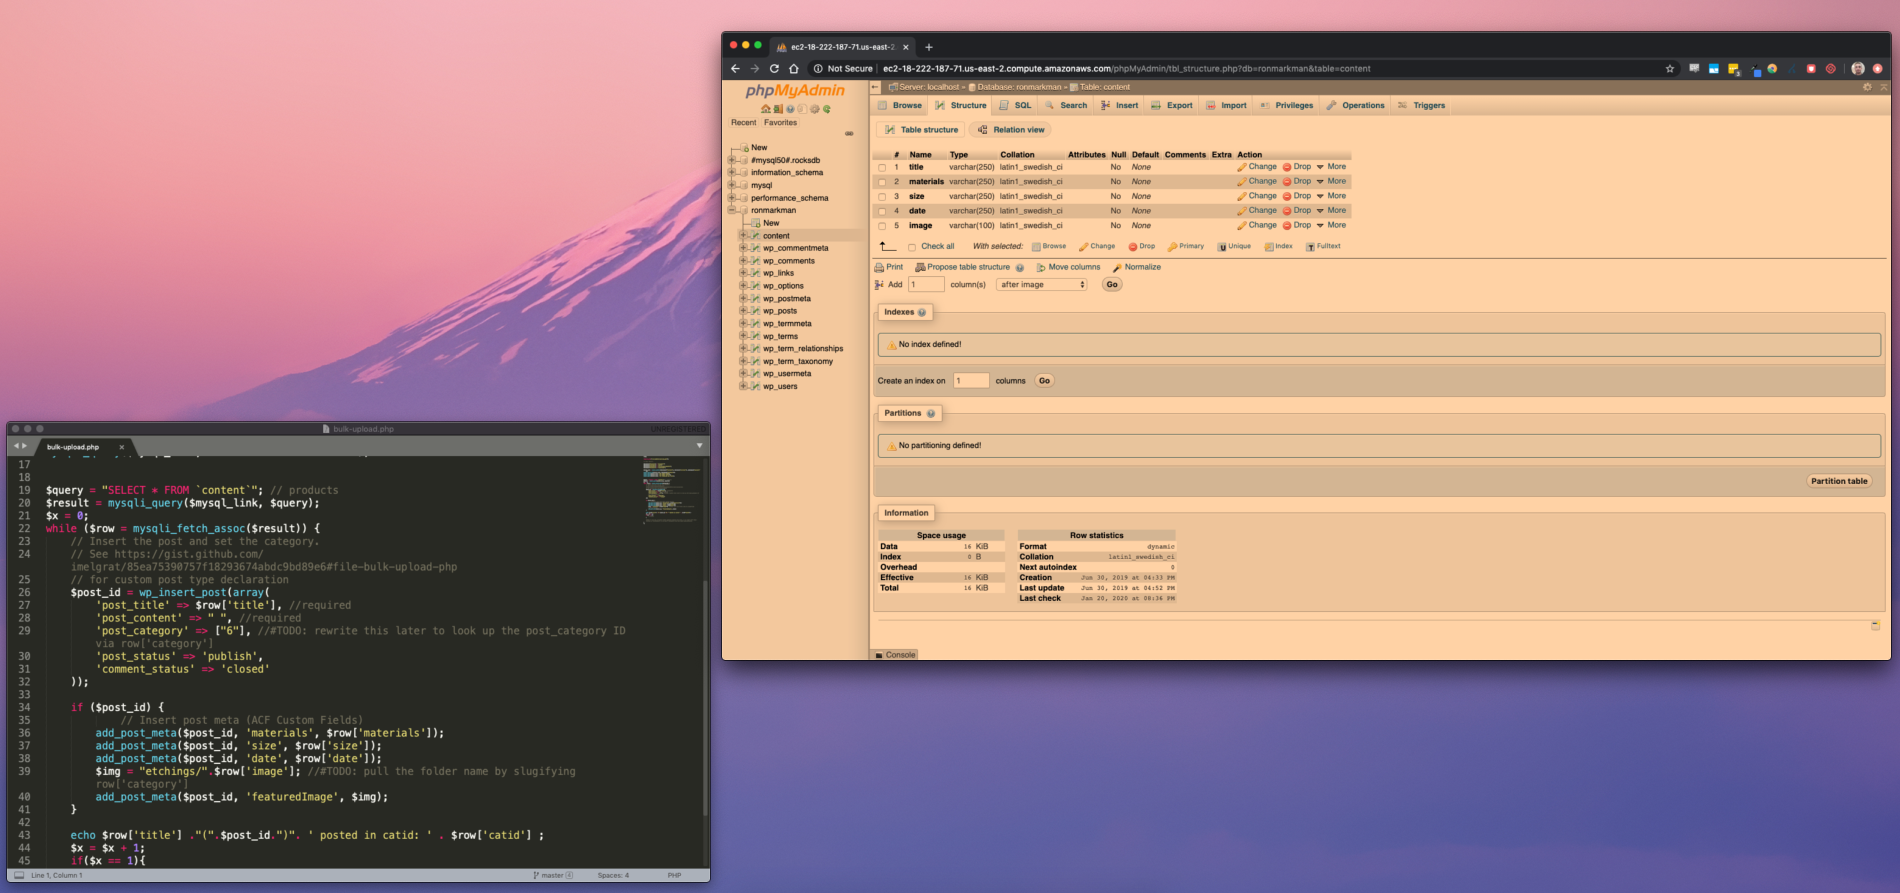
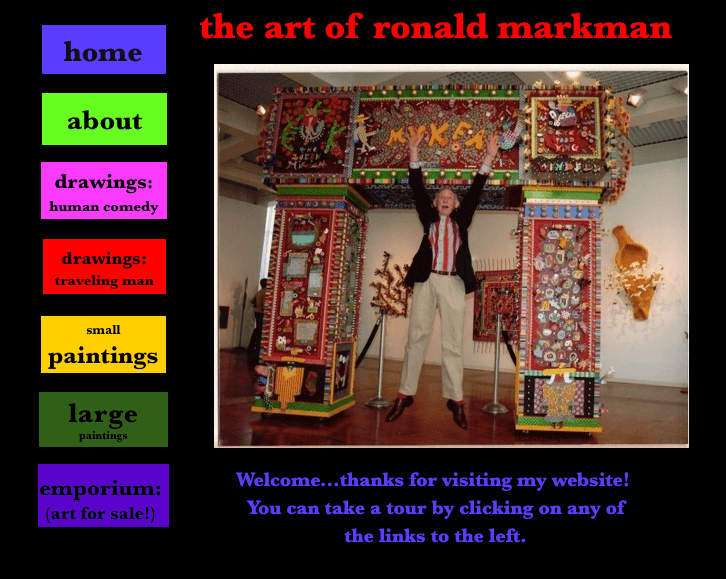
A website I built featured the work of visual artist Ron Markman – paintings, etchings, photos. It had a lot of content. A lot of content that needed massaging. As you may have guessed, I chose WordPress to manage it. I choose the HTML5 Blank WordPress Theme as our starting point.
I was recommended to Ericka by a previous client. Her late relative left behind a corpus of work that needed a new digital home. They already had a website, but needed it revamped and rebuilt from scratch.
This was my proposal:
“The look and feel will be modern, sleek, and adaptive. The homepage will feature a header section highlighting selected work. The website’s menu will link to the various category pages (as well as any ancillary pages). The menu, along with a footer, will persist throughout all pages to create a cohesive experience and brand identity. The website will be built responsively, adapting to all screen-sizes and devices. As discussed, select content will feature “zooming” functionality.”
This was a situation where I had to be a project manager, and deliver results. Although the content itself was impressive, it was delivered as image files in various formats and different sizes. Filenames were not consistent. And the meta-data – descriptions, titles, notes – was listed is excel files that didn’t always match-up to the image’s filename. This required a lot of spot checking, and manual work. I did my best to automate as much as I could, and make things uniform.
Phases of Work
I broke the work out into four phases. This is how I described it to the client:
Layout and hierarchy
I will provide wire-frame layouts describing the essential structure, layout and hierarchy of the website overall.
Look and feel
I will finalize aesthetic details such as color palette, typography, user interface, and stylization.
Implementation
I will build and deploy the website with the content provided.
Content input
You’ll need to provide all copy, images, media, etc. before a first build of the website can be deployed. I’ll be implementing a standard content-management system that will allow you to add additional content, categories, pages, etc. Often times, content delivery can be a bottleneck for projects like this. After the finalized website is deployed live, with the initial content provided, you’ll be responsible for adding any more additionally.
Image Gallery
The UI to show each piece of art was powered by Galleria. It was out-of-the-box responsive. At first, each gallery page had so many large image files that things would crash or load very slowly. I was able to leverage the framework’s AJAX lazy loading to mitigate that issue.
Resizing Multiple Images
Resizing a batch of images can be done directly in Mac OS by selecting the files, and opening them in Preview. From the ‘Edit’ menu, I clicked ‘Select All’. Then, in the ‘Tool’ menu I found ‘Adjust Size’. Windows has a similar feature, as does other image manipulation apps.
Renaming Multiple Files
I had to make the filenames match what was listed in the meta-data spreadsheet. Here’s the command I used, in Mac OS, to truncate filenames to the first eight characters:
rename -n 's/(.{8}).*(\.jpg)$/$1$2/' *.jpg
Batch Uploading WordPress Posts
Each piece of art was a WordPress post, with a different title, meta-values, and image. Once all of the files were sized and named properly, I uploaded them to the server via sFTP. Each category of art (paintings, photos, etc.) was a folder. I created a temporary database table that matched the columns from the meta-data spreadsheet I was given.
CREATE TABLE `content` (
  `content_id` int,
  `title` varchar(250) NOT NULL,
  `medium` varchar(250) NOT NULL,
  `category_id` varchar(250) NOT NULL,
  `size` varchar(250) NOT NULL,
  `date` varchar(250) NOT NULL,
  `filename` varchar(100) NOT NULL,
  `processed` int
) ENGINE=InnoDB DEFAULT CHARSET=latin1;
COMMIT;
I wrote a PHP script that would loop through all records, and create a new post for each. I had to make sure to include core WordPress functionality, so that I would be able to use the wp_insert_post() method.
require_once('/var/www/html/wp-load.php');
Once I connected to the database, I queried my temporary table, excluding any records that have been marked as already uploaded:
$query = "SELECT * FROM `content` where `processed` != 1";
$result = mysqli_query($mysql_link, $query);
While looping through each record, I would look up the WordPress category ID and slug based on the provided category name. This would allow my code to assign the post to the correct category, and to know which folder the image file was in. Once the post is inserted, I take that post ID and assign meta-values. At the end of the loop, I mark this record as processed.
Managing clients, and their content, can be the most challenging part of web development. Using the right software for the job makes it easier. So does having a toolbox of techniques, and being clever.
Managing server operations
This website was hosted on AWS. It used EC2. At first, the instance size we selected was too small and led to repeated website crashes. That experience led me to coming up with a hacky work-around for restarting the server when it crashed – read about it here.
In a previous post, I wrote about creating an image carousel using basic web tech: HTML, CSS, and vanilla JavaScript. No frameworks, no jQuery. This is an update to that. The major difference is that it supports multiple carousels on the same page. I also added a try/catch, in case no carousel data is found in the database. I recently used this implementation on a WordPress site. Each carousel was a post (of a custom carousel post-type), that had each image attached. On that post-type archive page, I looped through the posts, and created a separate carousel for each.
Here is the updated JavaScript.
try{
    var galleries = document.getElementsByClassName("carousel-class");
    for(var i = 0; i < galleries.length; i++){
        showGalleries(galleries.item(i), 0);
    }
}catch(e){
    console.log(e);
}

function showGalleries(gallery, galleryIndex){
    var galleryDots = gallery.getElementsByClassName("dot-button");
    var gallerySlides = gallery.getElementsByClassName("my-slide");
    if (galleryIndex < 0){galleryIndex = gallerySlides.length-1}
    galleryIndex++;
    for(var ii = 0; ii < gallerySlides.length; ii++){ gallerySlides[ii].style.display = "none"; galleryDots[ii].classList.remove('active-dot'); } if (galleryIndex > gallerySlides.length){galleryIndex = 1}
    gallerySlides[galleryIndex-1].style.display = "block";
    var resizeEvent = new Event('resize');
    window.dispatchEvent(resizeEvent);
    galleryDots[galleryIndex-1].classList.add('active-dot');
    //hide gallery navigation, if there is only 1
    if(gallerySlides.length < 2){
        var dotContainer = gallery.getElementsByClassName("dots");
        var arrowContainer = gallery.getElementsByClassName("gallery-arrows");
        dotContainer[0].style.display = "none";
        arrowContainer[0].style.display = "none";
    }
    gallery.setAttribute("data", galleryIndex);
}

//gallery dots
document.addEventListener('click', function (event) {
    if (!event.target.matches('.carousel-class .dot-button')){ return; }
    var index = event.target.getAttribute("data");
    var parentGallery = event.target.closest(".carousel-class")
    showGalleries(parentGallery, index);

}, false);

//gallery arrows

//left arrow
document.addEventListener('click', function (event) {
    if (!event.target.matches('.fa-arrow-left')){ return; }
    var parentGallery = event.target.closest(".carousel-class")
    var galleryIndex = parentGallery.getAttribute("data");
    galleryIndex = galleryIndex - 2;

    showGalleries(parentGallery, galleryIndex);
}, false);

//right arrow
document.addEventListener('click', function (event) {
    if (!event.target.matches('.fa-arrow-right')){ return; }
    var parentGallery = event.target.closest(".carousel-class")
    var galleryIndex = parentGallery.getAttribute("data");

    showGalleries(parentGallery, galleryIndex);
}, false);
You’ll notice that each carousel section has a data attribute assigned, so our JS knows which one to affect. This version also includes left and right navigation arrows, in addition to the navigation dots we already had.
I emphasize simplicity when building solutions. I avoid including superfluous code libraries when a vanilla technique works. It’s helpful to keep track of solutions I engineer, and try to reuse them where they fit. And when they need to be adjusted to work with a new problem, I enhance them while still trying to avoid complexity.
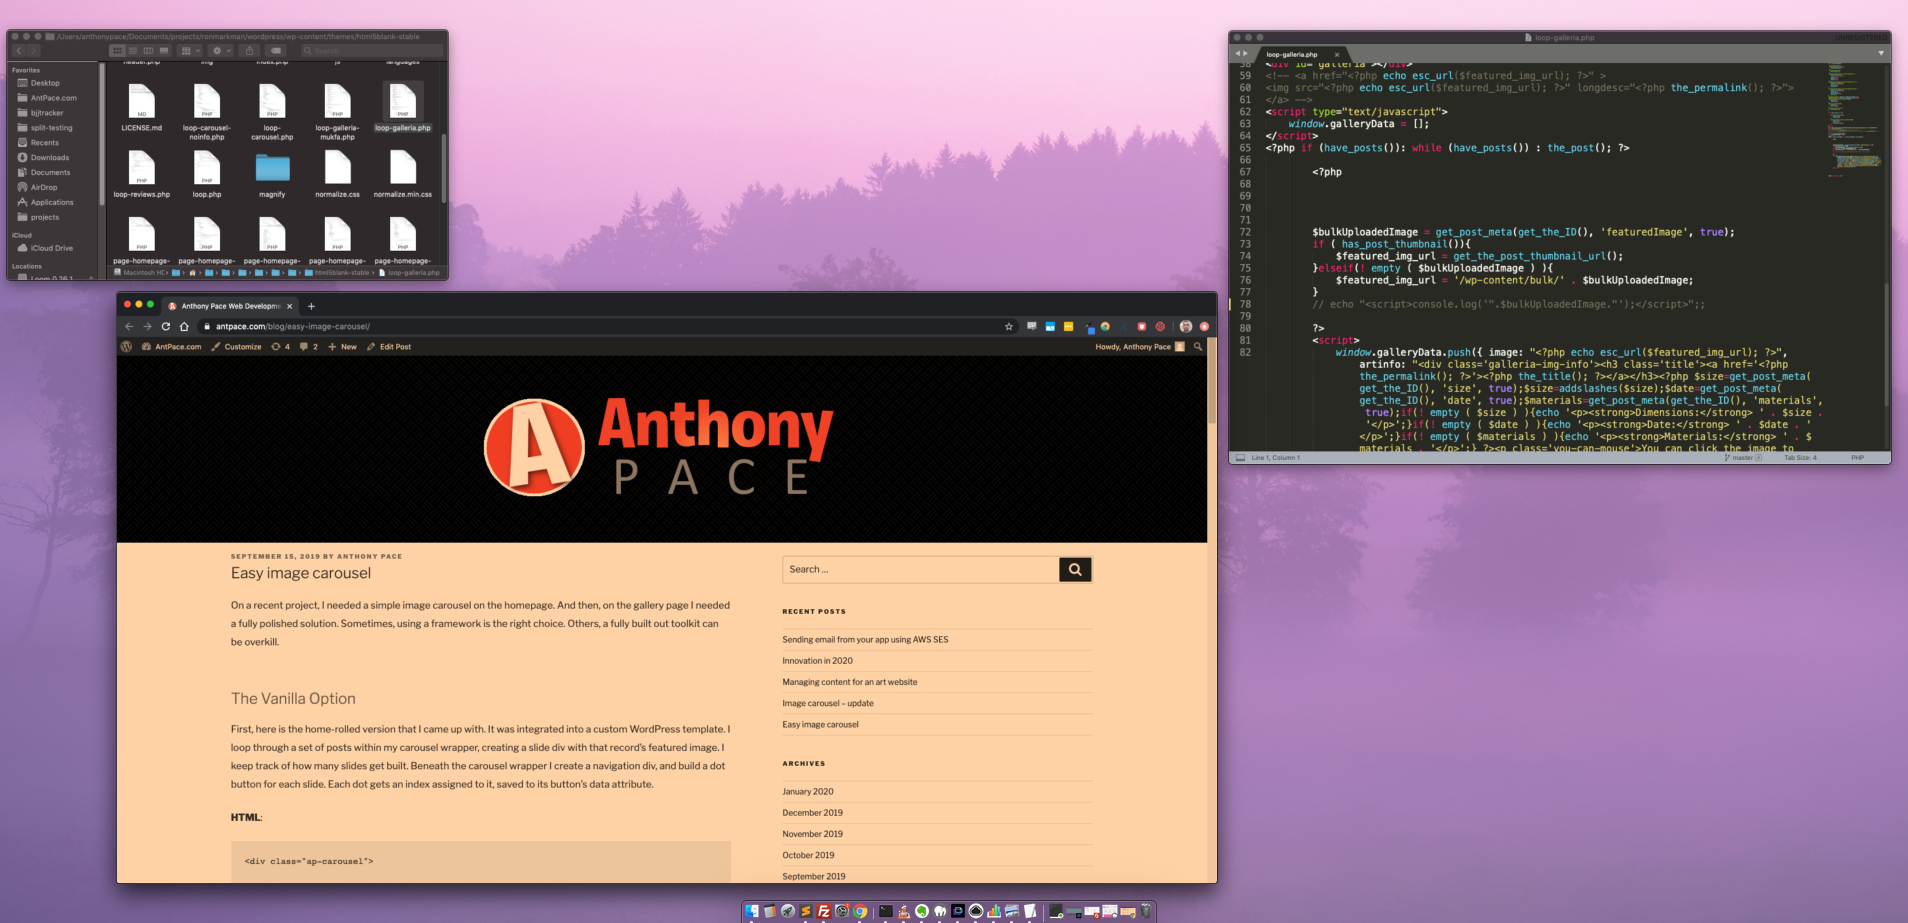
On a recent project, I needed a simple image carousel on the homepage. And then, on the gallery page I needed a fully polished solution. Sometimes, using a framework is the right choice. Others, a fully built out toolkit can be overkill.
The Vanilla Option
First, here is the home-rolled version that I came up with. It was integrated into a custom WordPress template. I loop through a set of posts within my carousel wrapper, creating a slide div with that record’s featured image. I keep track of how many slides get built. Beneath the carousel wrapper I create a navigation div, and build a dot button for each slide. Each dot gets an index assigned to it, saved to its button’s data attribute.
Finally, I create a JS function to change the slide and active dot based on a timer. I attach an event listener to the dots that will change the active slide based on the saved index data.
var slideIndex = 0;
showSlides();

function showSlides() {
	var i;
	var slides = document.getElementsByClassName("ap-slide");
	var dots = document.getElementsByClassName("dot-button");
	for (i = 0; i < slides.length; i++) { slides[i].style.display = "none"; dots[i].classList.remove("active-dot"); } slideIndex++; if (slideIndex > slides.length) {slideIndex = 1}
	slides[slideIndex-1].style.display = "block";
	dots[slideIndex-1].classList.add("active-dot")
	setTimeout(showSlides, 5000); // Change image every 5 seconds
}

document.addEventListener('click', function(event){
	if(!event.target.matches('.dot-button')) return;

	slideIndex = event.target.getAttribute("data");
	showSlides();
}, false);
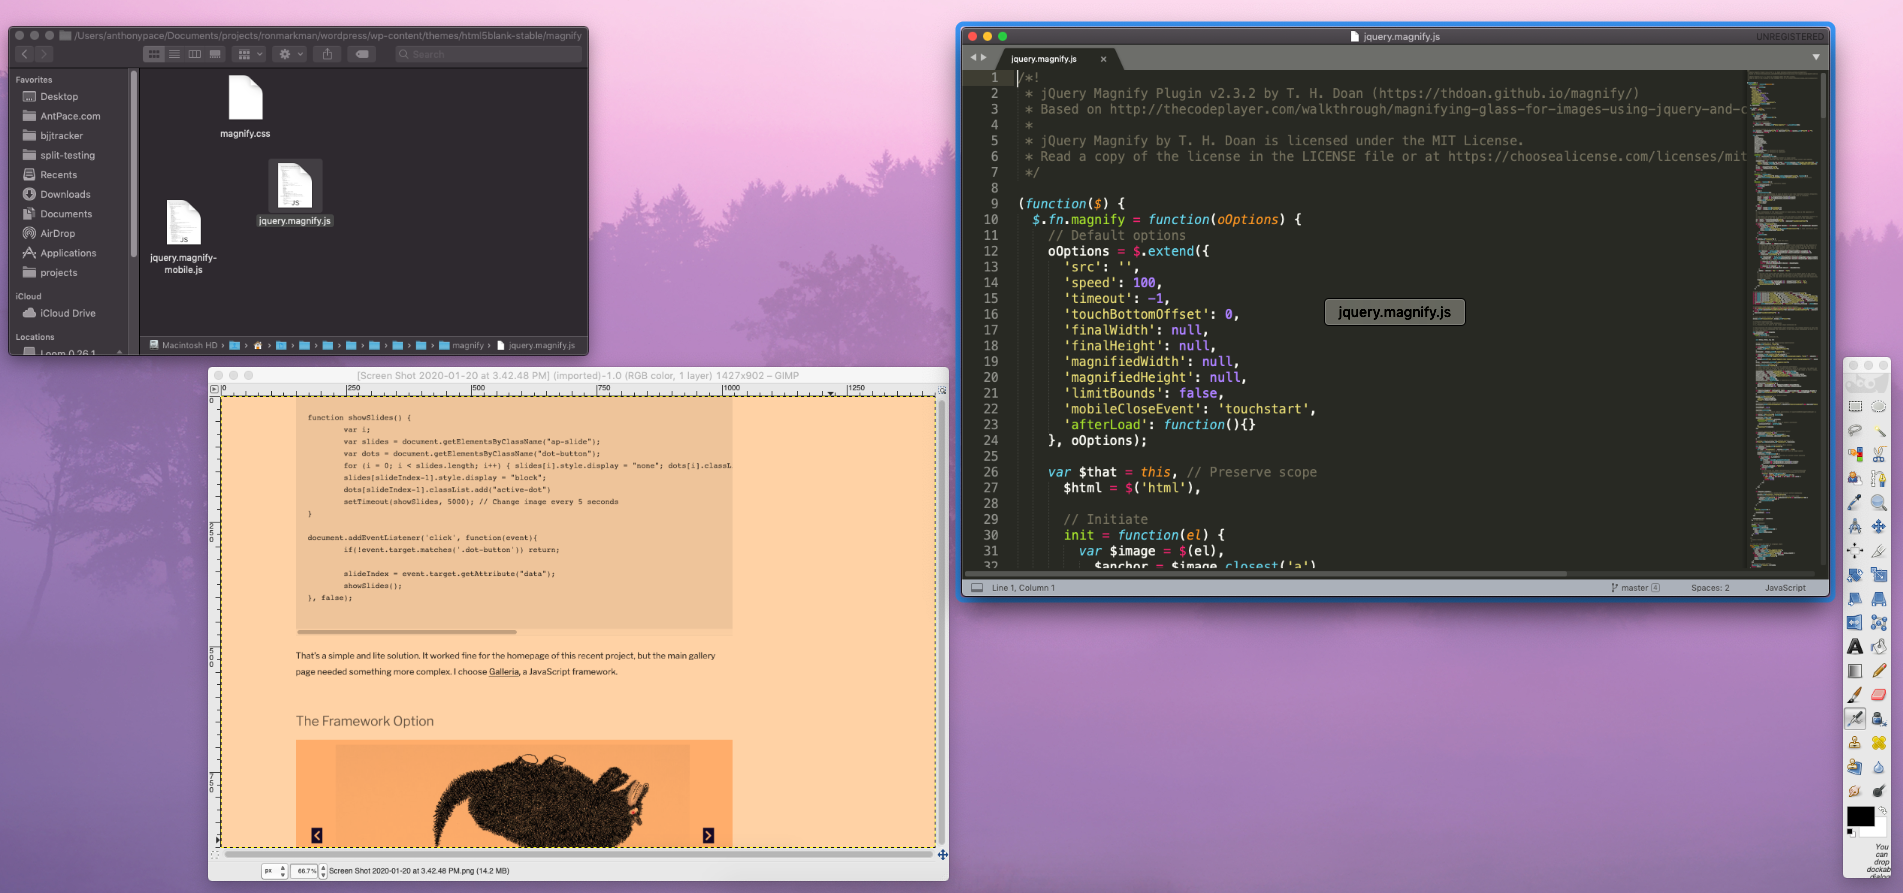
That’s a simple and lite solution. It worked fine for the homepage of this recent project, but the main gallery page needed something more complex. I choose Galleria, a JavaScript framework.
The Framework Option
Carousel showcasing artwork
I implemented this option onto the WordPress category archive page. For this project, each piece of artwork is its own post. In my category template file I loop through posts, and populate a JSON object with the data about each slide. Initially, I had built HTML elements for each slide, but that caused slow page load times. The JSON data option is significantly faster. Here’s what my code setup looked like:
I think it’s best to avoid using plug-ins when possible. It reduces bloat and “black-box” code.
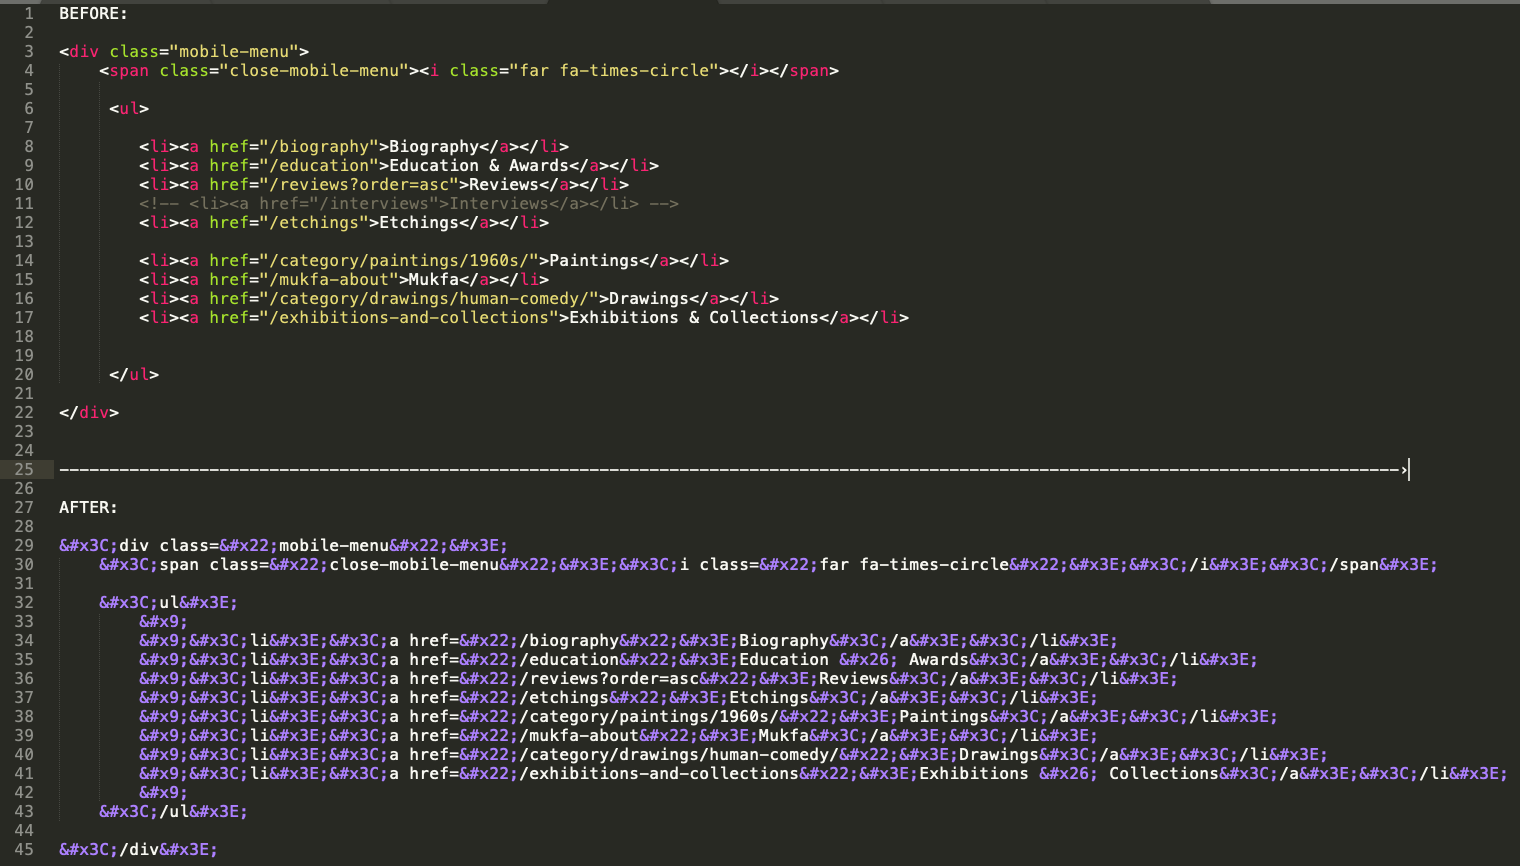
The mobile “hamburger” menu is a staple of responsive user interface design. Users know that clicking on that three-lined icon will show a menu. It’s a modern solution to displaying long navigation lists on smaller screens.
The web, as a platform, is open and free. Unlike native app markets, we don’t have to wait for software to be approved by any third-party. It works across any device or operating system that has a web browser. (Which is why standards across browsers is so important). But, until recently web-apps faced limitations. Not having full access to a device’s hardware and operating system was an issue – but that’s being fixed as more native APIs are being added to modern web browsers.
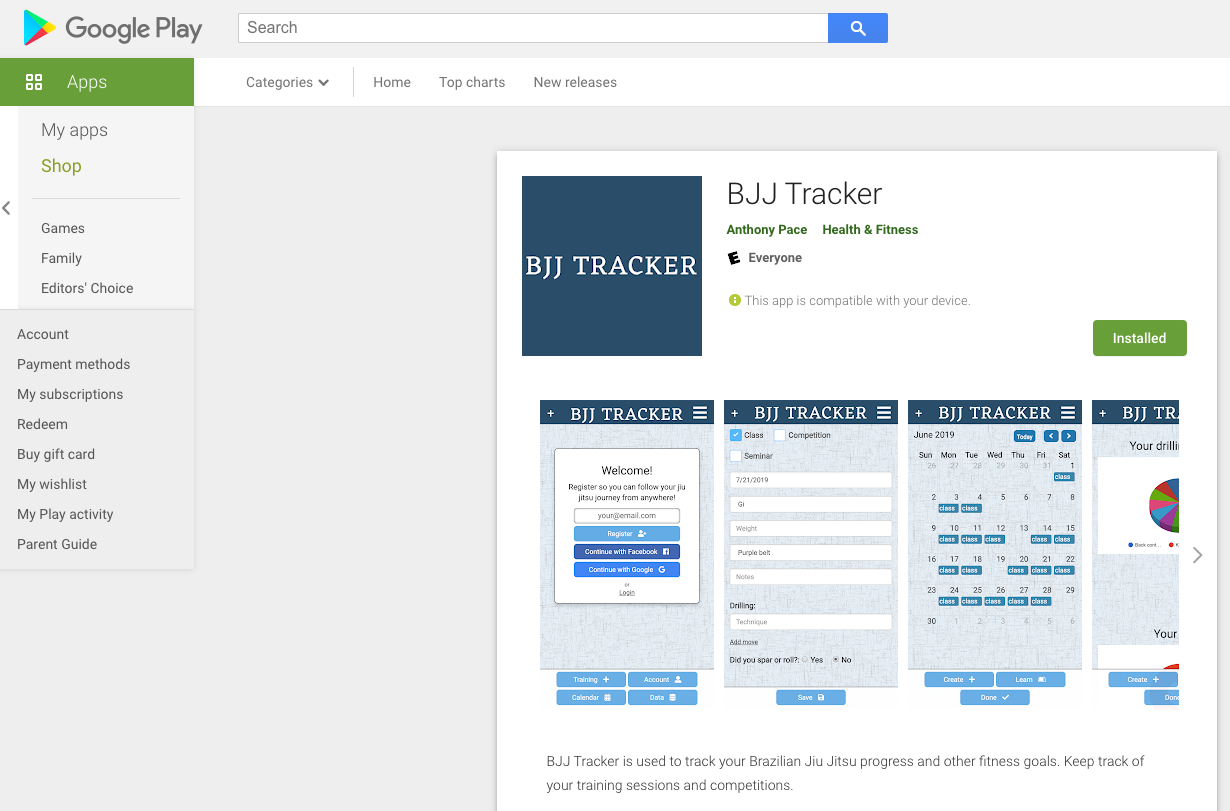
A disadvantage of having a web-only app was losing out on the discoverability that comes with having it listed in a searchable marketplace. Adding a web-app to your device home screen, from a web browser, is not intuitive to average users. Fortunately, the Google Play Market allows us to upload an app file that links to a progressive web app.
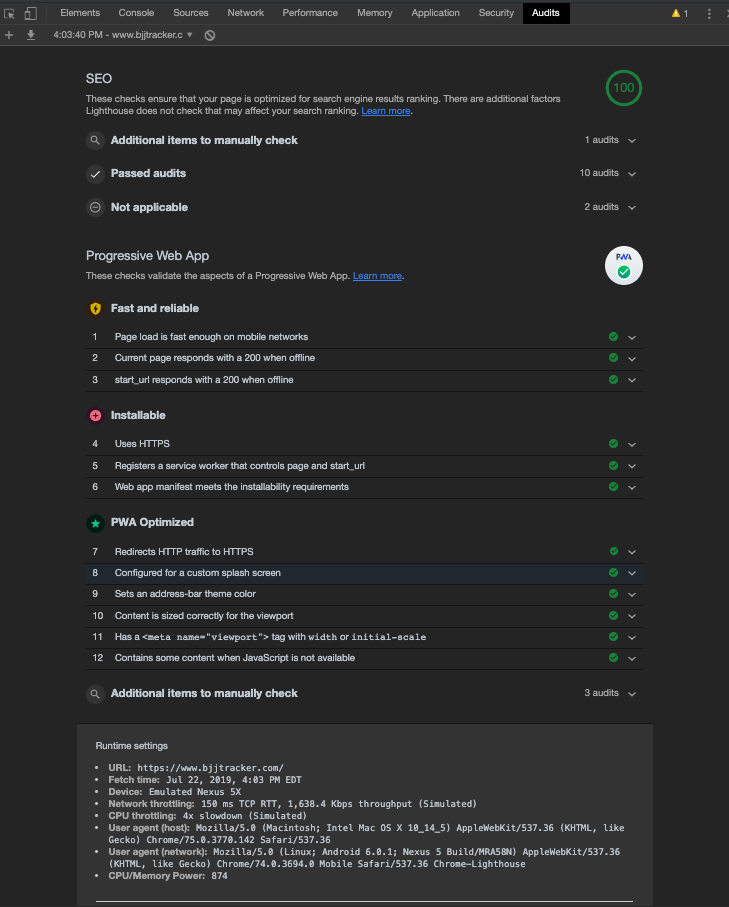
I had to make sure it qualified as a PWA. It needed offline support, as well as any other features that would make it feel like a native app. Google Chrome’s developer tools has a section called “Audits” that helped me identify such opportunities.
The first step was to create a “service worker” JavaScript file, and register it when BJJ Tracker loads.
I added the above code to a shared file that loads on every page of my app. Below is an example service worker file. This file downloads any vital assets to a user’s device, and later loads them from the cache. Including a polyfill ensures that the cache methods exist (in case the browser does not support them natively). “We need to use the polyfill because the Cache API is not yet fully supported in all browsers.”
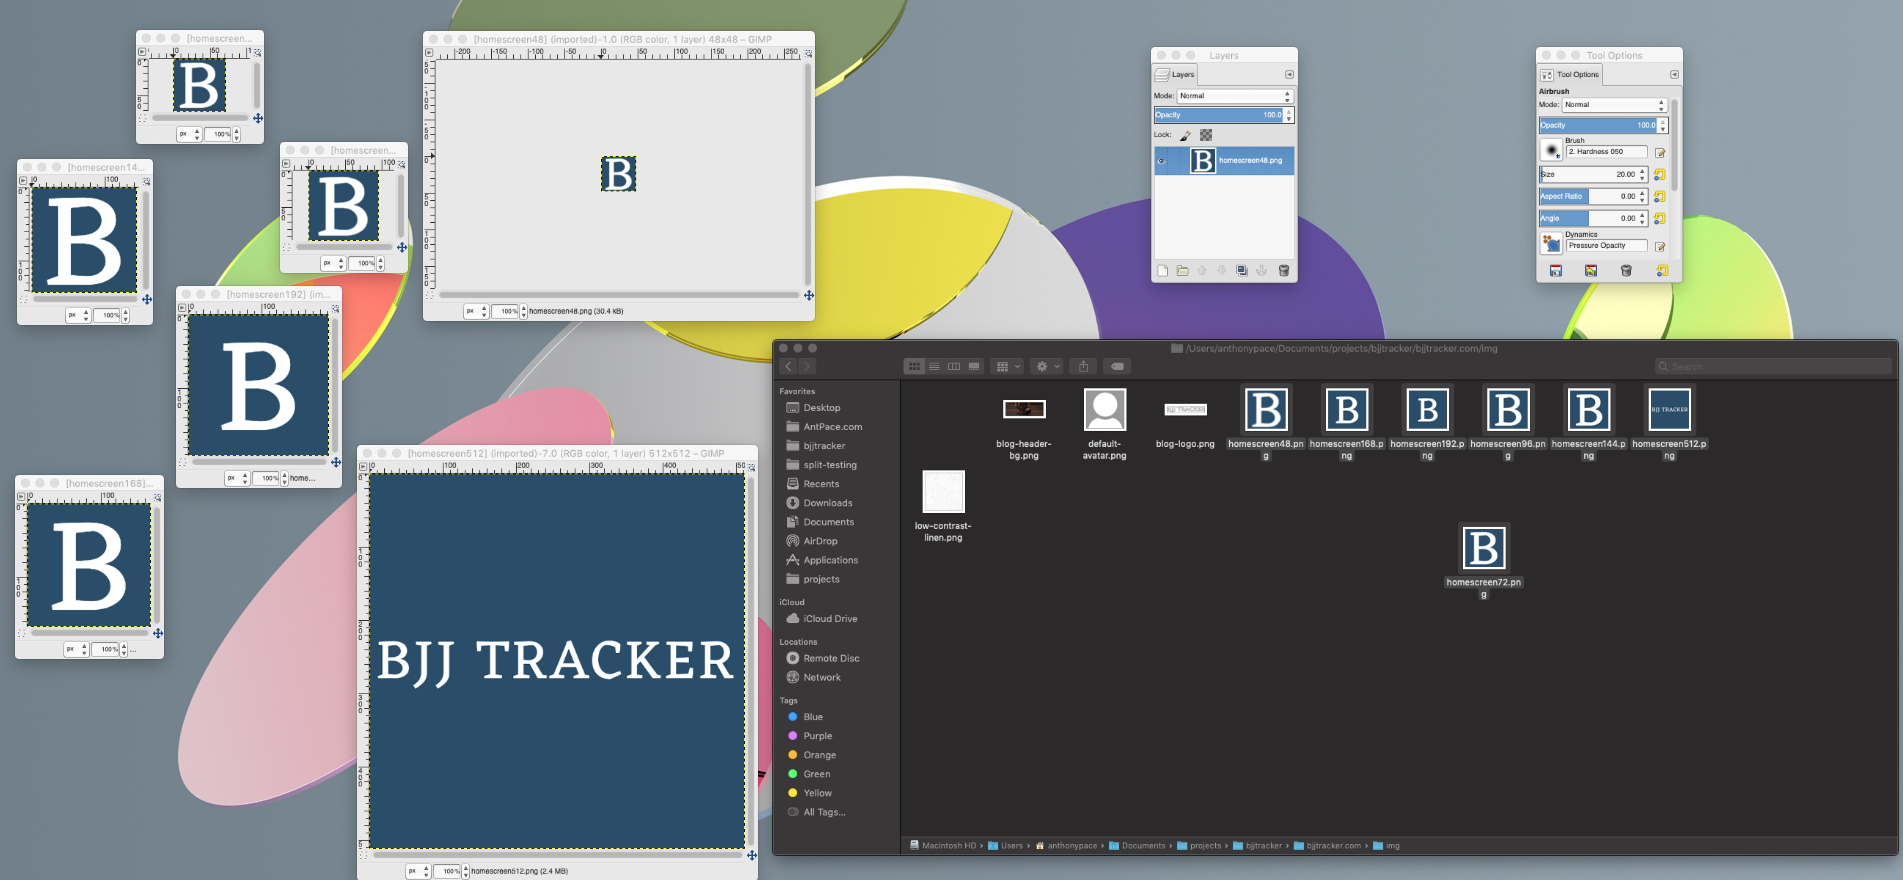
Next, I created a “manifest” file. This file is written in JSON format. It helps describe how the web-app behaves once “installed”. It handles things such as app icon images and meta data.
The manifest needs to be referenced by the app. I added a link tag to a shared <head> file. Additionally, I included a few other meta tags that let browsers know to treat this website as an app.
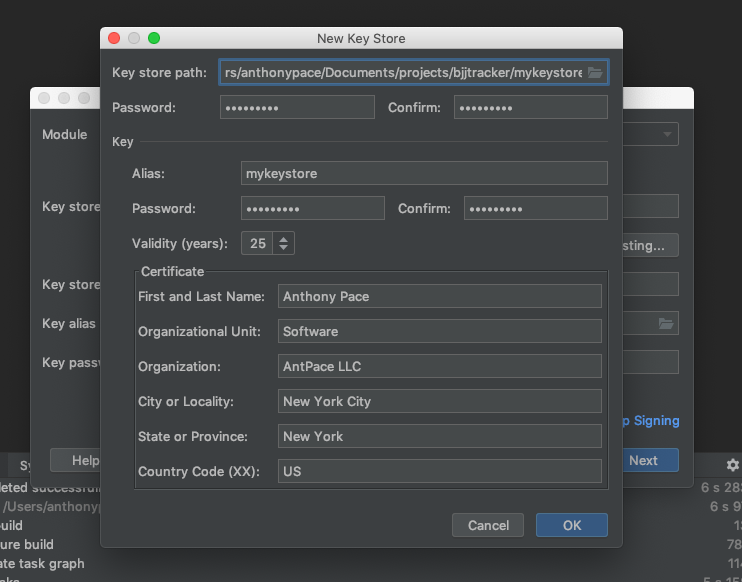
When creating the app bundle (“Build > Generate Signed Bundle/APK”) we’ll need a signing key. I created a new one, and named the file mykeystore.keystore.
That command shows us the certificate fingerprints. Copy the SHA256 value. It is used with Google’s Statement List Generator to create the contents of the assetlinks.json file. The statement file is then placed in a “.well-known” directory on the root of our PWA domain (eg.https://www.bjjtracker.com/.well-known/assetlinks.json)
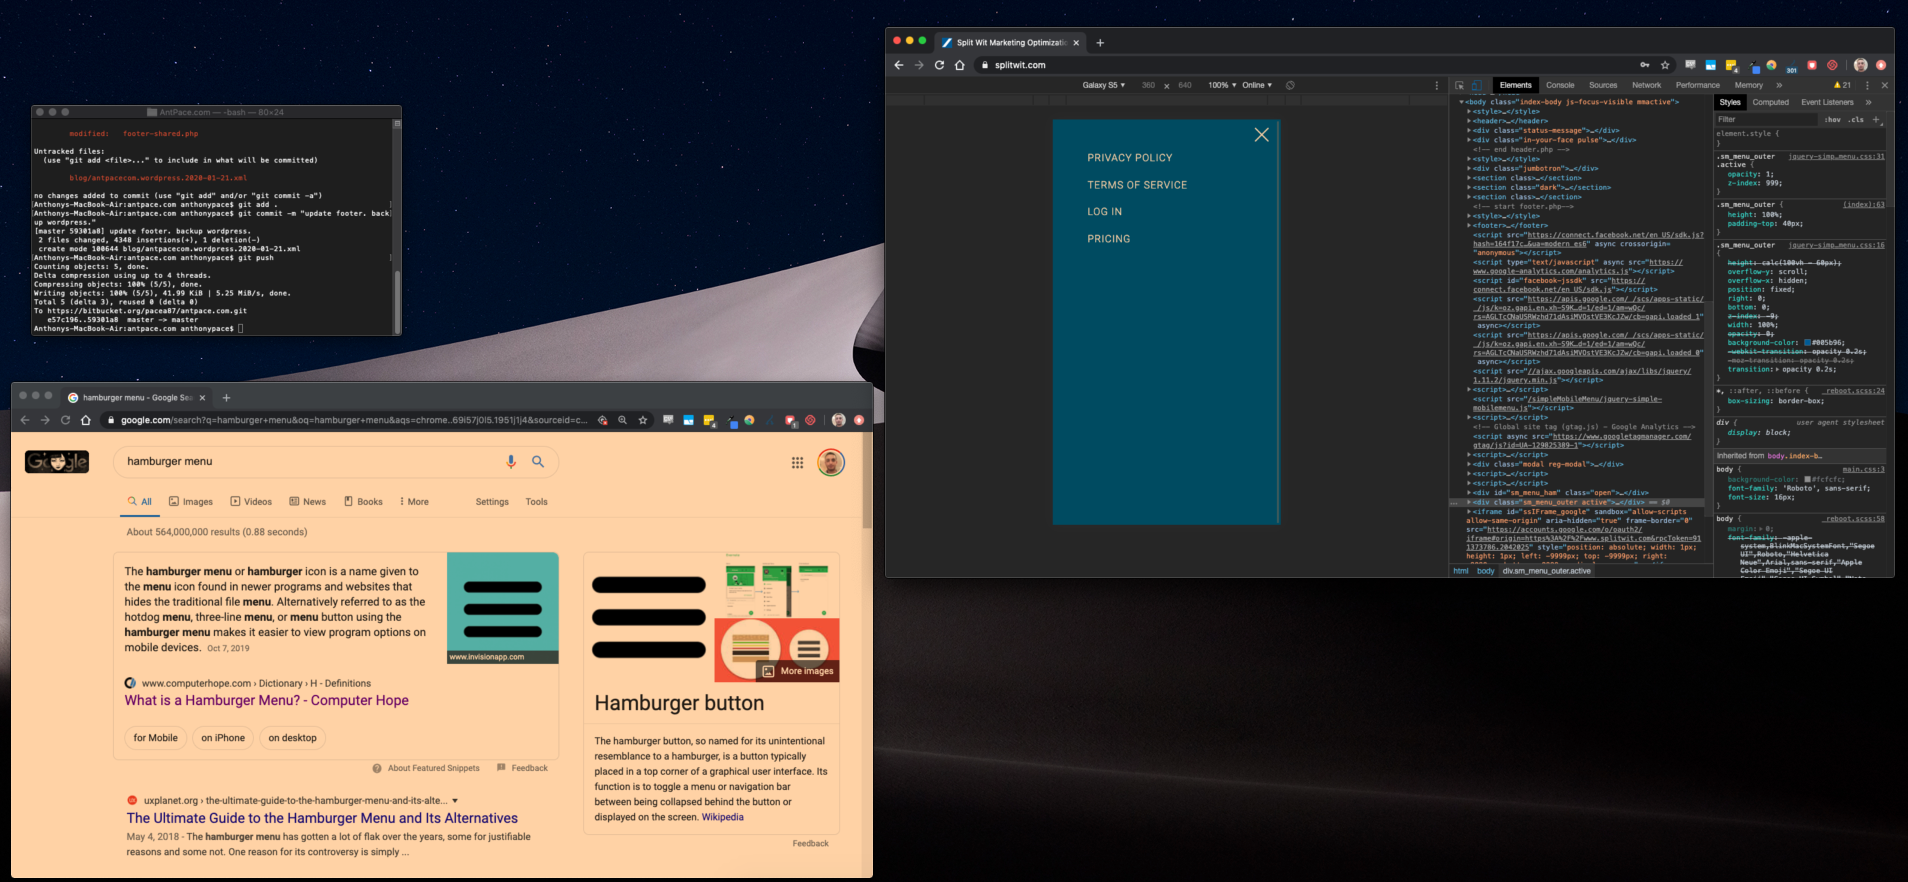
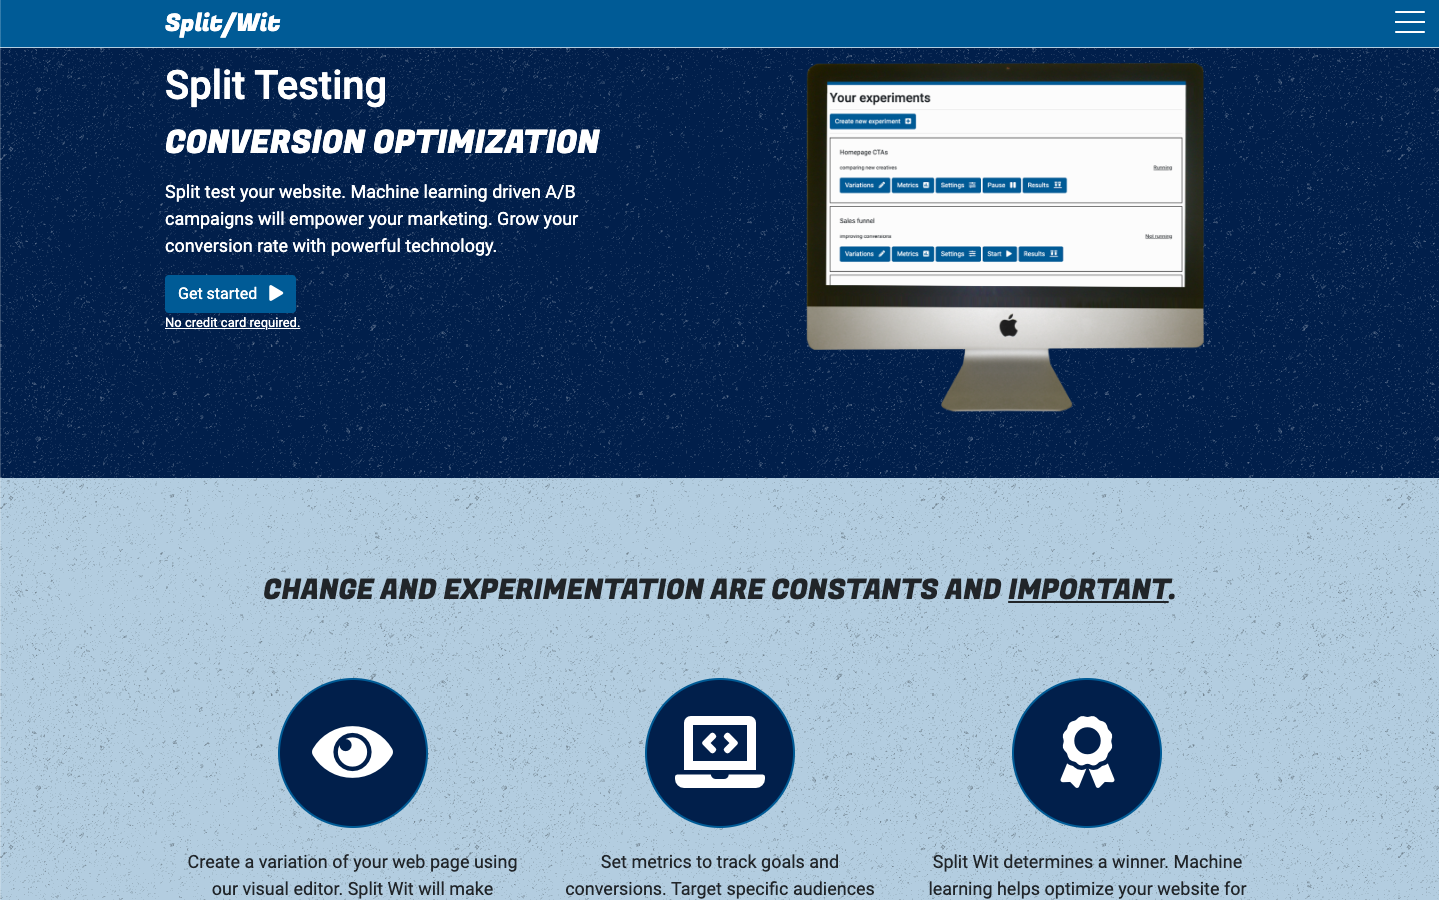
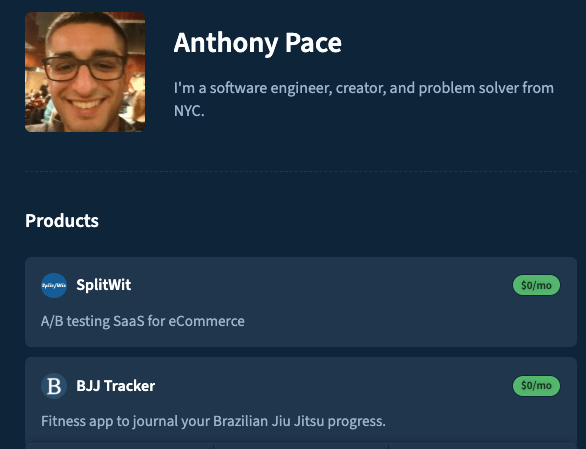
This app is a side project I use to toy with new web technologies. I’m trying to drive traffic to it so that I can experiment with optimizing conversions. I’m using it as a trial grounds for another software service called SplitWit. SplitWit is focused on optimizing conversions for the web, and helping digital marketers reach their goals. You can read about it on another post from this blog.
SplitWit is a digital product. It is a “software as a service” platform that helps split test websites and apps. That means it allows us to make changes to a website, that only half of visitors will see, and then determine which version has better results (sales, sign-ups, etc.).
The front-end design utilizes basic principles that focus on user experience. I iterated through various color pallets, and ended with a blue-shaded scheme. Subtle textured patterns applied to background sections help add a finished look. And of course, FontAwesome is my go-to icon set.
https://www.SplitWit.com
I used a CSS rule on the main container of each page to have a minimum height of 100% of the viewport. This ensures that the page footer doesn’t end up in the middle of the screen if there is not enough content.
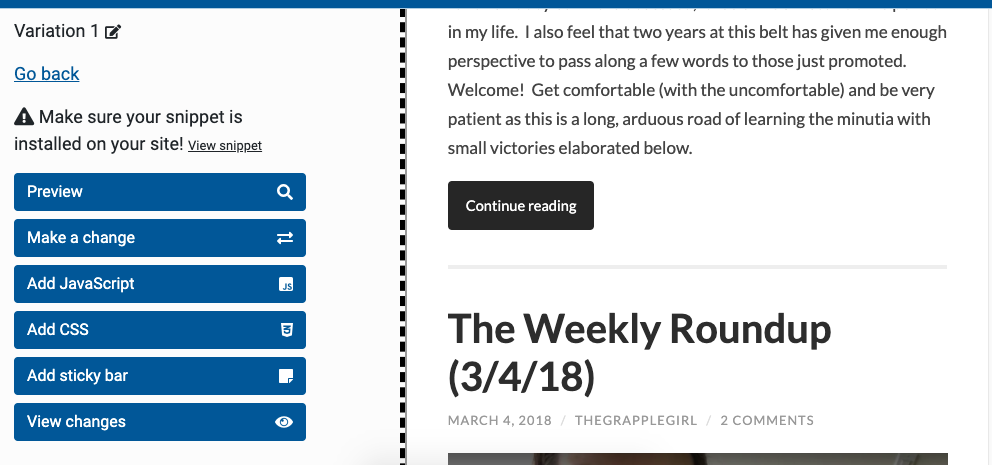
After setting up an account, users can create experiments that target certain pages of a website. The visual optimizer lets changes be made easily between the control and variation versions.
The editor loads up a website as an iFrame on the right side of the page. Once a page is loaded, SplitWit adds an overlay to the iFrame. This way, instead of interacting with the page, clicks can be intercepted. Any elements that get clicked are loaded up as HTML into the “make a change” section of the editor. Any changes made are saved to that variation, and will be displayed to half of visitors.
Here is an example of the code that powers the overlay and connects it to the editor:
The editor has lots of built in options, so users can change the style and behavior of a page without needing to know how to code. A marketer can use this tool without the help of a developer.
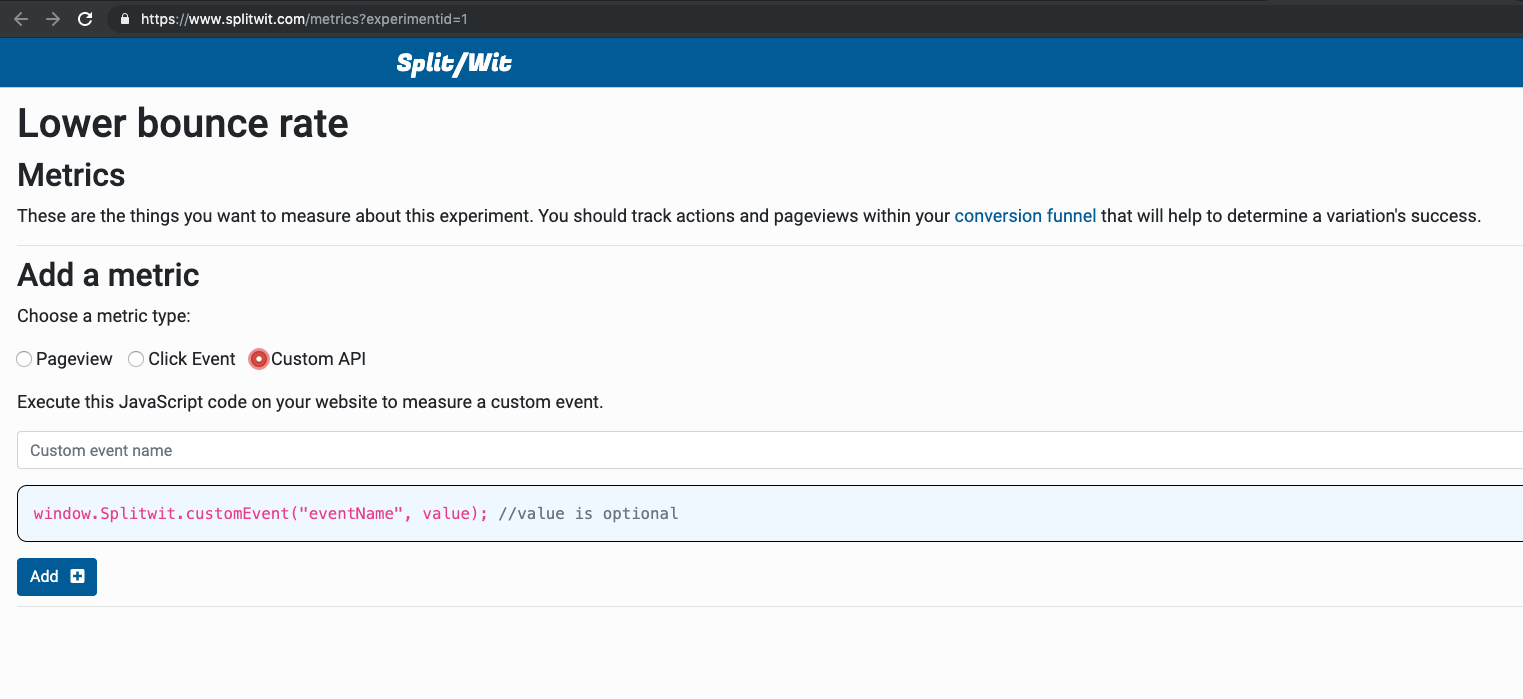
Metrics and statistical significance
A key feature of SplitWit is to measure conversion metrics and performance indicators. The platform determines which variation is a winner based on the metrics set. Three types of metrics are offered: page views, click events, and custom API calls.
Algorithms calculate statistical significance based on the number of visitors an experiment receives and the conversion metrics configured. This makes sure that the result is very unlikely to have occurred coincidently.
The code snippet
Each project setup in SplitWit generates a code snippet. Once this snippet is added to a website, SplitWit is able to do its magic. Using JavaScript, it applies variation changes, splits user traffic between versions, and measures key metrics about the experiments running.
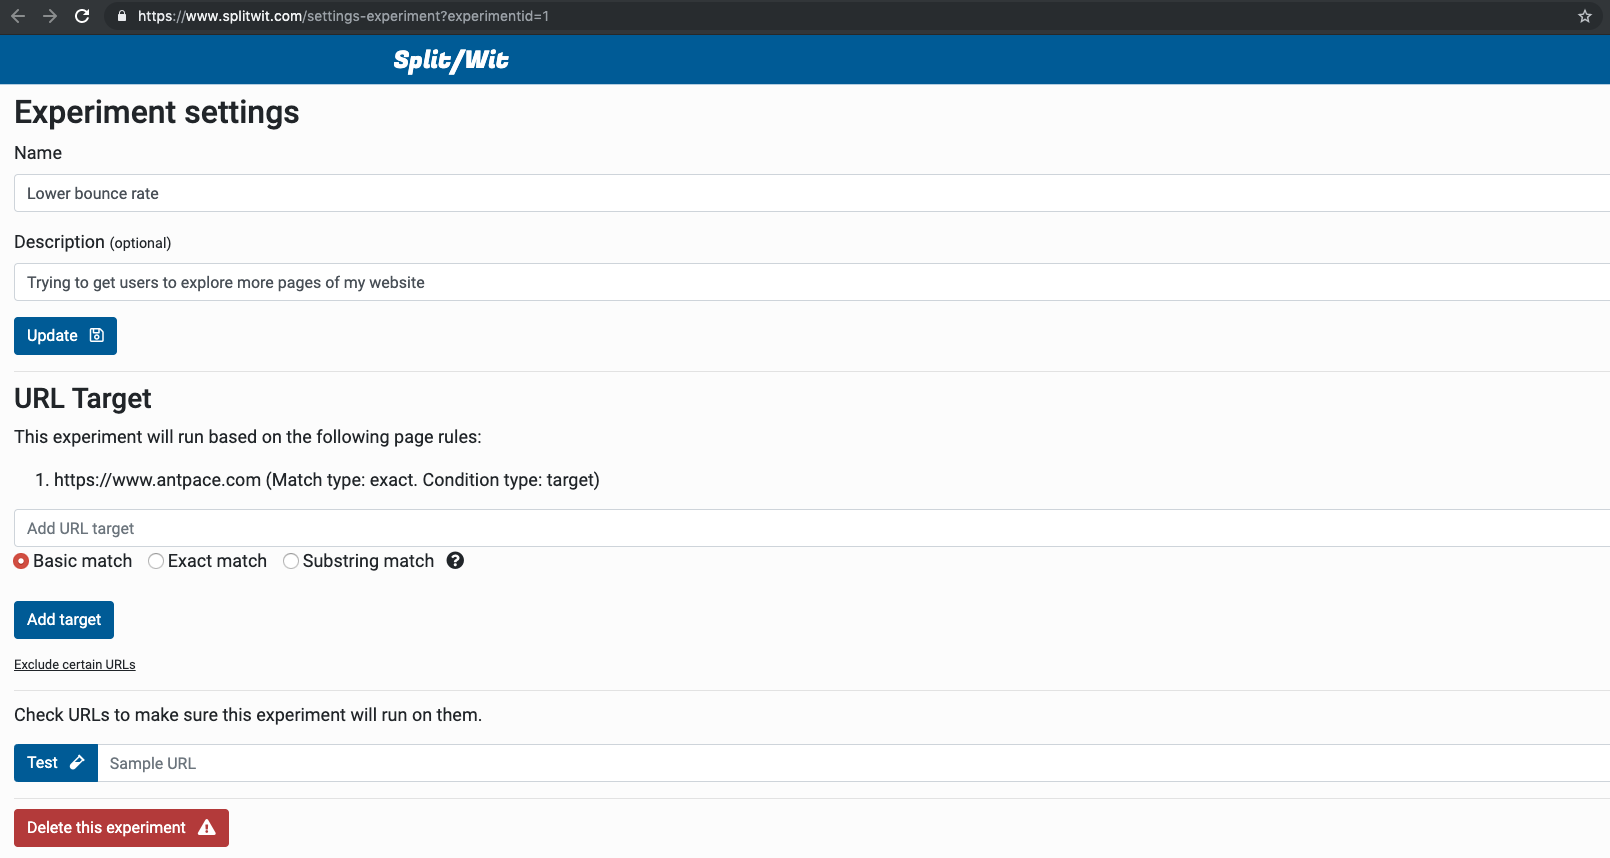
The platform uses a relational database structure. As changes are made to experiments, the details are saved and written to a unique snippet file. When the snippet file loads, the first thing is does is check to see if there are any experiments that should be running on the current page. Each experiment can be configured to run on various URLs. The configuration rules contain three parts: a URL pattern, a type (target or exclude), and a match type (exact, basic, or substring). You can read SplitWit documentation to find an explanation of these match types.
Here is the code used to test a URL against an experiment’s configuration rules:
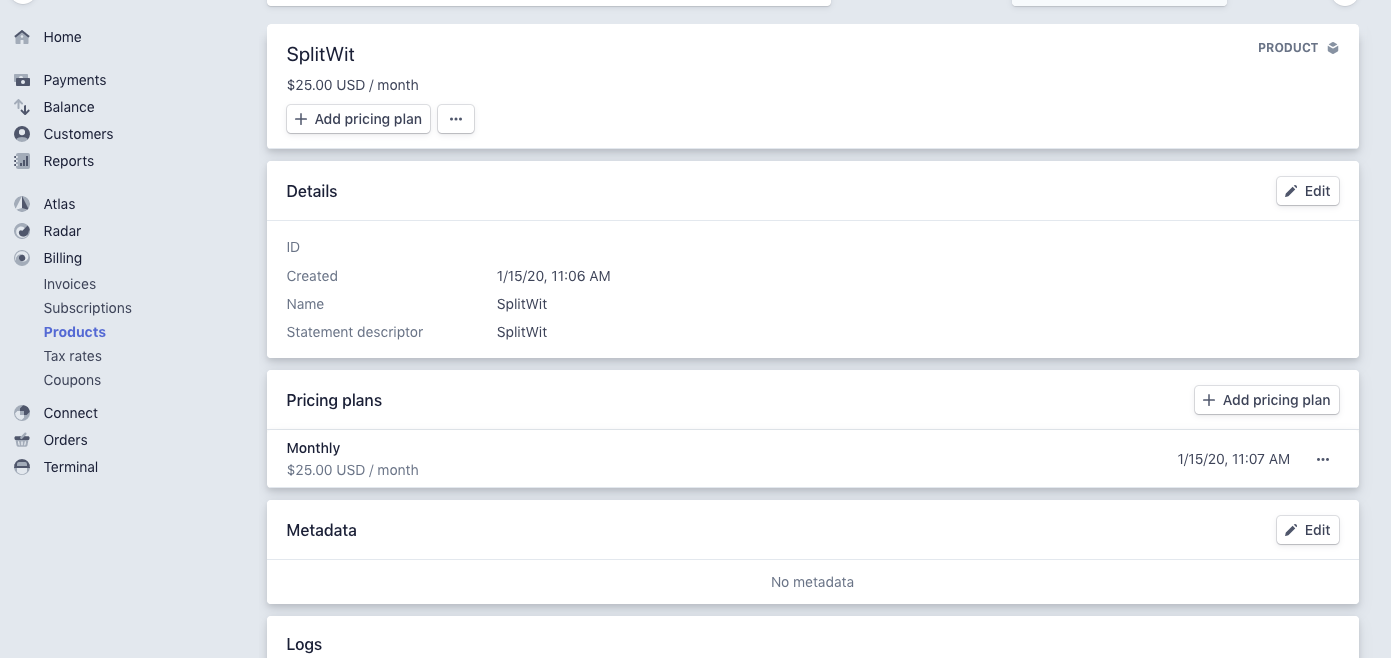
Stripe is used to bill customers. In the billing dashboard we can create a product, and assign it a monthly pricing plan.
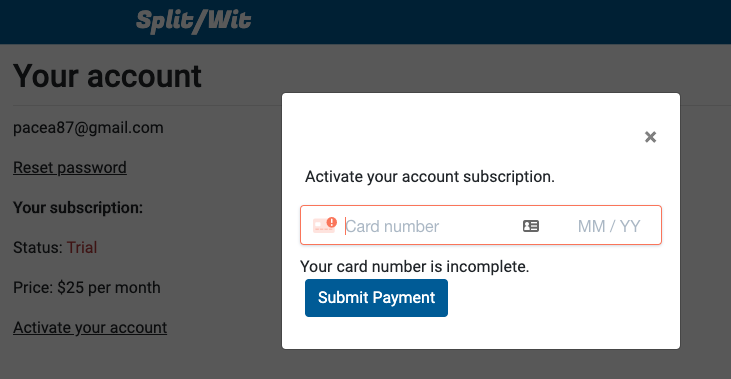
The payment processor handles re-billing customers each month. Our software is responsible for keeping track of each account’s payment status. In the database we record the date of when an account will be considered delinquent. Upon registration each account has this field set to 15 days in the future, affording a two week trial. At this point, users have not entered any credit card information.
Initial payment
Stripe’s JavaScript SDK is used during initial payment to tokenize credit card information before passing it along to the server.
Stripe’s JS library handles card validation and tokenization.
Below is the HTML used for a Stripe payment element:
<div id="stripe-payment-modal" class="modal stripe-payment-modal" style="display: none;">
<!-- Modal content -->
<div class="modal-content">
<p>
<button type="button" class="dismiss-modal close" >×</button>
</p>
<p>Activate your account subscription.</p>
<form id="payment-form">
<div class="form-row">
<!-- <label for="card-element">
Credit or debit card
</label> -->
<div id="card-element">
<!-- A Stripe Element will be inserted here. -->
</div>
<!-- Used to display Element errors. -->
<div id="card-errors" role="alert"></div>
</div>
<button type="button" class="btn submit-payment">Submit Payment</button>
</form>
</div>
</div>
And the JavaScript:
<script src="https://js.stripe.com/v3/"></script>
<script type="text/javascript">
var stripe = Stripe('your-public-key-goes-here');

var elements = stripe.elements();

// Custom styling can be passed to options when creating an Element.
var style = {
  base: {
    color: '#32325d',
    fontFamily: '"Helvetica Neue", Helvetica, sans-serif',
    fontSmoothing: 'antialiased',
    fontSize: '16px',
    '::placeholder': {
      color: '#aab7c4'
    }
  },
  invalid: {
    color: '#fa755a',
    iconColor: '#fa755a'
  }
};

// Create an instance of the card Element.
var card = elements.create('card', {style: style});

// Add an instance of the card Element into the `card-element` div.
card.mount('#card-element');

// Handle real-time validation errors from the card Element.
card.addEventListener('change', function(event) {
  var displayError = document.getElementById('card-errors');
  if (event.error) {
    displayError.textContent = event.error.message;
  } else {
    displayError.textContent = '';
  }
});

// Handle form submission.
var form = document.getElementById('payment-form');
form.addEventListener('submit', function(event) {
  event.preventDefault();

  stripe.createToken(card).then(function(result) {
    if (result.error) {
      // Inform the user if there was an error.
      var errorElement = document.getElementById('card-errors');
      errorElement.textContent = result.error.message;
    } else {
      // Send the token to your server.
      stripeTokenHandler(result.token);
    }
  });
});

// Submit the form with the token ID.
function stripeTokenHandler(token) {
  // Insert the token ID into the form so it gets submitted to the server
  var form = document.getElementById('payment-form');
  var hiddenInput = document.createElement('input');
  hiddenInput.setAttribute('type', 'hidden');
  hiddenInput.setAttribute('name', 'stripeToken');
  hiddenInput.setAttribute('value', token.id);
  form.appendChild(hiddenInput);

  var data = $("#payment-form").serialize();
  $.ajax({
  	url:"stripe-payment-service.php",
  	method: "POST",
  	data: data,
  	complete: function(response){
  		console.log(response);
  		window.location.reload();
  	}
  })
}

$(".submit-payment").click(function(){
	stripe.createToken(card).then(function(result) {
    if (result.error) {
    	// Inform the customer that there was an error.
    	var errorElement = document.getElementById('card-errors');
    	errorElement.textContent = result.error.message;
    } else {
	$(".submit-payment").attr("disabled", "disabled").html('Working...');
      	// Send the token to your server.
      	stripeTokenHandler(result.token);
    }
  });
});
</script>
The above code creates a new Stripe object using a public API key. That object injects a credit card form into our ‘#card-element’ div, with custom styles attached. It listens for any changes, and displays validation errors. When the form is submitted, the Stripe object creates a token from the payment information. That token is passed to our back-end. Stripe’s PHP library is used to finish the transaction:
<?php
function subscribe(){
        require_once('stripe-php-6.43.0/init.php');
        \Stripe\Stripe::setApiKey('sk_XXXX');
	$stripe_token = $_POST['stripeToken'];
	$conn = $this->connection;

	if(isset($_SESSION['email'])){
		$email = $_SESSION['email'];
	}else{
		die("No email found.");
	}

	if(strlen($email)>0){
		$sql = "SELECT * FROM `account` WHERE email = ?";
		$result = $conn->prepare($sql);
		$result->execute(array($email));
		$row = $result->fetch(PDO::FETCH_ASSOC);
	}
	$customer_id = $row['stripe_customer_id'];
	//check if this account already has a stripe_customer_id
	if(strlen($customer_id) < 1){
		//if not, create the customer
		$customer = \Stripe\Customer::create([
		  'email' => $email,
		  'source' => $stripe_token,
		]);
		$customer_id = $customer['id'];
		//write stripe ID to db
		$sql = "UPDATE `account_table` SET stripe_customer_id = ? WHERE email = ?";
		$result = $conn->prepare($sql);
		$result->execute(array($customer_id, $email));
	}

	// Create the subscription
	$subscription = \Stripe\Subscription::create([
	  'customer' => $customer_id,
	  'items' => [
	    [
	      'plan' => 'plan_XXX', //setup in Stripe dashboard.
	    ],
	  ],
	  'expand' => ['latest_invoice.payment_intent'],
	  'billing_cycle_anchor' => time()
	]);
	$subscription_status = $subscription['status'];
	$subscription_id = $subscription['id'];
	if($subscription_status == "active"){
		//set current_period_end to 32 days (1 month plus some leeway) in the future. set past_due as false
		$sql = "UPDATE `account_table` SET stripe_subscription_id = ?, current_period_end = ?, past_due = 0 WHERE email = ?";
		$result = $conn->prepare($sql);
		$past_due = false;
		$current_period_end = new DateTime;
		$current_period_end->modify( '+32 day' );
		$current_period_end = $current_period_end->format('Y-m-d H:i:s');
		$result->execute(array($subscription_id, $current_period_end, $email));
	}

}
?>
On the server side our secret API key is used. A customer record is created in Stripe using the payment token and user’s email. The Stripe customer ID is then used to create a subscription. We record the the customer ID and subscription ID to our database. The account’s new subscription period end is updated to 32 days in the future.
Cancel a subscription
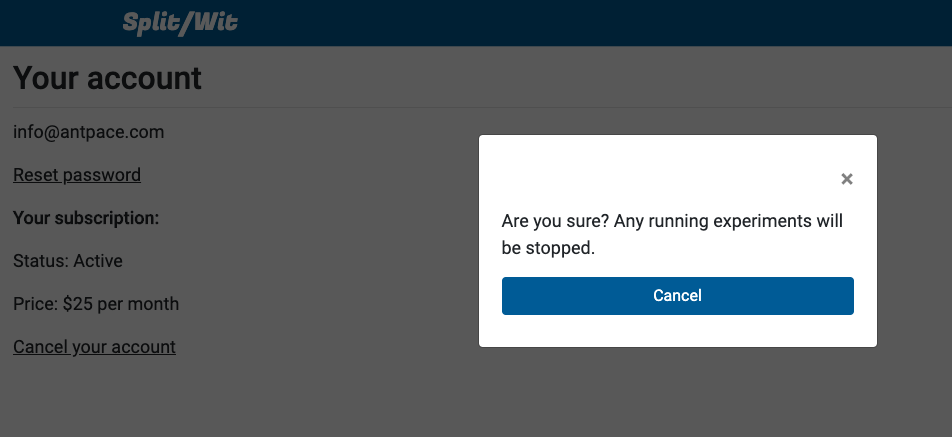
The user is able to cancel their subscription from the SplitWit account dashboard.
We retrieve their subscription from Stripe, and cancel it, using their subscription ID. They will no longer be billed. We update our database to turn off the account’s experiments, delete any Stripe details, mark their subscription as delinquent, and re-write their snippet file.
<?php

function cancelSubscription(){
	require_once('stripe-php-6.43.0/init.php');
        \Stripe\Stripe::setApiKey('sk_XXXX');

	$conn = $this->connection;
	if(isset($_SESSION['userid'])){
		$accountid = $_SESSION['userid'];
	}else{
		die("No userid found.");
	}

	if(strlen($accountid)>0){
		$sql = "SELECT * FROM `account` WHERE accountid = ?";
		$result = $conn->prepare($sql);
		$result->execute(array($accountid));
		$row = $result->fetch(PDO::FETCH_ASSOC);
	}
	$stripe_subscription_id = $row['stripe_subscription_id'];
	$subscription = \Stripe\Subscription::retrieve($stripe_subscription_id);
	$subscription->cancel();

	//turn off experiments and update snippets. clear stripe IDs. set current_period_end to yesterday. set past_due = 1
	$current_period_end   = new DateTime;
	$current_period_end->modify( '-1 day' );
	$current_period_end = $current_period_end->format('Y-m-d H:i:s');
	$sql = "UPDATE `account` SET stripe_customer_id = '', stripe_subscription_id = '', past_due = 1, current_period_end = ? WHERE accountid = ?";
	$result = $conn->prepare($sql);
	$result->execute(array($current_period_end, $accountid));

	//turn off all experiments
	$status = "Not running";
	$sql = "UPDATE `experiment` set status = ? where accountid = ?";
	$result2 = $conn->prepare($sql);
	$result2->execute(array($status, $accountid));

	//update all snippets for this account (1 snippet per project)
	$sql = "SELECT * FROM `project` WHERE accountid = ?";
	$result3 = $conn->prepare($sql);
	$result3->execute(array($accountid));
	$rows3 = $result3->fetchAll(PDO::FETCH_ASSOC);
	foreach ($rows3 as $key3 => $value3) {
		$projectid = $value3['projectid'];
    	        $databaseProjectService = new DatabaseProjectService();
		$databaseProjectService -> writeSnippetFile(false, false, $projectid);
	}

	$this->status = "complete";
}

?>
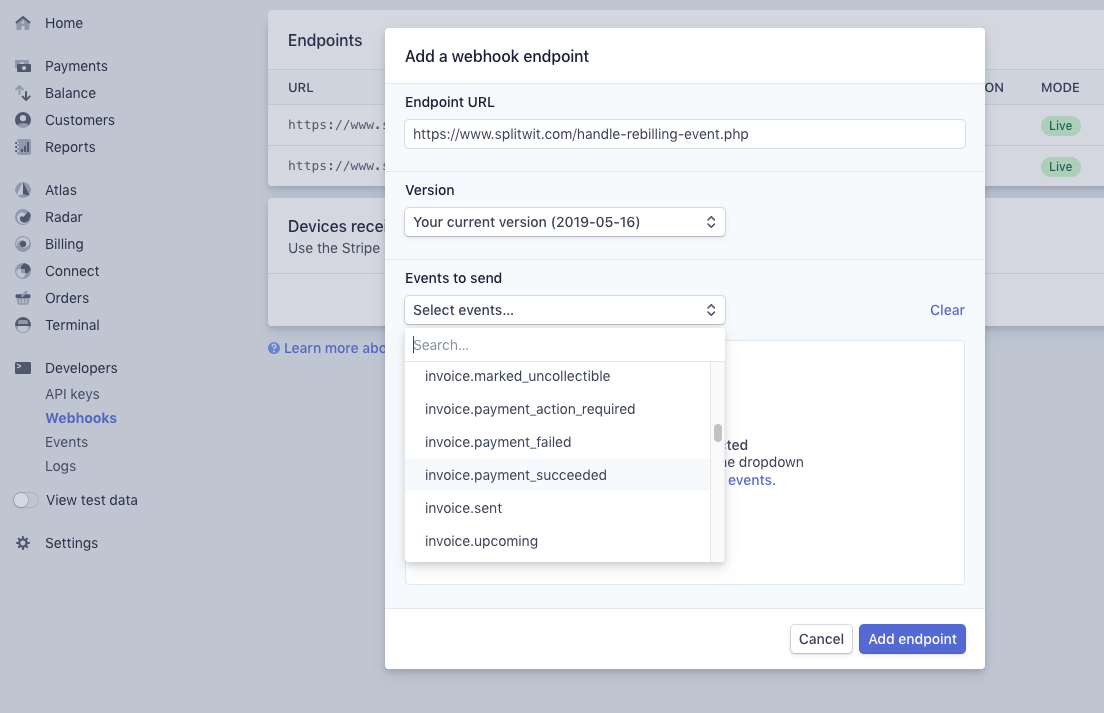
Re-billing subscriptions
As long as an account has an active subscription in Stripe, they will be automatically re-billed each month. When this event takes place, Stripe can deliver data about it to an end-point of our choice (commonly known as a webhook).
SplitWit listens for an event called “invoice.payment_succeeded”, which occurs when a customer’s monthly payment is successful. When that happens the account’s subscription period end is updated to 32 days in the future.
What if payment fails or never happens? The account’s subscription period end never gets updated.
A daily scheduled task checks each active account’s subscription period end date. If that date is in the past, we mark the account as past due, turn off all experiments, and update its snippet files.
The value of experimentation
Driving digital conversions is a science. Experimentation should be a constant exercise in this respect. Take any field and we can benefit from testing the waters and adjusting our sail. Our ability to interpret that data is the bottle neck to making good decisions. The best lesson I’ve learned is that intuition is usually not enough. It’s better to look at the numbers and trust data.
Influencing users through a funnel of action, finally leading to a conversion, is a challenge. Optimizing conversions, sales, and leads can be broken down into a system based approach. SplitWit focuses on that point.
When writing about digital problem solving, I tell stories about past projects. On top of a tech perspective, I also dig into the business, design, marketing, and inter-personal aspects. I’ve been fortunate enough to have a wide breadth of tech experience through my career. It has helped me dive deep into principles and ideas about building digital products. This range of experience was afforded by continually pursuing new work. Finding room for side projects and extra gigs is a great way to grow.
After a daily, hour-long commute I could barely sneak an hour or two for my creative projects and side gigs. But I always did. Side projects were often for paying clients, but sometimes just for fun. They would include not just programming, but also design, marketing, networking, and infrastructure. On top of this, I always made sure my hobbies would serve my overall goals. Reading good books, playing quality games, and being physically competitive all lead to a better life and career.
The key take-away is to work on a variety of projects. Be ready to try different technologies and new platforms. In general, keep trying new things.
Understand infrastructure. Survive some horror stories.
Web infrastructure and hosting setup are skills often missed out on by both casual programmers and professionals. Configuring domain names, email, web hosting, and load balancers is usually reserved for system administrators. Working as one-stop-shop, on your own or in a company, can give you the opportunity to manage all of these details.
I’ve gotten to work with many third-party services and vendors. I’ve seen the good and the bad, and even worse. AWS (Amazon Web Services) has been the best infrastructure provider that I have used. I’ve had horrible experiences from other companies.
Once having had my web servers infected by ransom-ware, HostGator wanted to charge nearly a thousand dollars, to solve the problem. This was the only solution they offered while multiple web properties were infected and out of commission. I fixed the issue myself in less than a few hours by purging all data from the servers and redeploying source code from version control. That was a nightmare.
Another time servers provided by OLM went down for multiple days. This was in 2014. During this time, they wouldn’t answer telephones, letting them ring. I stood on hold for at least 30 minutes, multiple times per day trying to get through. After nearly a week, things started working again, with no explanation provided. That was one of the most unprofessional experiences of my career. I will forever shout them out about this.
Get your hands dirty
Looking forward, I’m excited to explore more of AWS. I’m currently learning through online courses from Udemy: “Certified Solutions Architect” and “Certified Developer”, and plan to take the certification tests. Next, I want to jump into their “Machine Learning” and “Internet of Things” services.
I regularly use AWS services for cloud computing, storage, and databases. My go-to for a new project is to spin up a EC2 instance. If I know I’m using WordPress, I may use a Bitnami AMI. Other times, I’ll create a basic Linux box, and setup Apache, MySql, and PHP myself. Here is the documentation I regularly reference: Install a LAMP Web Server on Amazon Linux 2. This process usually includes configuring a domain name, and setting up SSL: Configure SSL/TLS on Amazon Linux 2.
I’ll continue this post as a series. I plan tell stories about my experiences in building digital products. I’ll cover topics such as design, marketing software, customization, and APIs. Follow me on Instagram for regular updates: @AntPace87
Working at an agency for years
For many years I worked a software development agency that specialized in start-ups. It had a close partnership with a private equity firm in Manhattan. During that time I really learned the proper way to work in a team as a software engineer practicing agile project management methodology. The office was co-located on 5th avenue in a shared services dynamic with well-funded start-ups. I got to build the tech for companies across industries. I will continue to recall and write about those experiences here.
Building my own digital products
I’ve written blog posts about the products I’ve built, launched, and marketed. I’ll reference them here. Also, you can find them on Indie Hacker.
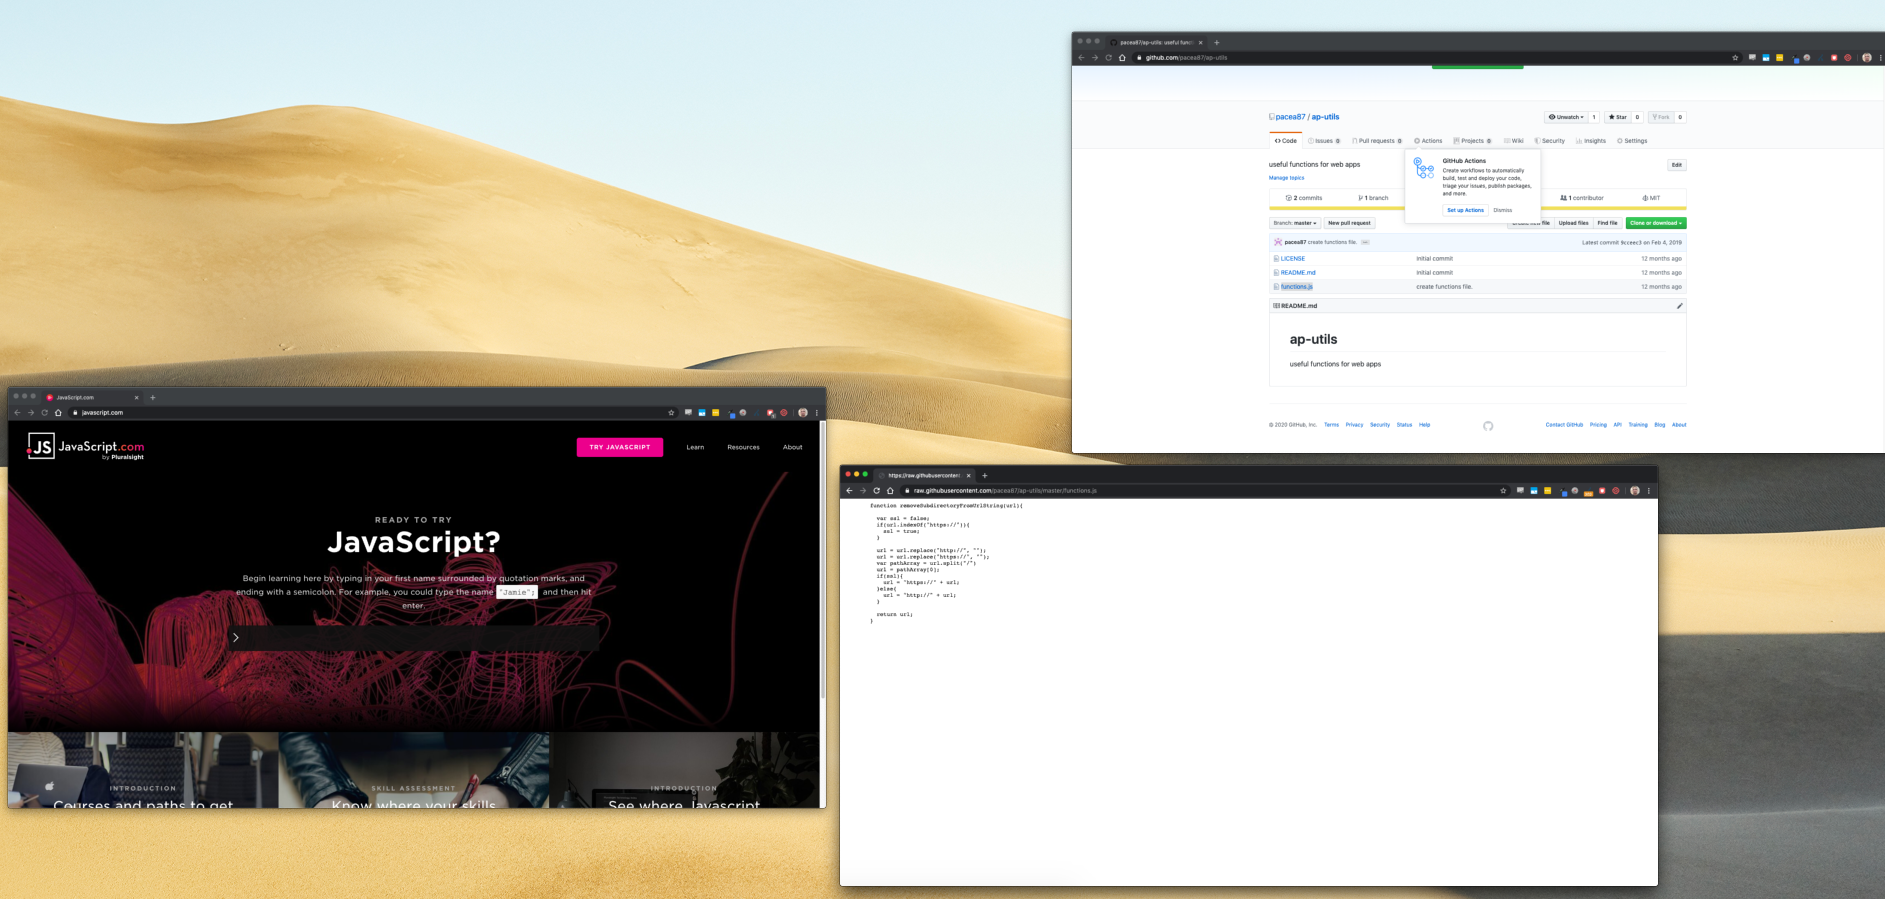
I use GitHub to manage code that I’ll want to re-use. I had trouble finding a canned function to remove the subdirectory path from a URL string – so I wrote one and added it to my latest public repository: https://github.com/pacea87/ap-utils
I’ll keep adding useful code to it – and feel free to make a pull request and contribute yourself. This code should focus on utility functions for manipulating data in interesting ways. Below is the JavaScript code for removing the subdirectories from a URL string. This will also strip away any query string parameters.
Now, you can get the current page’s URL, and strip off everything after the host name:
var url = window.location.href;
var baseUrl = removeSubdirectoryFromUrlString(url);
console.log(baseUrl);
Another example:
var url = "https://www.antpace.com/blog/index.php/2018/12/";
var baseUrl = removeSubdirectoryFromUrlString(url);

//This will return "https://www.antpace.com"
console.log(baseUrl);
I used this code to re-write all URL references in an iFrame to be absolute. My implementation loops through all image, anchor, and script tags on the source site. It determines if each uses an absolute reference, and if not re-writes it as one. This was part of a project that uses a visual editor to allow users to manipulate a remote site. Check out my source code below.
pageIframe.contents().find("img").each(function(){
  var src = $(this).attr("src");
  if(src && src.length > 0 && src.indexOf("//") == -1){  //if not absolute reference
    var url = iframeUrlString;
    if(src.charAt(0) == "/"){ //only do this if the src does not start with a slash
      url = removeSubdirectoryFromUrlString(url);
    }
    src = url+"/"+src
  }
  $(this).attr("src", src);
});

pageIframe.contents().find("script").each(function(){
  var src = $(this).attr("src");
  if(src && src.length > 0 && src.indexOf("//") == -1){
    var url = iframeUrlString;
    if(src.charAt(0) == "/"){
      url = removeSubdirectoryFromUrlString(url);
    }
    src = url+"/"+src
  }
  $(this).attr("src", src);
});

pageIframe.contents().find("link").each(function(){
  var src = $(this).attr("href");
  if(src && src.length > 0 && src.indexOf("//") == -1){
    var url = iframeUrlString;
    if(src.charAt(0) == "/"){
      url = removeSubdirectoryFromUrlString(url);
    }
    src = url+"/"+src
  }
  $(this).attr("href", src);
});