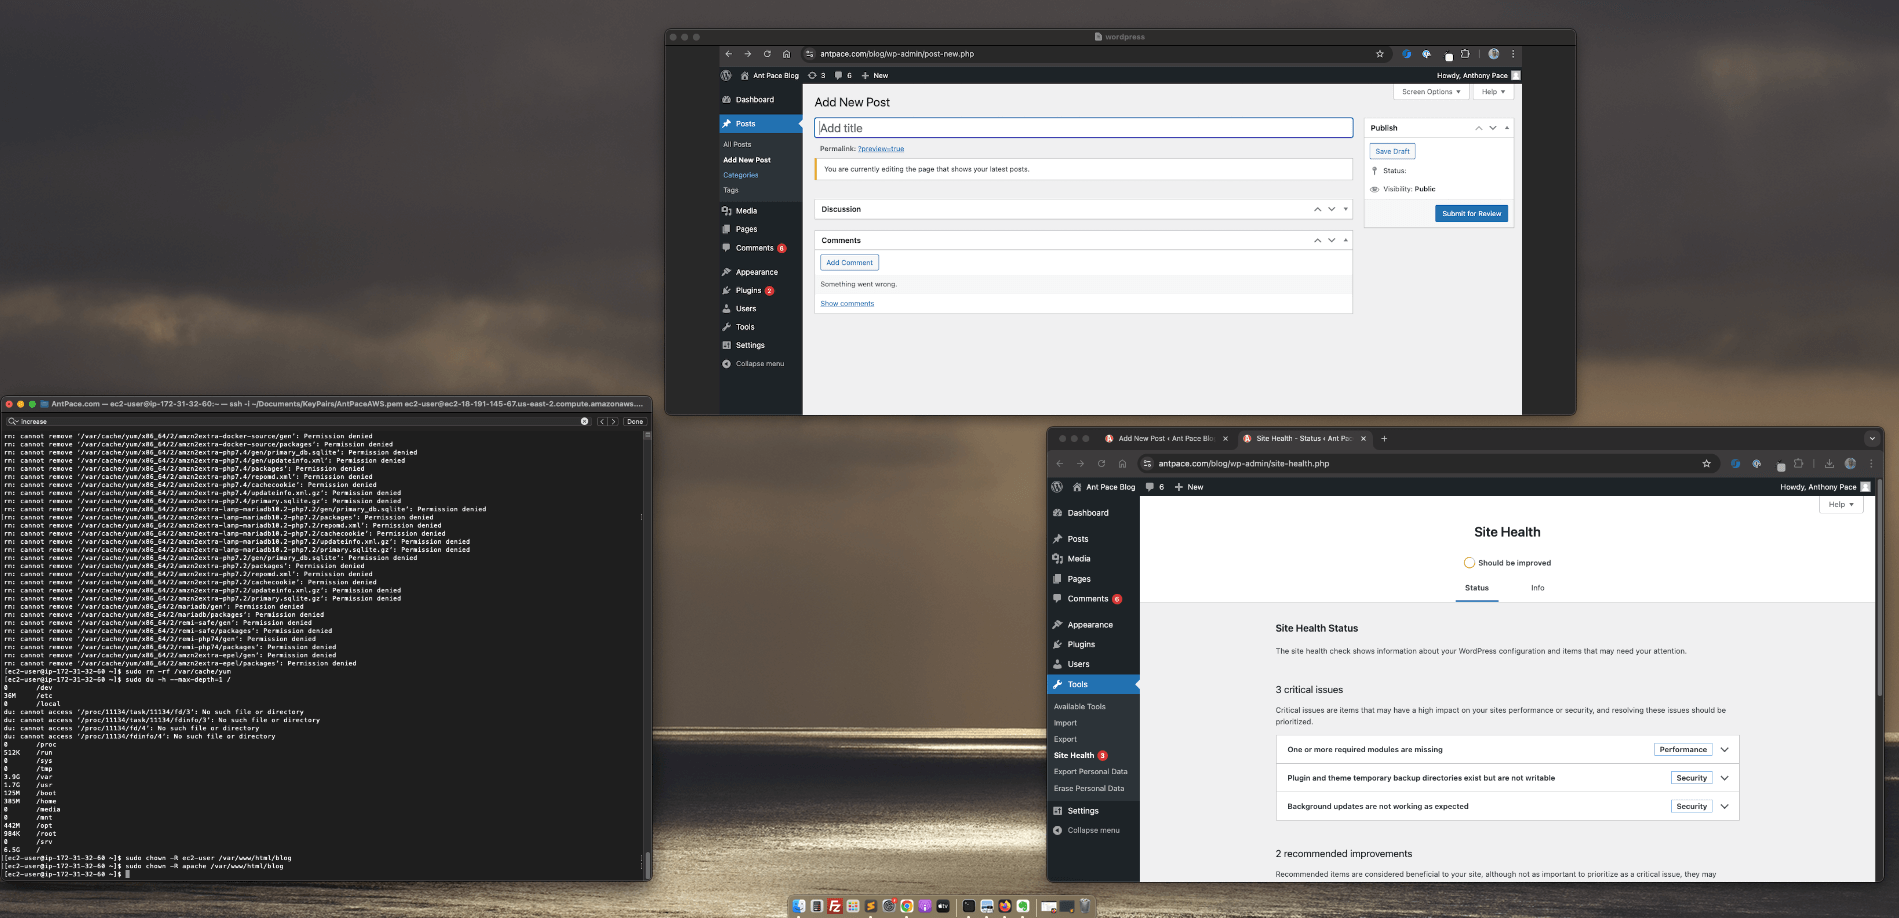
I run this website on a t2.micro EC2 instance. It only has 8 gigabytes of storage space. The blog runs on WordPress. I tried creating a new post recently, but it wouldn’t let me publish.
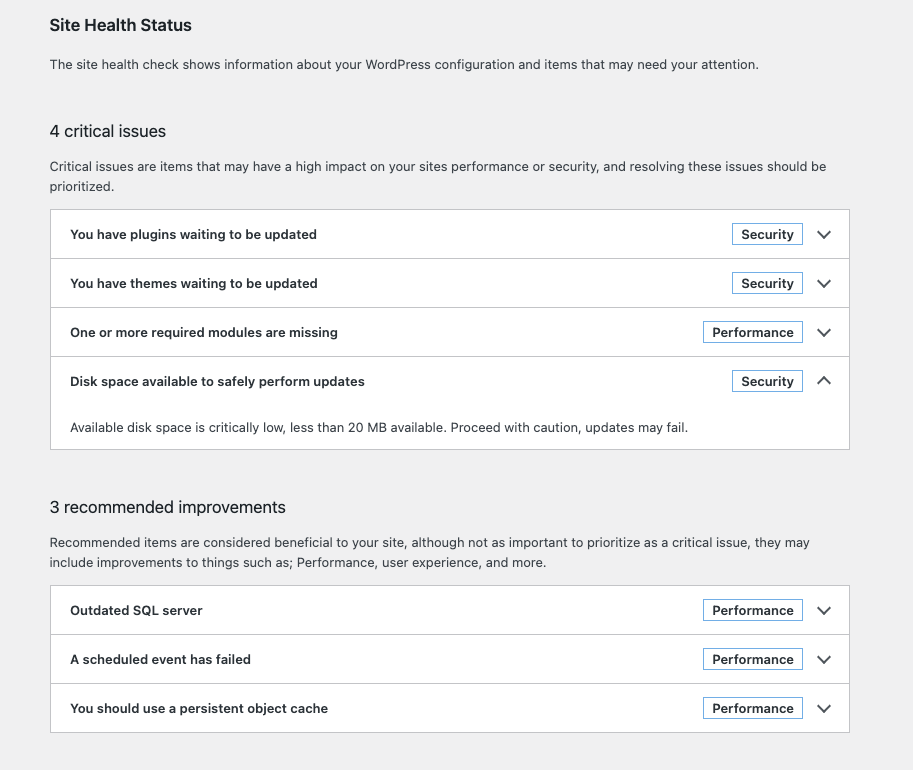
A vague message told me I was “editing the page that shows your latest posts” – even though I wasn’t. I checked the dashboard site health, and noticed that somethings needed updating, but disk space was critically low.
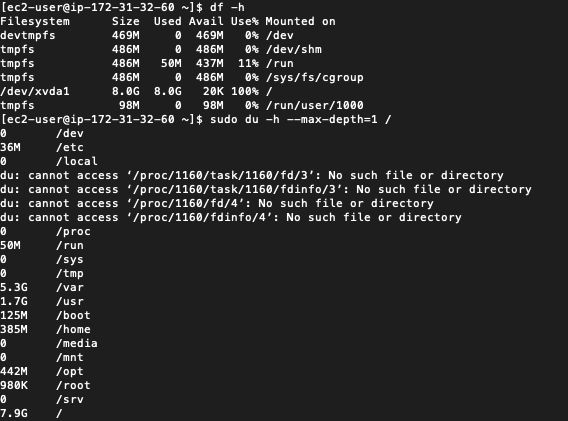
I SSH’d into the instance was able to confirm that 100% of the 8 gigabytes was in use: `df -h`
I was able to use the ‘disk usage’ command to drill down and find large directories: ‘sudo du -h –max-depth=1 /var’. I was able to clean up unused yum packages, logs, and cache to clear up over a gigabyte of space.
sudo journalctl --vacuum-size=100M
sudo yum clean all
rm -rf /var/cache/yum
It looks like there are some database files that could be cleaned up too, but I’ll wait for now. I think my next course of action, when this inevitably happens again, will be to increase my disk space by expanding my EBS volume and resizing the file system.
Playing with databases and storage can be dangerous. Make sure you always have a back-up strategy and disaster recovery plan.
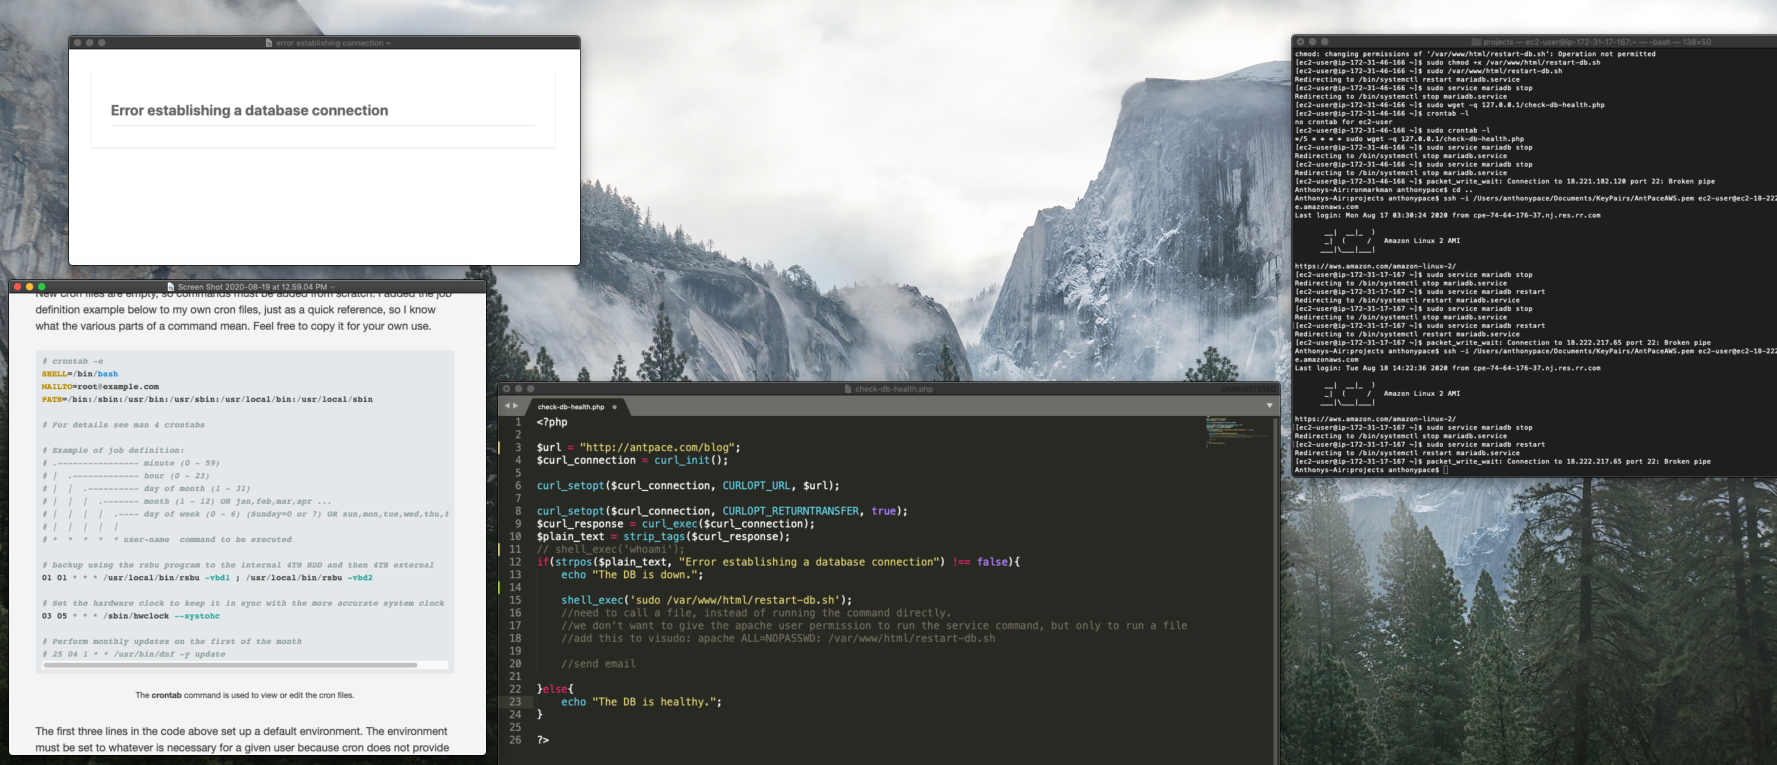
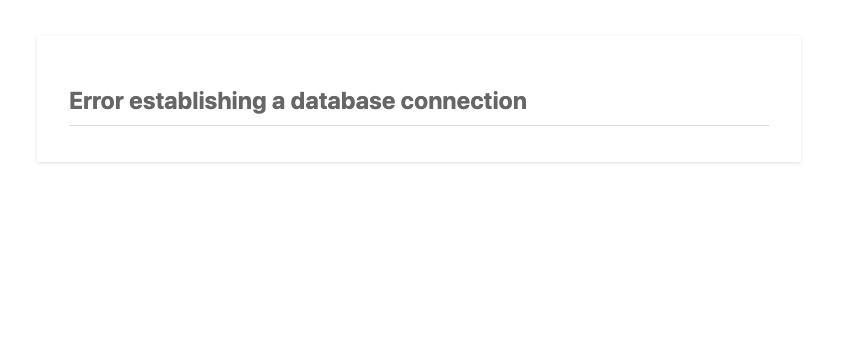
A crashed database is a problem I’ve encountered across multiple WordPress websites. When trying to load the site you’re faced with a dreaded “Error establishing a database connection” message. Restarting the DB service usually clears things up. But, sometimes it won’t restart at all – which is why I started automating nightly data dumps to an S3 bucket.
Recently, one particular site kept going down unusually often. I assumed it was happening due to low computing resources on the EC2 t3.micro instance. I decide to spin up a a new box with more RAM (t3.small) and migrate the entire WordPress setup.
Since I couldn’t be sure of what was causing the issue, I needed a way to monitor the health of my WordPress websites. I decided to write code that would periodically ping the site, and if it is down send an email alert and attempt to restart the database.
The first challenge was determining the status of the database. Even if it crashed, my site would still return a 200 OK response. I figured I could use cURL to get the homepage content, and then strip out any HTML tags to check the text output. If the text did match the error message, I could take further action.
Next, I needed to programmatically restart MySql. This is the command I run to do it manually: sudo service mariadb restart
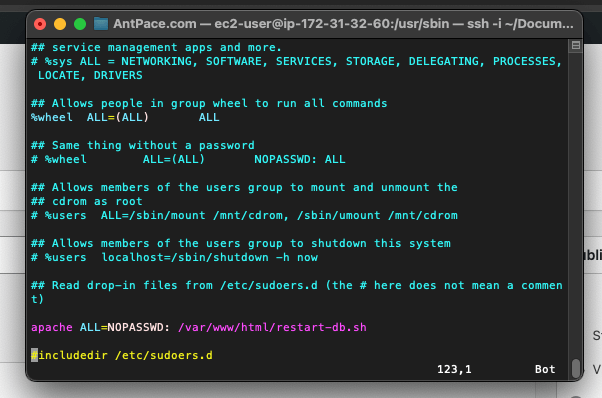
After doing some research, I found that I could use shell_exec() to run it from my PHP code. Unfortunately, Apache wouldn’t let the (non-password using) web server user execute that without special authorization. I moved that command to its own restart-db.sh file, and allowed my code to run it by adding this to the visudo file: apache ALL=NOPASSWD: /var/www/html/restart-db.sh
My visudo file was located at /usr/sbin/visudo. It is a tool found on most Linux systems to safely update the /etc/sudoers file, which is the configuration file for the sudo command. To edit this file, I don’t open it in vim like I would with other editable files. Instead, I run the file as its own command: sudo visudo. Once it is open, you can press the i key to enter “insert” mode. It is considered “safe” because it edits the sudoers file following a strict procedure.
I also needed to make the file executable by adjusting permissions: sudo chmod +x /var/www/html/restart-db.sh
Once those pieces were configured, my code would work:
<?php

$url = "https://www.antpace.com/blog/";
$curl_connection = curl_init();

curl_setopt($curl_connection, CURLOPT_URL, $url);

curl_setopt($curl_connection, CURLOPT_RETURNTRANSFER, true);
$curl_response = curl_exec($curl_connection);
$plain_text = strip_tags($curl_response);

if(strpos($plain_text, "Error establishing a database connection") !== false){
	echo "The DB is down.";

        //restart the database
        shell_exec('sudo /var/www/html/restart-db.sh');

        //send notification email
        include 'send-email.php';
        send_email();
}else{
	echo "The DB is healthy.";
}

?>
A cron job is a scheduled task in Linux that runs at set times. For my PHP code to effectively monitor the health of the database, it needs to run often. I decided to execute it every five minutes. Below are three shell commands to create a cron job.
The first creates the cron file for the root user:
sudo touch /var/spool/cron/root
The next appends my cron command to that file:
echo "*/5 * * * * sudo wget -q https://www.antpace.com/check-db-health.php" | sudo tee -a /var/spool/cron/root
And, the last sets the cron software to listen for that file:
sudo crontab /var/spool/cron/root
Alternatively, you can create, edit, and set the cron file directly by running sudo crontab -e . The contents of the cron file can be confirmed by running sudo crontab -l .
Pro-tip: If your WordPress site does continually crash, you probably do need to upgrade to an instance with more RAM. Also, consider using RDS for the database.
Update
I previously used the localhost loop back address in my cron file: */5 * * * * sudo wget -q 127.0.0.1/check-db-health.php. After setting up 301 redirects to prevent traffic from hitting my public DNS, that stopped working. It is more reliable to use an explicit domain name URL: */5 * * * * sudo wget -q https://www.antpace.com/check-db-health.php
I have had some lousy luck with databases. In 2018, I created a fitness app for martial artists, and quickly gained over a hundred users in the first week. Shortly after, the server stopped resolving and I didn’t know why. I tried restarting it, but that didn’t help. Then, I stopped the EC2 instance from my AWS console. Little did I know, that would wipe the all of the data from that box. Ouch.
Recently, a client let me know that their site wasn’t working. A dreaded “error connecting to the database” message was all that resolved. I’d seen this one before – no sweat. Restarting the database usually does the trick: “sudo service mariadb restart”. The command line barked back at me: “Job for mariadb.service failed because the control process exited with error code.”
Uh-oh.
The database was corrupted. It needed to be deleted and reinstalled. Fortunately, I just happen to have a SQL dump for this site saved on my desktop. This was no way to live – in fear of the whims of servers.
Part of the issue is that I’m running MySQL on the same EC2 instance as the web server. A more sophisticated architecture would move the database to RDS. This would provide automated backups, patches, and maintenance. It also costs more.
To keep cost low, I decided to automate MySQL dumps and upload to an S3 bucket. S3 storage is cheap ($0.20/GB), and data transfer from EC2 is free.
Deleting and Reinstalling the Database
If your existing database did crash and become corrupt, you’ll need to delete and reinstall it. To reset the database, I SSH’d into my EC2 instance. I navigated to `/var/lib/mysql`
cd /var/lib/mysql
Next, I deleted everything in that folder:
sudo rm -r *
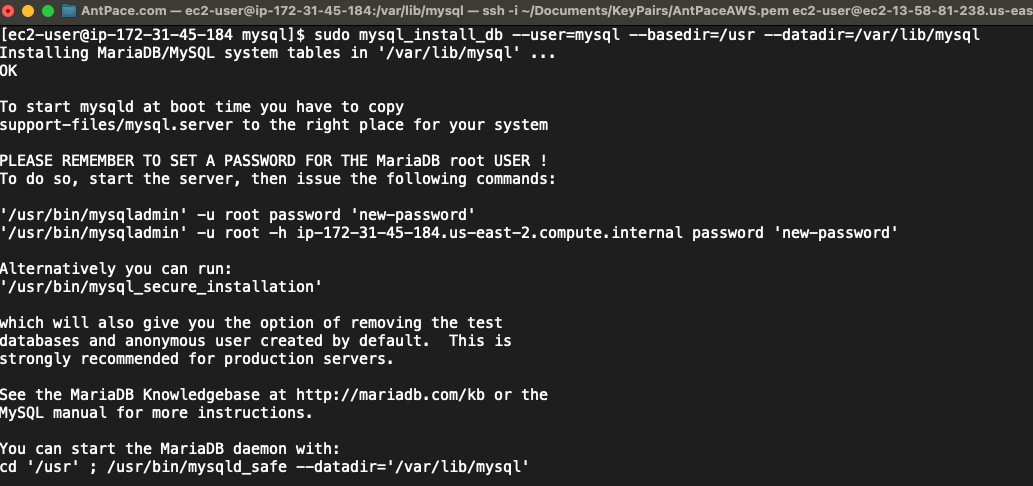
Finally, I ran a command to reinitialize the database directory
Afterwards, you’ll be prompted to reset the root password.
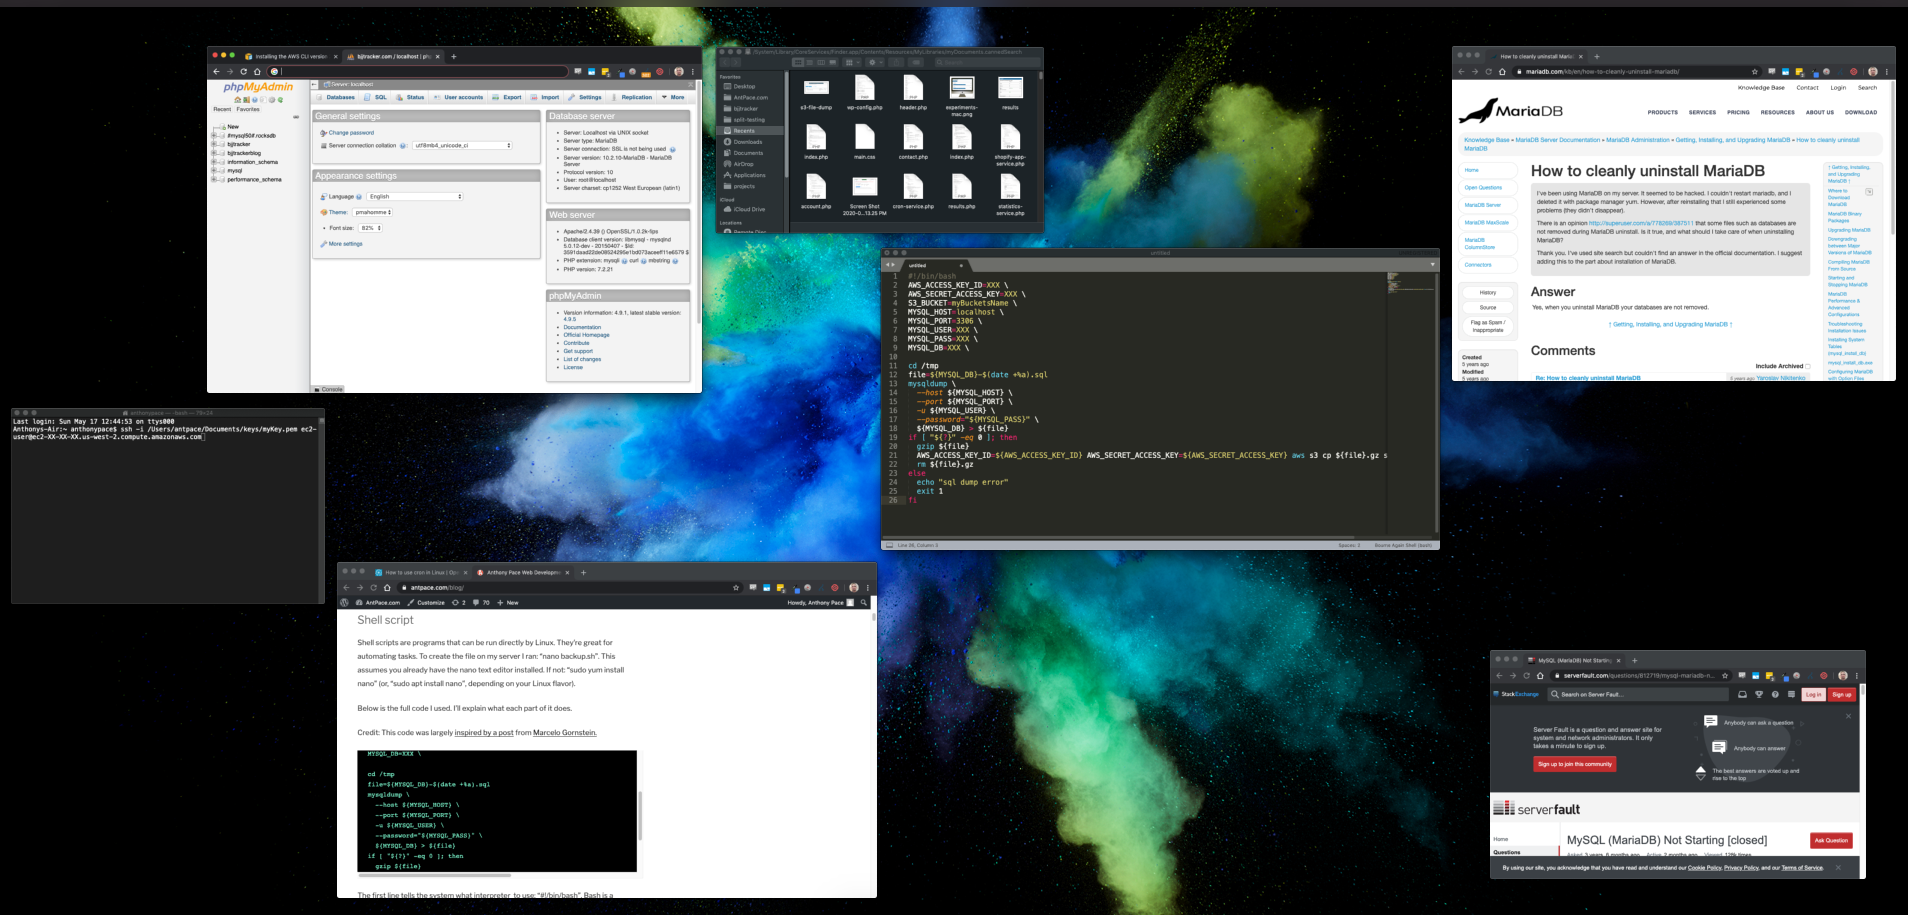
You’ll still need to import your sql dump backups. I used phpMyAdmin to do that.
Scheduled backups
AWS Setup
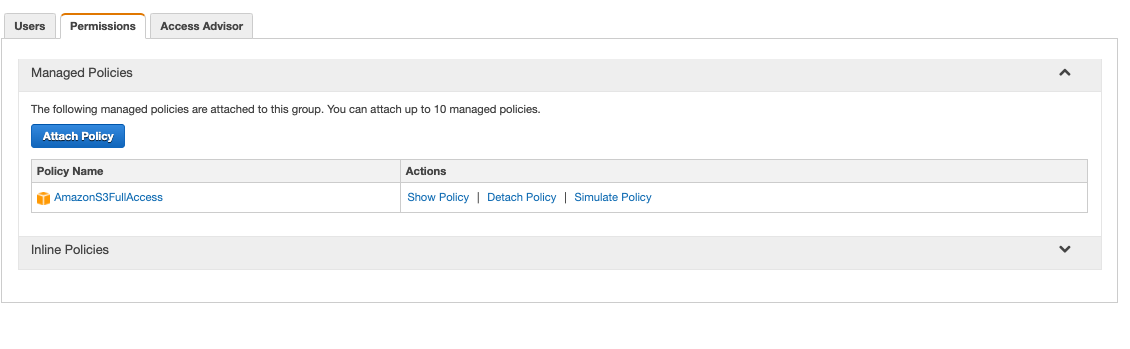
The first step was to get things configured in my Amazon Web Services (AWS) console. I created a new S3 bucket. I also created a new IAM user, and added it to a group that included the permission policy “AmazonS3FullAccess”.
This policy provides full access to all buckets.
I went to the security credentials for that user, and copied down the access key ID and secret. I would use that info to access my S3 bucket programatically. All of the remaining steps take place from the command line, via SSH, against my server. From a Mac terminal, you could use a command like this to connect to an EC2 instance:
Shell scripts are programs that can be run directly by Linux. They’re great for automating tasks. To create the file on my server I ran: “nano backup.sh”. This assumes you already have the nano text editor installed. If not: “sudo yum install nano” (or, “sudo apt install nano”, depending on your Linux flavor).
Below is the full code I used. I’ll explain what each part of it does.
The first line tells the system what interpreter to use: “#!/bin/bash”. Bash is a variation of the shell scripting language. The next eight lines are variables that contain details about my AWS S3 bucket, and the MySQL database connection.
After switching to a temporary directory, the filename is built. The name of the file is set to the database’s name plus the day of the week. If that file already exists (from the week previous), it’ll be overwritten. Next, the sql file is created using mysqldump and the database connection variables from above. Once that operation is complete, then we zip the file, upload it to S3, and delete the zip from our temp folder.
If the mysqldump operation fails, we spit out an error message and exit the program. (Exit code 1 is a general catchall for errors. Anything other than 0 is considered an error. Valid error codes range between 1 and 255.)
Before this shell script can be used, we need to change its file permissions so that it is executable: “chmod +x backup.sh”
After all of this, I ran the file manually, and made sure it worked: “./backup.sh”
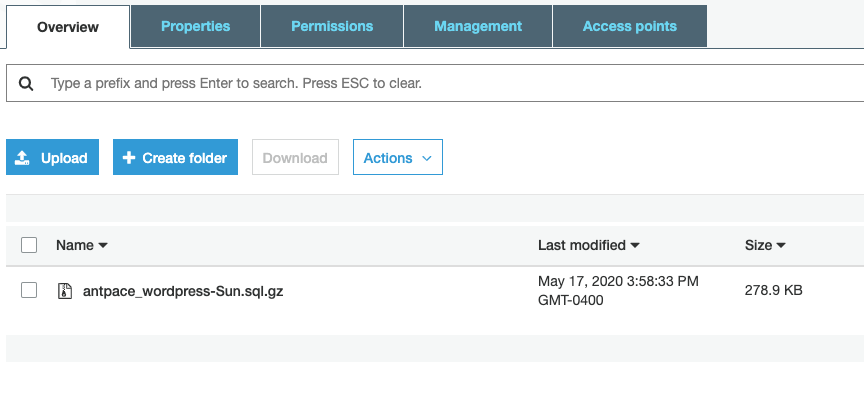
Sure enough, I received a success message. I also checked the S3 bucket and made sure the file was there.
Scheduled Cronjob
The last part is to schedule this script to run every night. To do this, we’ll edit the Linux crontab file: “sudo crontab -e”. This file controls cronjobs – which are scheduled tasks that the system will run at set times.
The file opened in my terminal window using the vim text editor – which is notoriously harder to use than the nano editor we used before.
I had to hit ‘i’ to enter insertion mode. Then I right clicked, and pasted in my cronjob code. Then I pressed the escape key to exit insertion mode. Finally, I typed “wq!” to save my changes and quit.
And that’s it. I made sure to check the next day to make sure my cronjob worked (it did). Hopefully now, I won’t lose production data ever again!
Updates
Request Time Too Skewed (update)
A while after setting this up, I randomly checked my S3 buckets to make sure everything was still working. Although it had been for most of my sites, one had not been backed up in almost 2 months! I shelled into that machine, and tried running the script manually. Sure enough, I received an error: “An error occurred (RequestTimeTooSkewed) when calling the PutObject operation: The difference between the request time and the current time is too large.“
I checked the operating system’s current date and time, and it was off by 5 days. I’m not sure how that happened. I fixed it by installing and running “Network Time Protocol”:
sudo yum install ntp sudo ntpdate ntp.ubuntu.com
After that, I was able to run my backup script successfully, without any S3 errors.
Nano text-editor tip I learned along the way:
You can delete chunks of text content using Nano. Use CTRL + Shift + 6 to enter selection mode, move the cursor to expand the block, and press CTRL + K to delete it.
In 2008 I deployed my first website to production. It used a simple LAMP stack , a GoDaddy domain name, and HostGator hosting.
Since 2016, I’ve used AWS as my primary cloud provider. And this year, I’m finally cancelling my HostGator package. Looking through that old server, I found artifacts of past projects – small businesses and start-ups that I helped develop and grow. A virtual memory lane.
Left on that old box was a site that I needed to move to a fresh EC2 instance. This is an opportunity to document how I launch a site to Amazon Web Services.
Amazon Elastic Compute Cloud
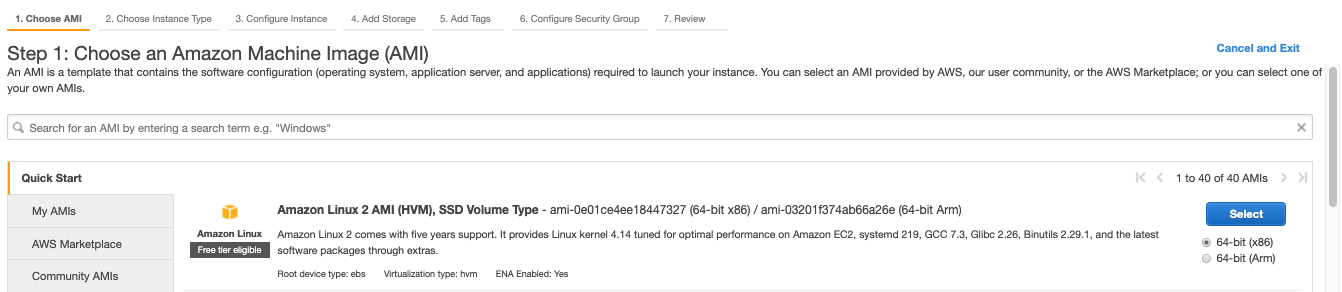
To start, I launch a new EC2 instance from the AWS console. Amazon’s Elastic Compute Cloud provides “secure and resizable compute capacity in the cloud.” When prompted to choose an Amazon Machine Image (AMI), I select “Amazon Linux 2 AMI”. I leave all other settings as default. When I finally click “Launch”, it’ll ask me to either generate a new key file, or use an existing one. I’ll need that file later to SSH or sFTP into this instance. A basic Linux server is spun up, with little else installed.
Amazon Linux 2 AMI is free tier eligible.
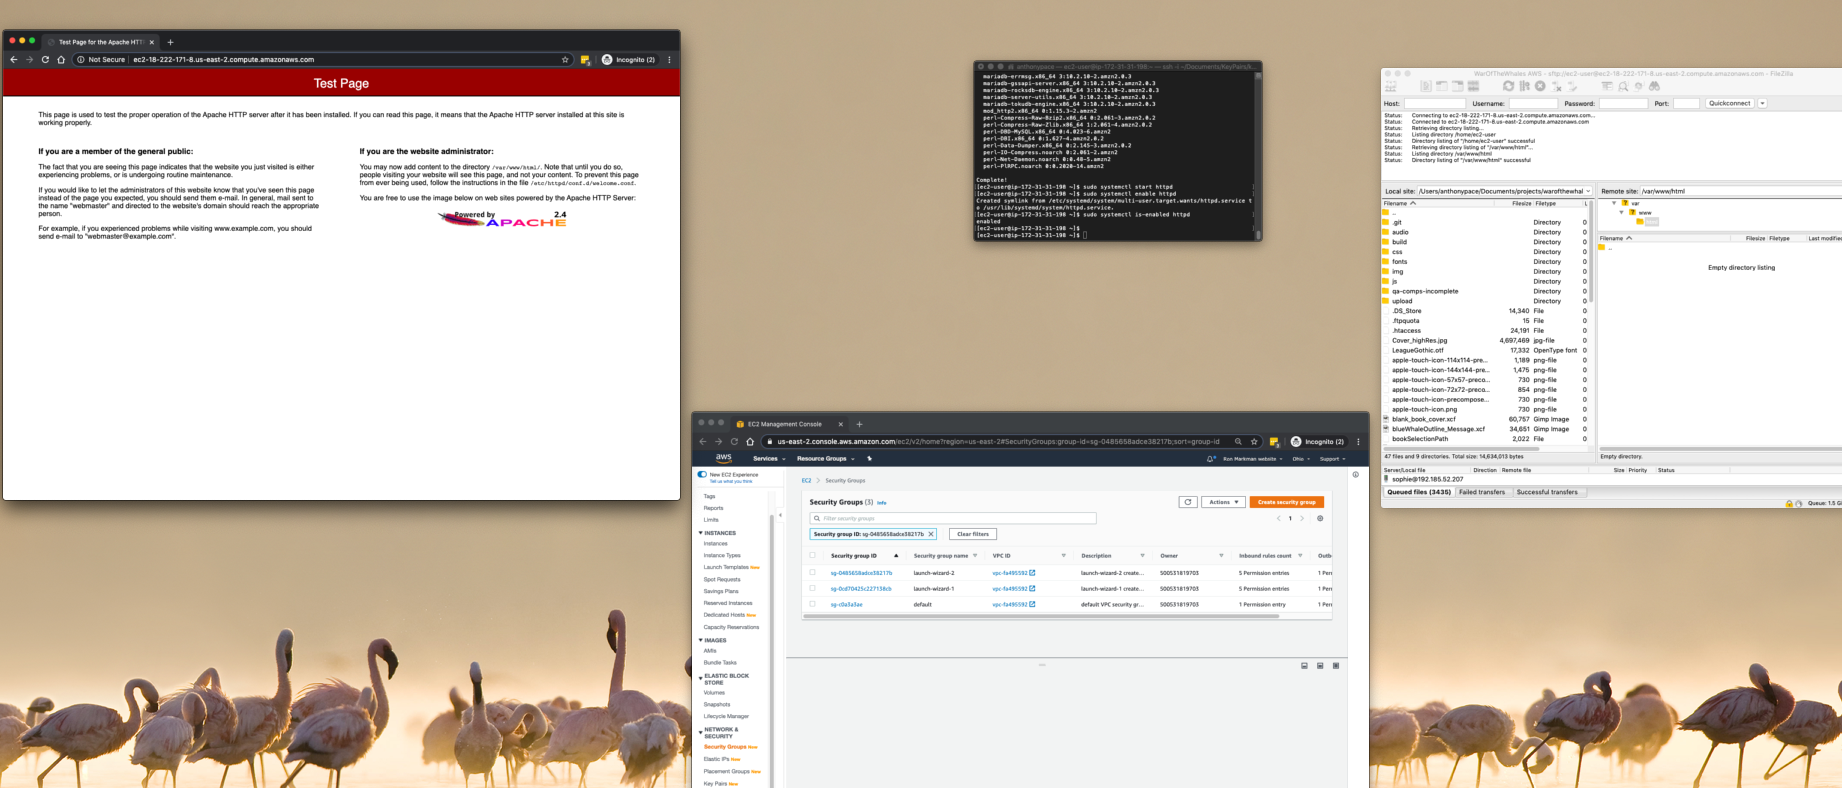
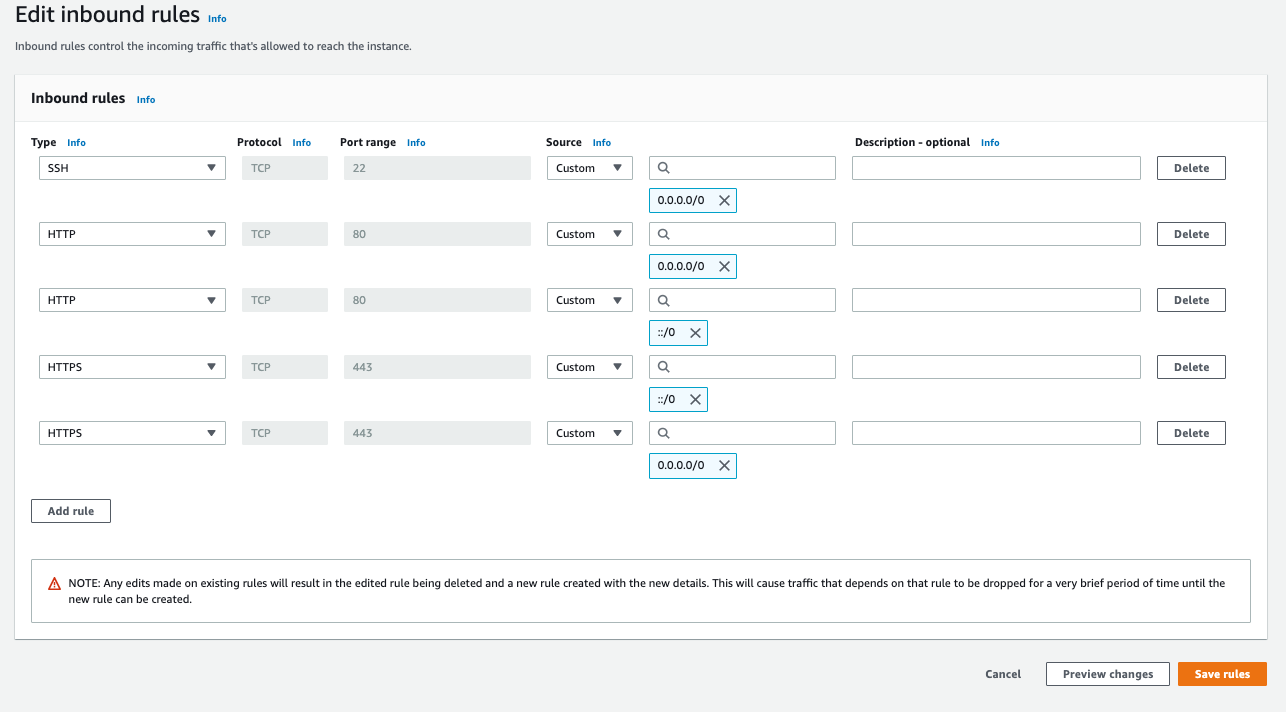
Next, I make sure that instance’s Security Group allows inbound traffic on SSH, HTTP, and HTTPS. We allow all traffic via HTTP and HTTPS (IPv4 and IPv6, which is why there are 2 entries for each). That way end-users can reach the website from a browser. Inbound SSH access should not be left wide open. Only specific IP addresses should be allowed to command-line in to the server. AWS has an option labeled “My IP” that will populate it for your machine.
Don’t allow all IPs to access SSH in a live production environment.
Recent AWS UI updates let you set these common rules directly from the “Launch an instance” screen, under “Network settings”
Configure the server
Now that the hosting server is up-and-running, I can command-line in via SSH from my Mac’s terminal using the key file from before. This is what the command looks like:
” It is required that your private key files are NOT accessible by others. This private key will be ignored. “
That just means you need to update the file permissions on the key file. You should do that from the command line, in the directory where the file resides:
chmod 400 KeyFileNameHere.pem
Make sure everything is up-to-date by running “sudo yum update“. I begin installing the required software to host a website:
That command gives me Apache, PHP, and MariaDB – a basic LAMP stack. This next one installs the database server:
sudo yum install -y httpd mariadb-server
MariaDB is a fork of the typical MySQL, but with better performance.
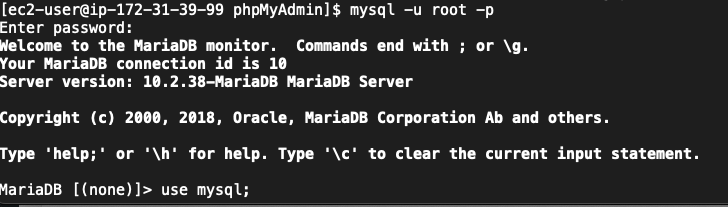
By default, MariaDB will not have any password set. If you choose to install phpMyAdmin, it won’t let you login without a password (as per a default setting). You’ll have to set a password from the command line. While connected to your instance via SSH, dispatch this command:
mysql -u root -p
When it prompts you for a password, just hit enter.
Once you’re logged in, you need to switch to the mysql database by running the following command:
use mysql;
Now you can set a password for the root user with the following command:
UPDATE user SET password = PASSWORD('new_password') WHERE user = 'root';
After setting the password, you need to flush the privileges to apply the changes:
FLUSH PRIVILEGES;
Start Apache: “sudo systemctl start httpd“. And, make sure it always starts when the server boots up “sudo systemctl enable httpd”
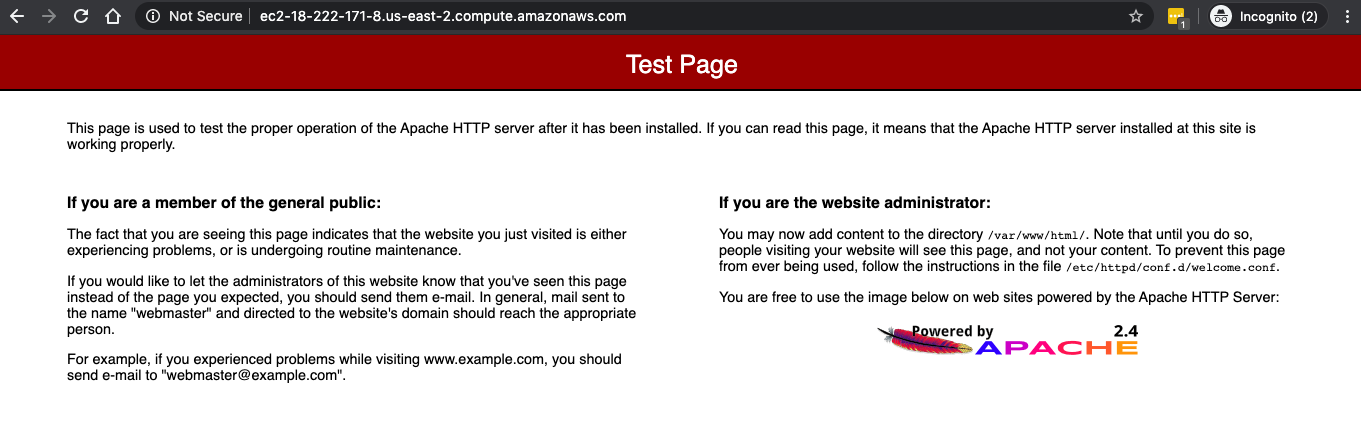
The server setup is complete. I can access an Apache test page from a web browser by navigating to the EC2 instance’s public IP address.
A test page shows when no website files are present.
I’ll take my website files (that are stored on my local machine and synched to a Git repo) and copy them to the server via sFTP.
I use FileZilla to access my EC2 public directory
I need to make sure the Linux user I sFTP with owns the directory “/var/www/html”, or else I’ll get a permission denied error:
sudo chown -R ec2-user /var/www/html
Later, if I want to be able to upload media to the server from the WordPress CMS, I’ll need to be sure to change the owner of the blog’s directory to the apache user (which is the behind-the-scenes daemon user invoked for such things):
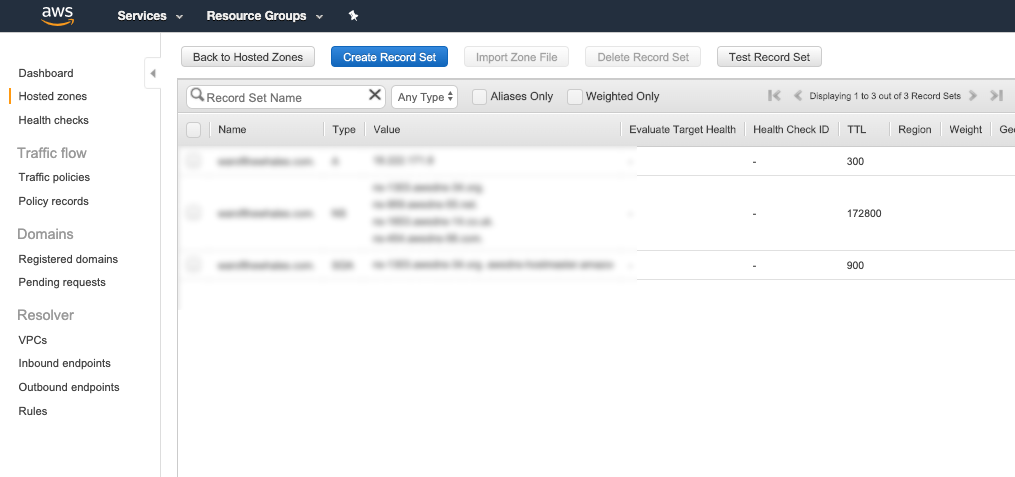
Instead of having to use the EC2 server’s public address to see my website from a browser, I’ll point a domain name at it. AWS Route 53 helps with this. It’s a “DNS web service” that routes users to websites by mapping domain names to IP addresses.
In Route 53 I create a new “hosted zone”, and enter the domain name that I’ll be using for this site. This will automatically generate two record sets: a Name Server (NS) record and a Start-of-Authority (SOA) record. I’ll create one more, an IPv4 address (A) record. The value of that record should be the public IP address that I want my domain to point at. You’ll probably also want to add another, identical to the last one, but specifying “www” in the record name.
Finally, I’ll head over to my domain name registrar, and find my domain name’s settings. I update the nameserver values there to match those in my Route 53 NS record set. It’ll likely take some time for this change to be reflected in the domain’s settings. Once that is complete, the domain name will be pointing at my new EC2 instance.
Any product, experience, or artwork – anything you build – is made up of pieces. And content always sits at the center. Content is the fleshy part of media.
The other pieces include structure, style, and functionality. These parts layout a skeleton, decorates the aesthetic, and adds usefulness. This model translates well to modern web development. HTML defines the structure. CSS describes the style. JavaScript adds interactivity. But always, content is King.
That’s why a robust content management system (CMS) is critical. Most clients prefer to have one. It makes updates easy. WordPress is the modern choice. It’s what this blog is built on.
WordPress Website
A website I built featured the work of visual artist Ron Markman – paintings, etchings, photos. It had a lot of content. A lot of content that needed massaging. As you may have guessed, I chose WordPress to manage it. I choose the HTML5 Blank WordPress Theme as our starting point.
I was recommended to Ericka by a previous client. Her late relative left behind a corpus of work that needed a new digital home. They already had a website, but needed it revamped and rebuilt from scratch.
This was my proposal:
“The look and feel will be modern, sleek, and adaptive. The homepage will feature a header section highlighting selected work. The website’s menu will link to the various category pages (as well as any ancillary pages). The menu, along with a footer, will persist throughout all pages to create a cohesive experience and brand identity. The website will be built responsively, adapting to all screen-sizes and devices. As discussed, select content will feature “zooming” functionality.”
This was a situation where I had to be a project manager, and deliver results. Although the content itself was impressive, it was delivered as image files in various formats and different sizes. Filenames were not consistent. And the meta-data – descriptions, titles, notes – was listed is excel files that didn’t always match-up to the image’s filename. This required a lot of spot checking, and manual work. I did my best to automate as much as I could, and make things uniform.
Phases of Work
I broke the work out into four phases. This is how I described it to the client:
Layout and hierarchy
I will provide wire-frame layouts describing the essential structure, layout and hierarchy of the website overall.
Look and feel
I will finalize aesthetic details such as color palette, typography, user interface, and stylization.
Implementation
I will build and deploy the website with the content provided.
Content input
You’ll need to provide all copy, images, media, etc. before a first build of the website can be deployed. I’ll be implementing a standard content-management system that will allow you to add additional content, categories, pages, etc. Often times, content delivery can be a bottleneck for projects like this. After the finalized website is deployed live, with the initial content provided, you’ll be responsible for adding any more additionally.
Image Gallery
The UI to show each piece of art was powered by Galleria. It was out-of-the-box responsive. At first, each gallery page had so many large image files that things would crash or load very slowly. I was able to leverage the framework’s AJAX lazy loading to mitigate that issue.
Resizing Multiple Images
Resizing a batch of images can be done directly in Mac OS by selecting the files, and opening them in Preview. From the ‘Edit’ menu, I clicked ‘Select All’. Then, in the ‘Tool’ menu I found ‘Adjust Size’. Windows has a similar feature, as does other image manipulation apps.
Renaming Multiple Files
I had to make the filenames match what was listed in the meta-data spreadsheet. Here’s the command I used, in Mac OS, to truncate filenames to the first eight characters:
rename -n 's/(.{8}).*(\.jpg)$/$1$2/' *.jpg
Batch Uploading WordPress Posts
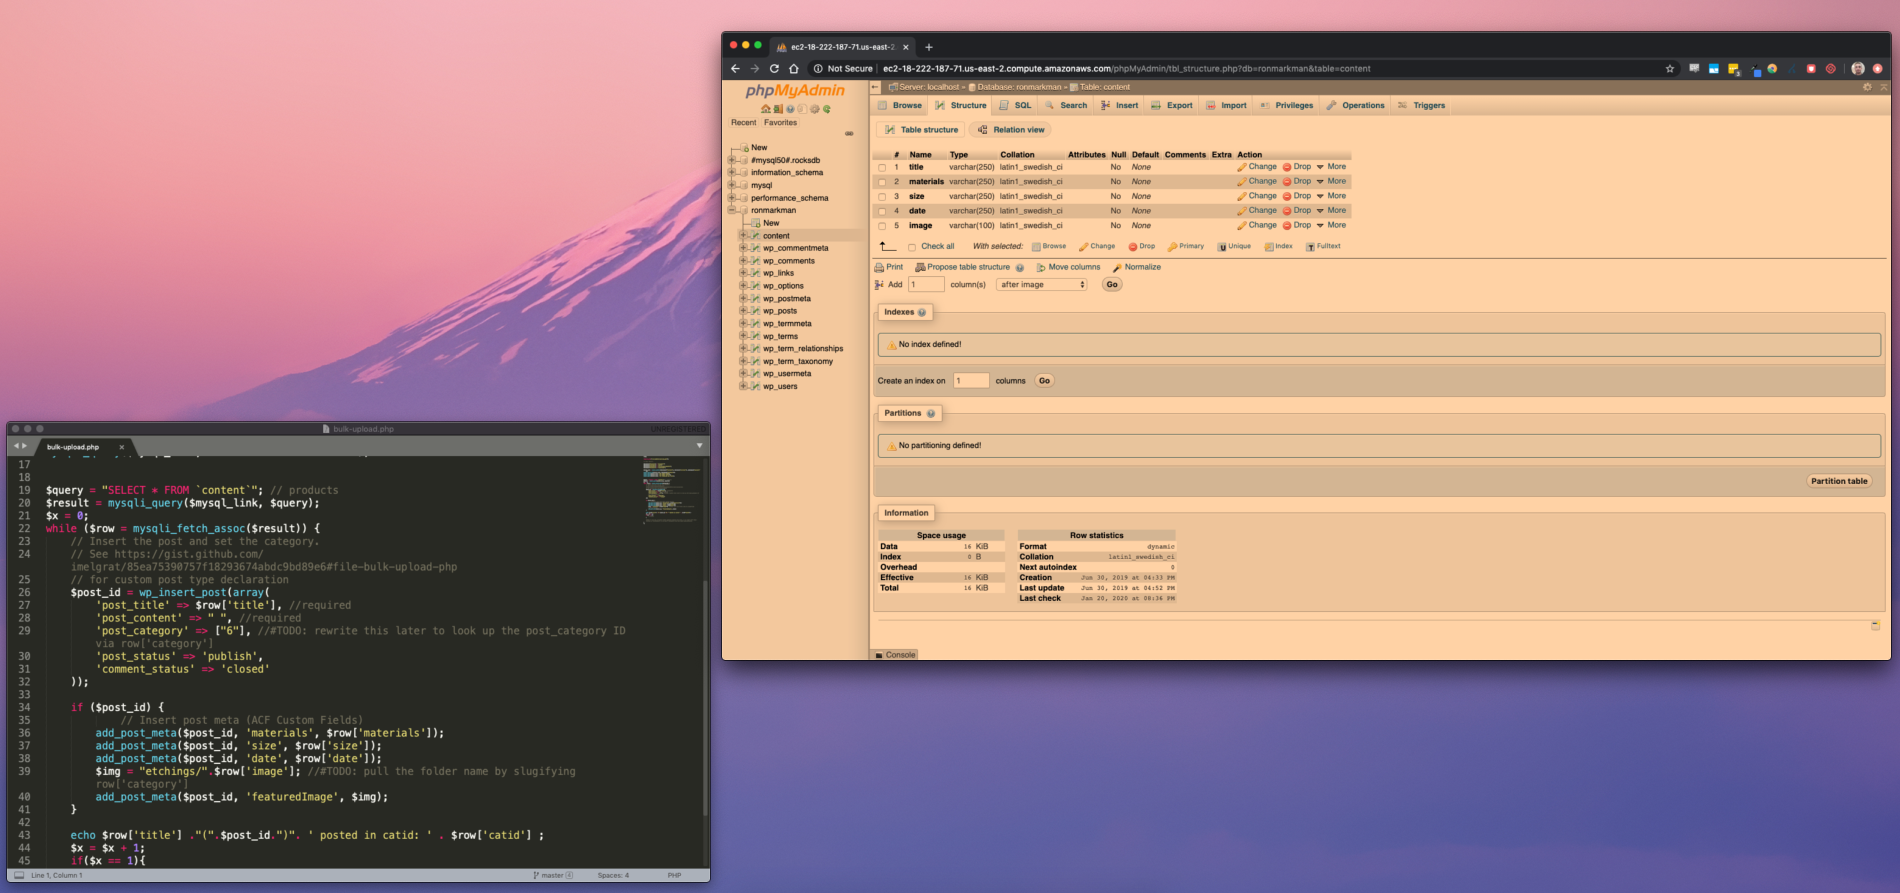
Each piece of art was a WordPress post, with a different title, meta-values, and image. Once all of the files were sized and named properly, I uploaded them to the server via sFTP. Each category of art (paintings, photos, etc.) was a folder. I created a temporary database table that matched the columns from the meta-data spreadsheet I was given.
CREATE TABLE `content` (
  `content_id` int,
  `title` varchar(250) NOT NULL,
  `medium` varchar(250) NOT NULL,
  `category_id` varchar(250) NOT NULL,
  `size` varchar(250) NOT NULL,
  `date` varchar(250) NOT NULL,
  `filename` varchar(100) NOT NULL,
  `processed` int
) ENGINE=InnoDB DEFAULT CHARSET=latin1;
COMMIT;
I wrote a PHP script that would loop through all records, and create a new post for each. I had to make sure to include core WordPress functionality, so that I would be able to use the wp_insert_post() method.
require_once('/var/www/html/wp-load.php');
Once I connected to the database, I queried my temporary table, excluding any records that have been marked as already uploaded:
$query = "SELECT * FROM `content` where `processed` != 1";
$result = mysqli_query($mysql_link, $query);
While looping through each record, I would look up the WordPress category ID and slug based on the provided category name. This would allow my code to assign the post to the correct category, and to know which folder the image file was in. Once the post is inserted, I take that post ID and assign meta-values. At the end of the loop, I mark this record as processed.
Managing clients, and their content, can be the most challenging part of web development. Using the right software for the job makes it easier. So does having a toolbox of techniques, and being clever.
Managing server operations
This website was hosted on AWS. It used EC2. At first, the instance size we selected was too small and led to repeated website crashes. That experience led me to coming up with a hacky work-around for restarting the server when it crashed – read about it here.