How to Fix a GoDaddy Parked Page and Revive Your Website

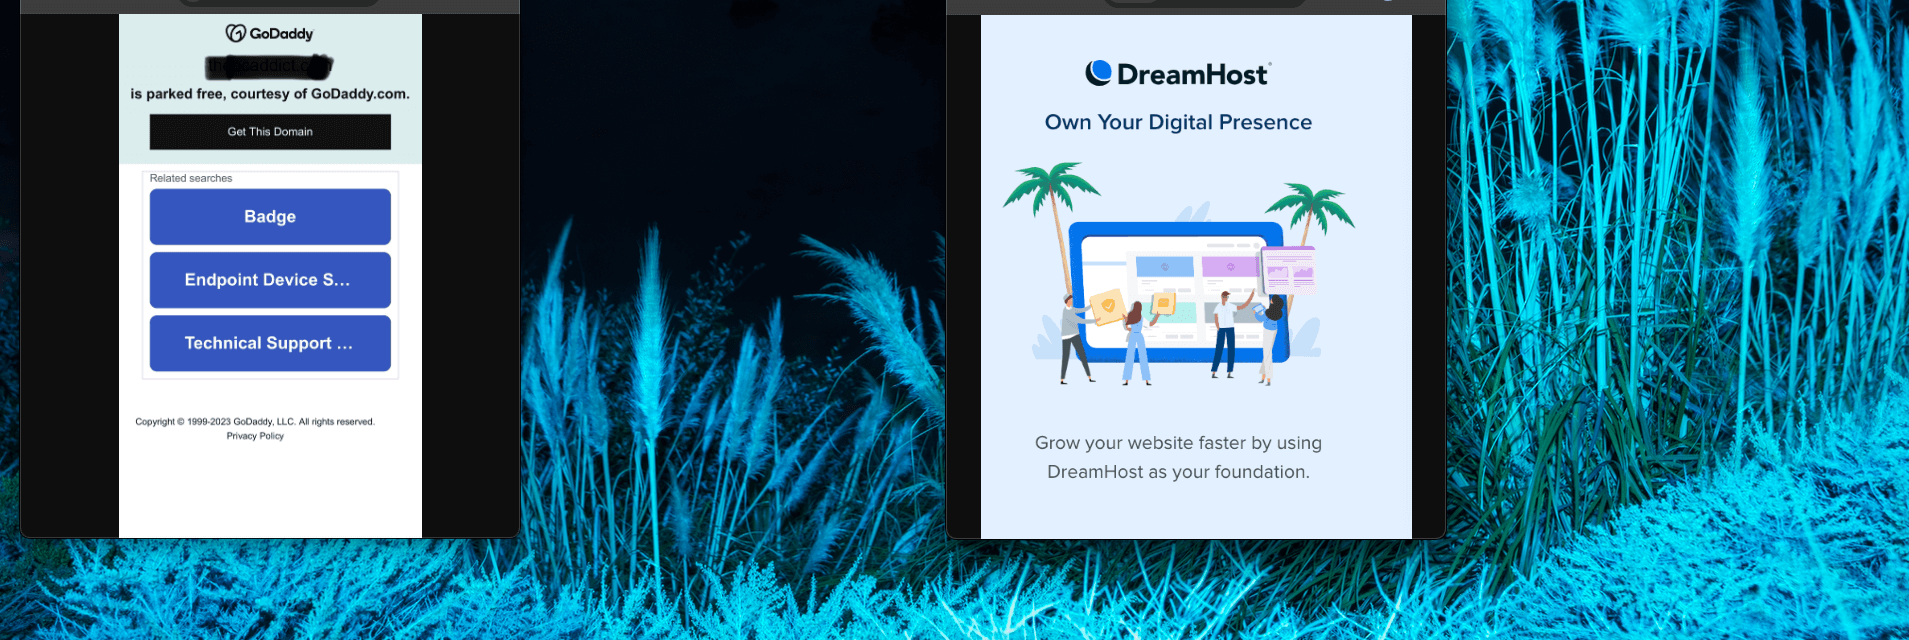
It all started with a client text message that was hard to miss — their website was suddenly showing a GoDaddy “parked” page. This unexpected hiccup was more than just a minor inconvenience; it was a full-blown business disruption for my client.

The Challenge

When the client reached out, he was understandably frustrated. His website, which was supposed to be active and processing sign-ups, was inactive, displaying a message typically associated with unconfigured or newly registered domains. This was particularly perplexing as the site had been running smoothly just days before.

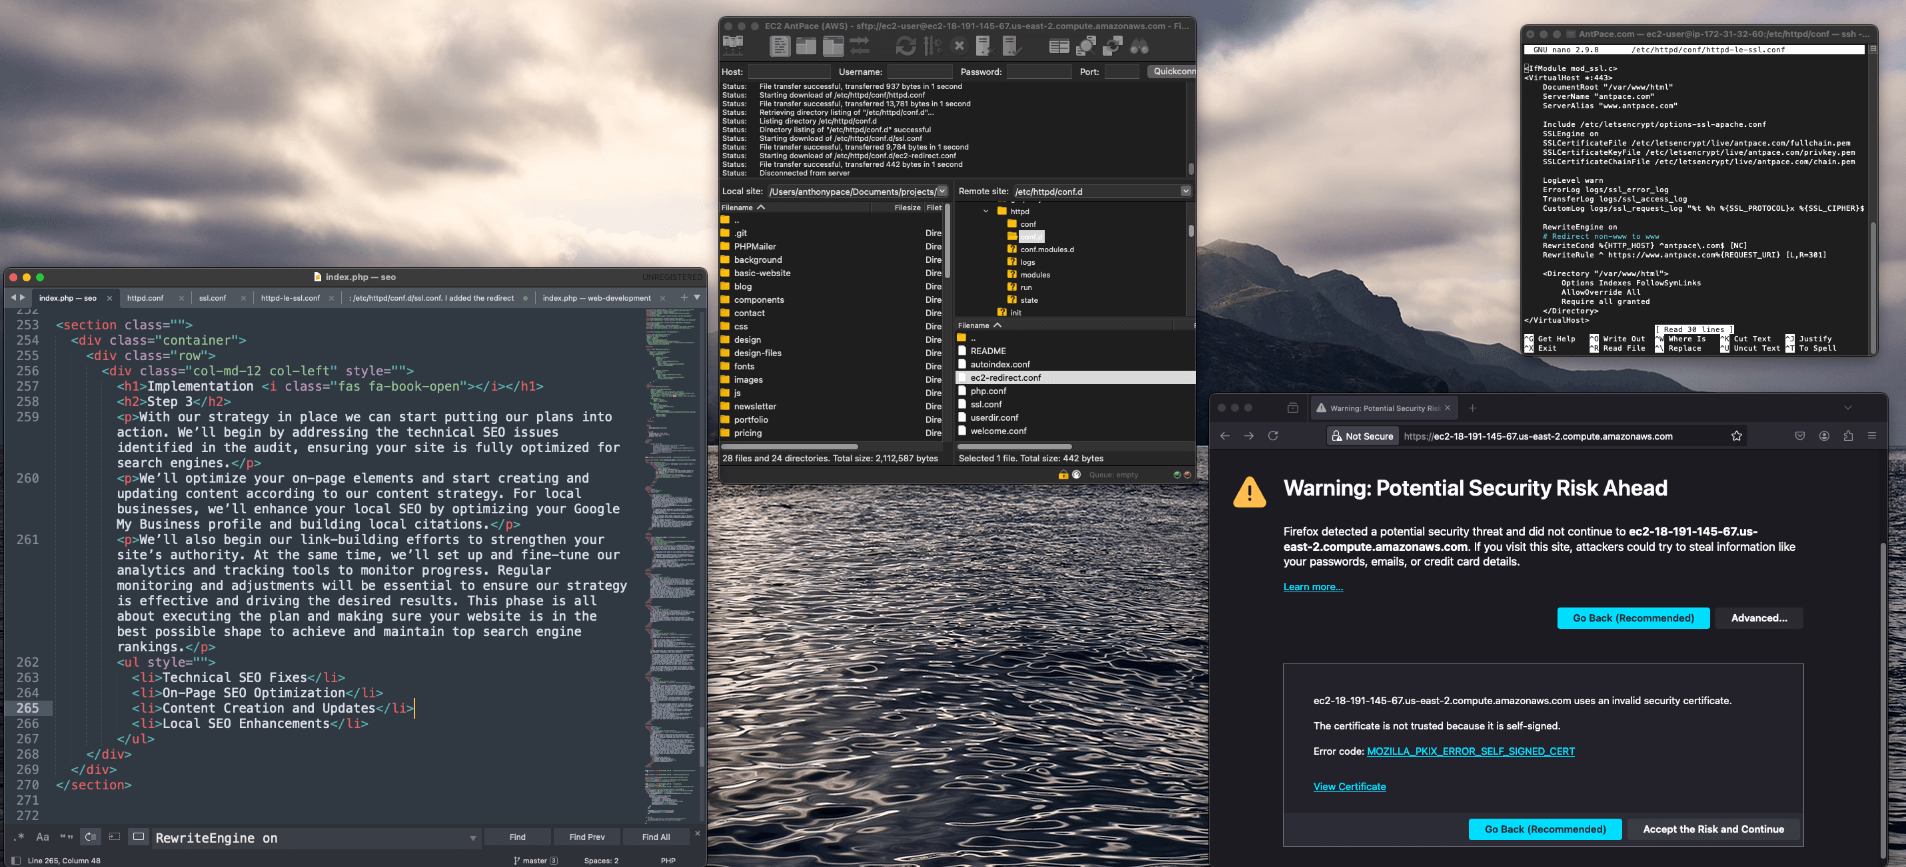
My first step was to verify the DNS settings. A parked domain page usually indicates issues with domain pointing, possibly due to changes in DNS or hosting services. The client told me he had tried to create a subdomain through his domain registrar, GoDaddy. It turned out that his domain’s name servers pointed to his web hosting company, DreamHost. Making DNS changes directly in GoDaddy led to a change in the domain’s nameserver records so that it became managed by GoDaddy directly, removing any reference to the web hosting package where the site actually lived.

The Solution

After identifying the mismatch, the next step was clear but not simple—access the DreamHost account to find the correct nameserver value to point the domain to. However, the client didn’t have the DreamHost login credentials readily available, which added another layer to our challenge.

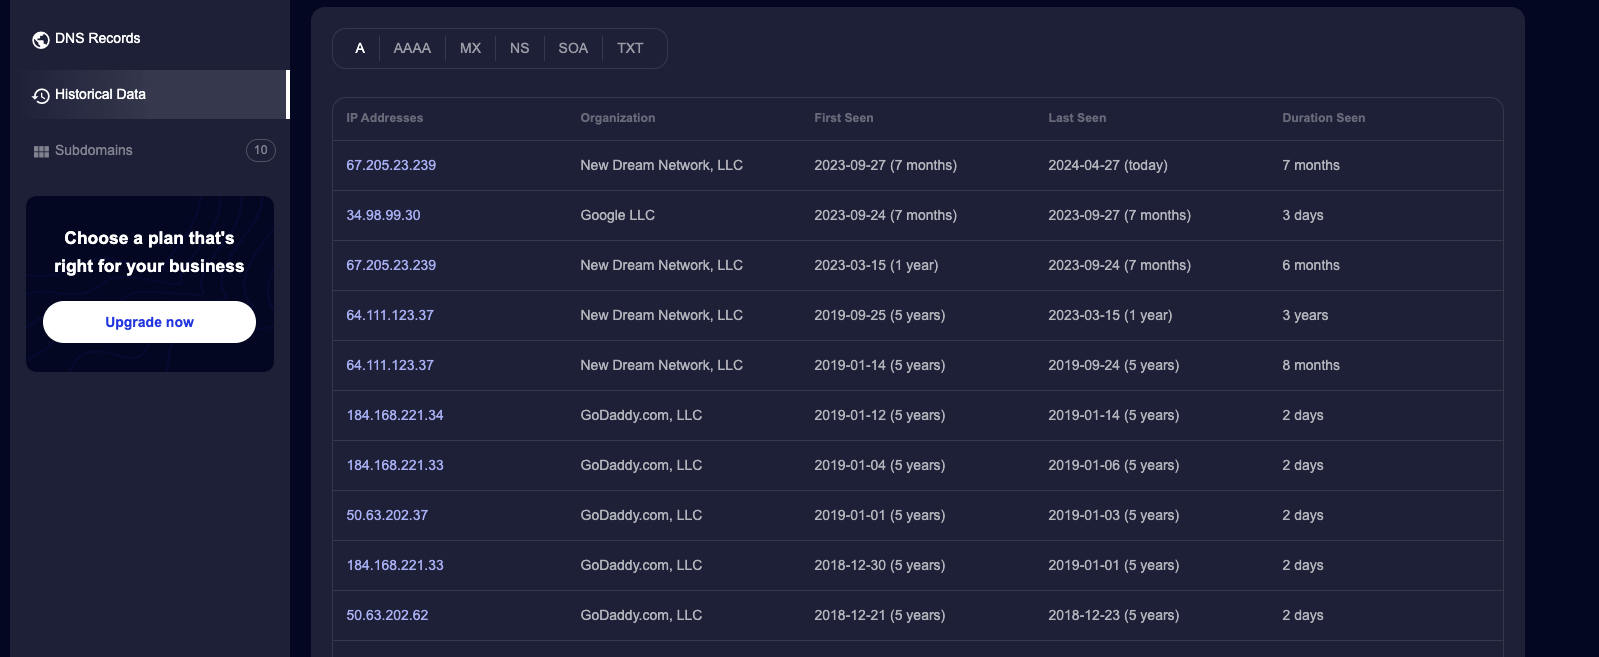
Using SecurityTrails, I conducted a DNS history check. This not only confirmed that the name servers were indeed pointing to DreamHost but also provided a clear historical view of the DNS changes over time. I was able to copy and paste the name server values from the history log. Subsequently, we were able to recover access to the DreamHost account by going through account recovery processes, which involved verifying the client’s identity and ownership of the domain.

dns log

Once we regained access, I immediately updated the DNS records to ensure they correctly pointed to the client’s active web server. This change effectively removed the parked page error, restoring the site’s functionality.

Conclusion

This scenario underscored the critical importance of keeping domain and hosting details organized and accessible. It also highlighted how easy it is for essential information to become overlooked, especially when multiple service providers are involved over the years. Effective disaster recovery strategies are crucial for quickly restoring operations in the event of a service disruption, whether caused by human error, technical failures, or external threats.

With the website back up and running, and the domain correctly configured, the client was relieved and could focus on his business again. For me, it reinforced a key aspect of my work: solving complex tech puzzles not only requires technical know-how but also an investigative approach to untangle the often convoluted web of digital assets. My role transcends building websites—it’s about ensuring they continue to serve their purpose, even when unexpected disruptions occur.

While my tagline says, “I can build your website,” days like these remind me it should also include, “and I can rescue it too.” This experience serves as a testament to the value of professional web management, especially in a world where digital presence is synonymous with business viability.

Binary Search in JavaScript

“Binary search” is a computer science term used in programming and software engineering. It is a way of determining if a value exists in an ordered data set. It’s considered a textbook algorithm. It is useful because it reduces the search space by half on each iteration.

Imagine we are asked to search for an integer in an array that is sorted in ascending order. The challenge is to return the target number’s index.

binary search

We could use a built in JavaScript function indexOf():

var search = function(nums, target) {
    var answer = nums.indexOf(target);
    console.log(answer);
    return answer;
};
console.log(search([-1,0,3,4,5,9,12], 5)); // returns '4'

But that is an abstraction, which can be slow and expensive. Instead, we should implement our own binary search code.

Binary Search Implementation

Binary search starts in the middle of a collection, and checks if that is the requested term. The initial middle position is determined by taking the length of the array and dividing it by two. If the array has an even number of elements, then the ‘halfway position’ is considered close enough. I use a JavaScript Math function to round down, making sure I am not left with a decimal floating number:

cursor =  Math.floor( ((left + right) / 2) ); // about the middle

If the search term is not found, the position (the cursor) is moved. Since the collection is ordered from smallest to largest we know which direction to move the search cursor. If the target is less than the current value, we shift one to the left. If the target is greater than the current value, we shift two to the right.

This continues until the target query is found. That sequence is ran inside of a loop. The loop repeats while the left boundary is less than (or equal to) the right. The search cursor’s index is changed by adjusting the left or right bounds. Once adjusted, the cursor is recalculated on the subsequent iteration.

var search = function(nums, target) {
    var left = 0; // first element, initial left boundary
    var right = nums.length;
    right = right - 1; // last element, initial right boundary
    var cursor = 0;
    while(left <= right){
        cursor =  Math.floor( ((left + right) / 2) ); // about the middle to start
        console.log(cursor + ": " + nums[cursor]);
        if(nums[cursor] === target){
            return cursor; // query found!
        }
        if(target < nums[cursor]){
            right = cursor - 1; // move cursor to the left by one
            console.log("cursor moved to the left  by one")
        }else{
            left = cursor + 1; // move cursor to the right by two
            console.log("cursor moved to the right by two")
        }
    }
    return "false"; // not found
};
console.log(search([-1,0,1,2,3,4,5,6,7,8,9,10,11,12], 10));

The above code starts to search in the central location, nums[6] == 5. Look at the output below to see how the cursor moves until it finds the target value of 10 (at a zero-based index of 11):

binary search output

This algorithm has an O(log n) runtime complexity. That Big-O notation describes how it would scale as the input increases. Imagine an array with thousands of elements. O(log n) means that the time to execute this code will increase linearly only as the number of input items increase exponentially. That means our code is performant and efficient.

Why did the computer scientist use binary search to find his lost pencil? Because he wanted to reduce the search space by half every time he checked a desk drawer!

Square root algorithm using binary search

Another implementation example of using binary search in a JavaScript function is to calculate the square root of a number. Now, of course, Javascript has a built in Math.sqrt() function that is highly performant compared to any custom code we will write. But, it is a good exercise to think about how this works.

The square root of a number is a value that, when multiplied by itself, gives the original number. To solve for it when given an input, we are going to take a guess at what the answer (square root) is, starting with itself divided by two (giving us the midpoint between it and zero). We multiply that midpoint by itself to check our guess. It will only be correct on the first iteration if the input is the number four (four divided by two is two; two times two is four). Otherwise, we will move the cursor (halving the search range) to either the left or the right, depending on if the square of our guess is larger or smaller than the original input.

The concept of “moving the cursor” helps to visualize how the binary search algorithm zeroes in on the square root by iteratively narrowing down the search range based on the comparison of the square of the midpoint to the target number.

I accounted for two special cases in my code. For negative numbers we return false because negative numbers have imaginary square roots. For numbers smaller than one we set the range’s end to one because the square root of a fraction is larger than the fraction itself. Additionally, I set a precision threshold (0.0000000001), because some numbers have square roots that are irrational.

function binarySearchSquareRoot(n, precision = 1e-10) {
    if (n < 0) {
        throw new Error('Input must be a non-negative number');
    }

    let start = 0;
    let end = n;

    // If the number is less than 1, set end to 1 to handle fractions
    if (n < 1) {
        end = 1;
    }

    while (end - start > precision) {
        const mid = (start + end) / 2;
        const midSquared = mid * mid;

        if (midSquared === n) {
            return mid;  // Found exact square root
        } else if (midSquared < n) {
            start = mid;
        } else {
            end = mid;
        }
    }

    return (start + end) / 2;  // Return approximate square root
}

// Usage:
const number = 25;
const squareRoot = binarySearchSquareRoot(number);
console.log(`The square root of ${number} is approximately ${squareRoot}`);

Alternatively, the Babylonian algorithm can be  implemented to solve for square roots.

Additional References

https://delboy1978uk.wordpress.com/2018/02/06/binary-search-trees-in-php/
https://research.google/blog/extra-extra-read-all-about-it-nearly-all-binary-searches-and-mergesorts-are-broken/

Redirecting Traffic from EC2 Public DNS to a Domain Name

I searched Google for my own website, and noticed that some results were returning with my EC2 instance’s public hostname: http://ec2-18-191-145-67.us-east-2.compute.amazonaws.com/ – That’s a bad look for branding, and I figured it couldn’t be good for SEO. I fixed it by adding a new rewrite condition to my apache server’s httpd.conf file. The server runs on a Linux 2 image, and I found that file in this directory: /etc/httpd/conf/.

Initial Configuration

I already had a Virtual Host block that listens on port 80, responsible for making sure all traffic going through my domain name goes to the https://www.antpace.com. I just had to add the public DNS to the ServerAlias statement and add an additional RewriteCond statement:

<VirtualHost *:80>
    DocumentRoot "/var/www/html"
    ServerName "antpace.com"
    ServerAlias "www.antpace.com" "ec2-18-191-145-67.us-east-2.compute.amazonaws.com"
    RewriteEngine on
    RewriteCond %{HTTP_HOST} ^ec2-18-191-145-67.us-east-2.compute.amazonaws.com$ [OR]
    RewriteCond %{SERVER_NAME} =antpace.com [OR]
    RewriteCond %{SERVER_NAME} =www.antpace.com
    RewriteRule ^ https://www.antpace.com%{REQUEST_URI} [END,NE,R=permanent]
</VirtualHost>

Handling SSL Traffic

After restarting the server, I did another search, and saw some pages still returning with the SSL encrypted address https://ec2-18-191-145-67.us-east-2.compute.amazonaws.com/.

SERP

To handle traffic going there, I needed to add another Virtual Host block that would listen on port 443. You’ll notice that I had to reference my SSL certificates that were installed via Let’s Encrypt.

<VirtualHost *:443>
    DocumentRoot "/var/www/html"
    ServerName "antpace.com"
    ServerAlias "www.antpace.com" "ec2-18-191-145-67.us-east-2.compute.amazonaws.com"

    SSLEngine on
    SSLCertificateFile /etc/letsencrypt/live/antpace.com/fullchain.pem
    SSLCertificateKeyFile /etc/letsencrypt/live/antpace.com/privkey.pem
    SSLCertificateChainFile /etc/letsencrypt/live/antpace.com/chain.pem

    RewriteEngine on
    RewriteCond %{HTTP_HOST} ^ec2-18-191-145-67.us-east-2.compute.amazonaws.com$ [OR]
    RewriteCond %{HTTP_HOST} ^antpace.com$ [OR]
    RewriteCond %{HTTP_HOST} ^www.antpace.com$
    RewriteRule ^ https://www.antpace.com%{REQUEST_URI} [END,NE,R=permanent]
</VirtualHost>

Unfortunately, adding this block broke the site temporarily. It resulted in a redirect loop, in tandem with the previous block. I tried to adjust them both, resulting in the following:

<VirtualHost *:80>
    DocumentRoot "/var/www/html"
    ServerName "antpace.com"
    ServerAlias "www.antpace.com" "ec2-18-191-145-67.us-east-2.compute.amazonaws.com"

    RewriteEngine on
    # Redirect all HTTP traffic to HTTPS
    RewriteCond %{HTTPS} off
    RewriteRule ^ https://%{HTTP_HOST}%{REQUEST_URI} [L,R=301]
</VirtualHost>

<VirtualHost *:443>
    DocumentRoot "/var/www/html"
    ServerName "antpace.com"
    ServerAlias "www.antpace.com" "ec2-18-191-145-67.us-east-2.compute.amazonaws.com"

    SSLEngine on
    SSLCertificateFile /etc/letsencrypt/live/antpace.com/fullchain.pem
    SSLCertificateKeyFile /etc/letsencrypt/live/antpace.com/privkey.pem
    SSLCertificateChainFile /etc/letsencrypt/live/antpace.com/chain.pem

    RewriteEngine on
    # Redirect all non-preferred hostnames to the preferred hostname
    RewriteCond %{HTTP_HOST} ^ec2-18-191-145-67.us-east-2.compute.amazonaws.com [NC,OR]
    RewriteCond %{HTTP_HOST} ^antpace.com [NC]
    RewriteRule ^ https://www.antpace.com%{REQUEST_URI} [L,R=301]
</VirtualHost>

Although this configuration resolved the redirect loop, it failed to address the original issue. I discovered that my system had a separate configuration file for SSL traffic: /etc/httpd/conf.d/ssl.conf. I added the redirect rule and certificate references to the 443 Virtual Host block within this file, but the redirect issue persisted.

Diagnosing the Issue

Executing sudo apachectl -S revealed a conflicting Virtual Host on port 443 in httpd-le-ssl.conf. I moved the rewrite rules to this file, yet the redirect remained elusive. Suspecting a browser cache issue, I verified the redirect using curl:

301 redirect via CLI CURL

The 301 Moved Permanently response confirmed the redirect to https://www.antpace.com. Since the redirection works when tested with curl -k but not in a browser, the issue likely stems from the browser not accepting the SSL certificate due to the mismatch. Browsers are more strict with SSL certificate validation than curl -k.

I attempted to add the public host name as a subject alternative name (SAN) in my existing SSL certificate, but Let’s Encrypt refuses to issue certificates for EC2 hostnames. This restriction is due to Let’s Encrypt’s policy to prevent abuse. To circumvent this, I generated a self-signed certificate:

sudo mkdir -p /etc/ssl/private
sudo mkdir -p /etc/ssl/certs
sudo chmod 700 /etc/ssl/private
sudo openssl req -x509 -nodes -days 365 -newkey rsa:2048 -keyout /etc/ssl/private/ec2-selfsigned.key -out /etc/ssl/certs/ec2-selfsigned.crt

Final Configuration

I created a new Apache configuration file for the EC2 redirection and ensured no conflicts with existing configurations:

sudo nano /etc/httpd/conf.d/ec2-redirect.conf

Here’s the contents:

<IfModule mod_ssl.c>
<VirtualHost *:443>
    DocumentRoot "/var/www/html"
    ServerName "ec2-18-191-145-67.us-east-2.compute.amazonaws.com"

    SSLEngine on
    SSLCertificateFile /etc/ssl/certs/ec2-selfsigned.crt
    SSLCertificateKeyFile /etc/ssl/private/ec2-selfsigned.key

    RewriteEngine on
    # Redirect EC2 URL to the preferred domain
    RewriteRule ^ https://www.antpace.com%{REQUEST_URI} [L,R=301]
</VirtualHost>
</IfModule>

Upon restarting Apache, the 301 redirect functioned correctly in the browser, albeit with an initial security warning due to the self-signed certificate. Accepting the certificate led me to the desired URL. This project underscored the importance of meticulous configuration and validation in managing web traffic and ensuring optimal SEO performance.

Pro-tip: Each time I had to edit any of these sever configuration files, I did so from the command line using the Nano text editor. I learned along the way that I could select multiple lines of text by pressing “Ctrl + Shift + 6”, pressing the arrows to expand the selection, and then “Ctrl + K” to remove content.

Alternative Approaches

To stop this problem from arising, even to begin with, we can take an alternative approach. It is possible, when creating a new EC2 instance, to disable the auto-assign public IP address in the network settings. This will launch the instance without a public IP address.

Optimize Your Site’s Speed: Convert Images to WebP Format

In a recent post I discussed auditing existing websites for potential performance enhancements. In the process I discovered issues with the AntPace.com Lighthouse estimates (a topic I covered briefly in a post about progressive web apps).

Lighthouse performance estimate

My performance only scored 50 out of 100. One “opportunity” (estimated to save 2.16s) was to “serve images in next-gen formats”. AVIF (based on the AV1 video codec) and WebP are considered next generation because of “superior compression and quality characteristics compared to their older JPEG and PNG counterparts“. I chose to upgrade my images WebP (instead of AVIF) mostly due to greater browser support.

Before I upload images to this site, I usually run them through TinyPNG. Sometimes, I’ll also do some manual pre-processing in the GIMP, like cropping or scaling images down. I know that there  must be a better way to do all of that through a proper CI pipeline – but for now that is my low tech solution. Now that I need to come up with a new process for next-gen image formats, it might be a good time to explore a more automated solution.

Properly Size an Image for Your Website

Site speed is important for user experience and SEO. Having an image with unnecessarily large dimensions eats up bandwidth and leads to slow load times. You can open an image file in the GIMP and use the scale tool to reduce the size while maintaining the ratio. Once it is reduced, you can copy and paste it to it’s own canvas and save the file.

I write more about using this image manipulation program in another article about design for programmers

Convert multiple images to next-gen WebP file format

For converting single images, manually, one at a time I could use the GIMP or an online service. I used a command line tool on my mac called webp tools to bulk upgrade all of the files in an image directory.

brew install webp

For a single file I can use this command:

cwebp -q 80 software-education.png -o software-education.webp

To hit all of my image files in that folder I ran loops over the existing file formats. You should change this to include any other file formats used in your project.

for i in *.jpg; do cwebp -q 80 "$i" -o "${i%.jpg}.webp";done
for i in *.png; do cwebp -q 80 "$i" -o "${i%.png}.webp";done

I saved them to a new folder, so that I could easily delete all of the old files at once and then replace them. Alternatively, I can save them in the same directory and then run a command to delete all of the .png files: rm *.png

New folder amongst legacy image files

My website has been around for a while, so there are unused legacy media files. I manually searched my code base (ctrl + shift + f) for the file names listed in the various /image directories throughout my project, and deleted them if I found no references. (Maybe having so many disjointed image folders is part of a bigger problem with this project). If I did find it, I updated the file extension to webp. Later, I wrote a script to automatically find and delete unused image files from a project.

This change increased my Lighthouse performance score by ten points (I gained an additional two but upgrading MariaDB from version 10.2 to 10.4). I did this process is a few other directories of my project to complete the upgrade. I was going to convert my Apple touch icon files to a next-gen format too, but the documentation specify the use of the PNG format (good thing I checked).

WordPress and WebP

Having adopted WebP as the new standard file format for AntPace.com, I decided to upload .webp images to my posts – starting with this one. When I tried, WordPress complained: “This image cannot be processed by the web server. Convert it to JPEG or PNG before uploading.”

error from wordpress when trying to upload a next generation image file

This surprised me. I upgraded WordPress to the latest version (6.3.1 at that time), but it didn’t help. After further investigation, it looked like the problem had to do with the PHP image module gd.

I SSH’d into my EC2 instance to see what I could do. When I tried to install gd for my PHP version 7.4, I got a version mismatch error. It had to due with Amazon Linux 2 (the OS I run on AWS EC2) not supporting PHP 7.4 as it approaching or have passed their end-of-support dates. Every time I tried to installthe gd module, Amazon Linux Extras (the default Amazon Linux 2 package mechanism) would try to pull the version compatible with PHP 7.2. In an attempt to make it work, I manually disabled ‘amazon-linux-extras’, installed the Remi repository and made sure it was prioritized as my package manager. Still, “Packages skipped because of dependency problems”.

Amazon Linux 2 is at EOL.

The same thing happened when I tried using ImageMagick instead. This made me consider my Linux distribution. Not having gd installed what causing other problems when uploading media through WordPress (responsive image sizes are not being generated).

I had been wanting to upgrade the size of my EC2 instance anyway, so this might be the right time. I am considering Amazon Linux 2023 or a Bitnami image.  As you know, I’ll write a blog post about which I choose and the implementation details

Identify Unused Image Files in a Code Project

I wrote a script to list (and optionally delete) the image files it finds in a directory that are not referenced any where.  I specified a single sub-directory at a time. If you do the entire project it may take long to complete.

#!/bin/bash

PROJECT_DIR="$PWD"
IMAGE_DIR="$PWD"

DELETE_FLAG=false

# Check for -d (delete) flag
if [[ $1 == "-d" ]]; then
    DELETE_FLAG=true
fi

# Find all image files
find $IMAGE_DIR -type f \( -iname \*.png -o -iname \*.jpg -o -iname \*.jpeg -o -iname \*.gif -o -iname \*.webp -o -iname \*.svg -o -iname \*.ico \) | while read img_file; do
    # Extract the basename of the image file
    img_basename=$(basename "$img_file")

    # Search for it in the project, excluding .zip files and .git directories
    result=$(grep -ril --exclude=*.zip --exclude-dir=.git "$img_basename" "$PROJECT_DIR")

    # If not found, print it or delete it based on flag
    if [ -z "$result" ]; then
        echo "Unused image: $img_file"
        if $DELETE_FLAG; then
            rm "$img_file"
            echo "Deleted: $img_file"
        fi
    fi
done

Be sure to edit the code to include the image file types that you want to target. Make the file executable before trying to use it:

chmod +x find_unused_images.sh

Run the script (without deletion)

./find_unused_images.sh

To run the script with the delete functionality:

./find_unused_images.sh -d

Find unused images in a project

In an early version, my script was leaving behind files that appeared to be completely unreferenced in the code base (I checked manually by searching the project via IDE). To troubleshoot, I ran grep from the command line:

grep -ril "experienceLogo2.png" "$PWD"

It turned out that those files were referenced in a zip file and in git objects (and therefore considered not unused). I fixed this bug by adding the flags –exclude=*.zip –exclude-dir=.git to my grep command in find_unused_images.sh.

grep to find a file reference within a directory
I had lots of unused stock images and old designs that felt good to purge. Now with generative image AI, I know I could create assets easily as I need them in the future.

I used this script during a project to upgrade my website to use next generation file formats. If you liked this post, read another one where I discuss managing graphic assets for a web project.

Update

Identify any unused files in a code project

This code can be changed to search for any kind of file. Here’s an updated version I used to see if some old Bootstrap files were being used any where:

#!/bin/bash

PROJECT_DIR="$PWD"
FILE_DIR="$PWD/css"

DELETE_FLAG=false

# Check for -d (delete) flag
if [[ $1 == "-d" ]]; then
    DELETE_FLAG=true
fi

# Find all image files
# find $FILE_DIR -type f \( -iname \*.png -o -iname \*.jpg -o -iname \*.jpeg -o -iname \*.gif -o -iname \*.webp -o -iname \*.svg -o -iname \*.ico \) | while read my_file; do
find $FILE_DIR -type f \( -iname \*.css -o -iname \*.js \) | while read my_file; do
    # Extract the basename of the image file
    file_basename=$(basename "$my_file")

    # Search for it in the project, excluding .zip files and .git directories and .xml directories
    result=$(grep -ril --exclude=*.zip --exclude-dir=.git --exclude=*.xml "$file_basename" "$PROJECT_DIR")

    # If not found, print it or delete it based on flag
    if [ -z "$result" ]; then
        echo "Unused file: $my_file"
        if $DELETE_FLAG; then
            rm "$my_file"
            echo "Deleted: $my_file"
        fi
    fi
done

This didn’t work perfectly. I had to add an exclusion condition for .xml files because my WordPress blog archive files were being highlighted in the search. (EOD, I ended up zipping the few .xml archive files anyway. I also keep them on an S3 bucket, but I enjoy redundancy.)

The file name “bootstrap.css” was being found in its own file.

Bootstrap source code

This, at least, gave me enough confidence to just delete the files manually. I can’t call this a perfect tool (and I don’t think it would scale well), but it is a utility for a practical use-case.

I saw other examples of it acting funny. For instance, I had an old stock photo file named ‘5.jpg’. It was coming up as being used in the project because, for some reason, that string was found in another image file – ‘jimmy.webp’.

using grep to search image file names

Ensure Your Website’s Success: Maintenance, Audit, and Enhancement Plans

This post is all about how I help clients with their existing websites. If you are a fellow web developer reading this, use it for ideas on how to serve more people. My mission is to help businesses achieve more through their web presence.

If your curious about how I can help you with your website, send me a message. Below are some ways I will serve you.

Content updates & maintenance

I try to be a company’s go-to guy that can be called whenever anything comes up with their website.

If someone has a website, even if it is a static brochure site, it will eventually need help. It could be small content updates to reflect inevitable changes to the business. Or, one day something goes wrong. The website suddenly doesn’t work at all. Maybe someone notices something broken, be it major or minor. I want them to think of me and know that I can help.

There’s some businesses that regularly make content updates themselves using a CMS (like WordPress, Wix, Shopify, etc.). They could need occasional help with customizations, CMS or plugin update issues, and more. I let clients know that when issues arise, I’m just a text message away.

Audit & enhancement

A client usually requests this service in the form of a complaint: “My website is too slow”, “I’m not getting enough sales/conversions/leads from my website”. My response is to do a formal audit and analysis. The result includes recommendations for improvement and an estimate (time/price) for implementation.

Other times, clients do not even know that there is a potential risk (security issues) or unrealized upside (UX issues) that needs attention. Providing those insights with empathy and transparency helps businesses see that value. Below is a list of audit types I offer:

  • Security: Is your website secure? Does it use https? Is WordPress up-to-date? Is your site vulnerable to being taken over by hackers?
  • Accessibility: Is your website usable for people with disabilities? Many businesses don’t realize that this is a legal requirement under the ADA.
  • SEO: Technical SEO, optimization, and more
  • Design UI/UX: Does your website look like it’s stuck in the past? How does it perform on different mobile devices? Is there brand consistency? Is the user experience the best that it can be? Maybe it is slow and bloated from plugins/integrations and needs a refresh.

Once we figure out what needs attention, I can create a plan and strategy to enhance your website. We can take it one step and a time, and focus on what will have the greatest impact for you and your business. You can read more about my process for web development with freelance clients in another post.

steps to handling a web development client

Preemptive audits to win new clients

I approach clients (existing or perspective) with a value proposition from a place of wanting to give. This is especially true for small businesses that appear to be leaving honey 🍯  on the table.

My process for engaging a new client, especially cold ones, is to review their website and make note of any obvious improvements. One example is using a generic email address (ExampleBusiness@gmail.com) instead of their own domain. Others include broken 404 links and bad mobile UX.

Google Chrome’s built in Lighthouse feature helps me to highlight low performance in existing websites of potential clients.

low performing lighthouse scores for a small business

Screaming Frog SEO Spider is another utility that I use to identify (and pitch) improvements to new client web projects.


Training & education

Sometimes, managers and stakeholders want to know how things work or how to make some changes themselves. That’s why I offer technical training, education, and tutoring.

Your business might have a designer or marketer that is ready to add some tech skills to the mix. I can help with that too. Contact me about the personalized tech training that I offer.

Disaster recovery & best practices

When a tech disaster happens you need to have a plan for recovery. Do you have backups? What is the RPO and RTO for your organization when “the business is on fire”? Work with me to be prepared in these situations. I apply proven strategies and make sure your digital presence is resilient.

A moment of preparation is worth a week of remediation. Sailing ahead of the storm is possible by following best practices  How does your organization manage passwords and credentials? What apps do your employees use? Knowing the right questions is the only way to build valuable answers.

React Redux Provider Store: No Overload Matches This Call

This post documents a solution for the following error I encountered in a React TypeScript project that was using Redux:

No overload matches this call.
  Overload 1 of 2, '(props: ProviderProps<Action> | Readonly<ProviderProps<Action>>): Provider<Action>', gave the following error.
    Type '{ children: Element; store: Store<{ readonly [$CombinedState]?: undefined; } & { repos: ReposState; }, Action>; }' is not assignable to type 'IntrinsicAttributes & IntrinsicClassAttributes<Provider<Action>> & Readonly<ProviderProps<Action>>'.
      Property 'children' does not exist on type 'IntrinsicAttributes & IntrinsicClassAttributes<Provider<Action>> & Readonly<ProviderProps<Action>>'.
  Overload 2 of 2, '(props: ProviderProps<Action>, context: any): Provider<Action>', gave the following error.

React is a JavaScript framework used to build web apps. Redux is an open-source library used to manage the state of an application, and is often used along with React JS.

In this context, the Redux <Provider> component is used to pass application state along to its children components. It is best practice to wrap the entirety of your app in the <Provider> component, and pass the store object into it as an argument (property):

import React from 'react';
import ReactDOM from 'react-dom/client';
import './index.css';
import { Provider } from 'react-redux';
import App from './App';
import { store } from './state';

const root = ReactDOM.createRoot(
  document.getElementById('root') as HTMLElement
);

root.render(
  <React.StrictMode>
    <Provider  store={store}>
      <App />
    </Provider>
  </React.StrictMode>
);

In my project, this was producing an error on the <Provider> component that said “No overload matches this call.” I knew this must have something to with the argument(s) being passed along.

No overload matches this call.

At first I thought it might have something to do with my store object, but that was not it. I was able to resolve this roadblock by explicitly passing a ProviderProps object into the Provider component.

import React from 'react';
import ReactDOM from 'react-dom/client';
import './index.css';
import { Provider, ProviderProps } from 'react-redux';
import App from './App';
import { store } from './state';


const providerProps: ProviderProps = {
  store: store,
};

const root = ReactDOM.createRoot(
  document.getElementById('root') as HTMLElement
);

root.render(
  <React.StrictMode>
    <Provider  {...providerProps}>
      <App />
    </Provider>
  </React.StrictMode>
);

This worked because the store object is explicitly typed in the ProviderProps object. This ensures that it matches the type expected by the Provider component. Ultimately, it was a TypeScript error. TypeScript was not able to infer the store type correctly.

This was a bug I encountered while building a web app for an Udemy course called “React and Typescript: Build a Portfolio Project“.

Memoization (Caching) and Recursion with JavaScript

A common coding challenge that you may encounter will ask you to write a function that returns the Fibonacci sequence, up to the nth number (which is provided as an argument). Below is a solution, along with some commentary about the topic. This challenge is a great exercise in problem solving.

Fibonnaci sequence

Fibonacci numbers

The sequence starts with 0 and 1, and the next number in the sequence is always the sum of the previous two numbers. The first few terms of the sequence are:

0, 1, 1, 2, 3, 5, 8, 13, 21, 34, 55, 89, 144, 233, 377, 610, 987, 1597, 2584, 4181, 6765, 10946, 17711, 28657, 46368, 75025, 121393, 196418, 317811

Since this series follows a known pattern, we can write code to generate it up to a specified position.

In mathematics, the Fibonacci sequence is a sequence in which each number is the sum of the two preceding ones. Numbers that are part of the Fibonacci sequence are known as Fibonacci numbers.

These numbers were first described in ancient Indian mathematics. They are named after the Italian mathematician Leonardo of Pisa, also known as Fibonacci, who introduced the sequence to Western European mathematics in his 1202 book Liber Abaci. Fibonacci numbers are also strongly related to the golden ratio. In computer science, these numbers can be applied to programming algorithms related to search, data structures, and graphs.

Recursion

In programming, recursion is an important concept. Recursion is when a function calls itself. Writing code that generates the Fibonacci sequence requires recursion. Here is an example in JavaScript:

function fibonacci(n) {
    if (n < 2){
        return 1;
    }else{
        return fibonacci(n-2) + fibonacci(n-1);
    }
}
console.log(fibonacci(7)); // Returns 21

If you ask this function for 0 or 1 terms, it will simply return 1. It is the condition that will ultimately stop the recursion. Anything above that, it will have to call itself recursively. What exactly is happening there? This Stack Overflow thread does a great job stepping though the logic and illustrating each iteration.

fibonacci visualized

When I decorate the code from above with console log statements and collect the results into an array, it becomes obvious:

function fibonacci(n) {
  console.log("Iterating on n = " + n)
  if (n <= 1) {
    console.log("n is: "+n)
    return [0, 1].slice(0, n + 1);
  } else {
    const fib = fibonacci(n - 1);
    console.log("fib is: "+fib)
    console.log("iterating on " + n)
    fib.push(fib[fib.length - 1] + fib[fib.length - 2]);
    return fib;
  }
}

You can see it iterates all the way down, starting at the desired argument of term numbers, and ending with 1. Once it gets to the bottom, it starts going back up. On each subsequent round, it adds a new number to the result array by summing the previous two numbers.

fibonacci console log

I asked ChatGPT to rewrite this code for me, and this is how it was cleaned up:

function fibonacci(n) {
  if (n <= 1) {
    return [0, 1].slice(0, n + 1);
  } else {
    var sequence = fibonacci(n - 1);
    sequence.push(sequence[sequence.length - 1] + sequence[sequence.length - 2]);
    return sequence;
  }
}

This function has an exponential time complexity. It can be very slow for larger values of n.

Memoization and Cacheing

This challenge is often followed with a request to make it “more performant”. I mentioned above that our solution has “exponential time complexity”. Its algorithmic efficiency can be described as O(2^n) in Big O notation.

big o notation

Every call (while n is greater than 1) results in two additional recursive calls, one with n-1 and another with n-2. Each of those calls then results in two more recursive calls, and so on, resulting in a binary tree of recursive calls.

The performance of this code can be improved by implementing memoization. Memoization is when we store the results of our function call. On subsequent calls, our application can look up answers it previously calculated without have to do the work again.

function fibonacci2(n, memo = {}) {
  if (n in memo) {
    console.log("we used the memo on: " + n)
    return memo[n];
  }
  if (n <= 1) {
    return [0, 1].slice(0, n + 1);
  } else {
    const fib = fibonacci2(n - 1, memo);
    fib.push(fib[fib.length - 1] + fib[fib.length - 2]);
    memo[n] = fib;
    return fib;
  }
}
memo = {}
console.log(fibonacci2(7, memo));
console.log(fibonacci2(15, memo));

On each iteration we save the results to an array called memo. When we use the function, we first check to see if the answer we want is already stored in our cache. Our course, the work still needs to be done the first time around, but never again – making computation much faster in the future. You can see that my 2nd call can start where the results of the previous call left off:

memoization results

By using memoization, this implementation of the Fibonacci function has a time complexity of O(n). Another way to improve the performance of our code, without using memoization, is to use a loop:

function fibonacci(n) {
  var sequence = [0, 1];
  for (var i = 2; i <= n; i++) {
    sequence.push(sequence[i-1] + sequence[i-2]);
  }
  return sequence;
}

The choice between memoization or a loop depends on the specific requirements and constraints of the use-case. While the time complexity of a loop-based solution is still O(n), it can be faster than the memoization approach for small or medium-sized values of n. If simplicity and readability are a higher priority, or if memory usage is a concern, a loop-based solution may be a better option.

Memoization is considered a “dynamic programming” technique. Dynamic programming involves solving sub-problems once and storing the results for future reference, which can significantly improve the efficiency of the overall solution.

Debugging Mobile CSS on Chrome for Android

On this website (this very one you are reading) I have a resume page. On it, I display a timeline styled with CSS. I use the border-radius property to create circles for the years on that timeline. The years connect between <div> elements that represent my work experience.

timeline displayed on a resume webpage
An image can be worth a forty-two words

It looks great (at least,  I think so). Except on mobile. Specifically, on Android running Chrome. The circle appears oblongly squished.

Broken CSS on Android

I could not recreate this bug on my laptop, even when I used Chrome Developer Tools to simulate mobile. Not being able to reproduce a bug consistently is a very frustrating experience.

Chrome developer tools
I couldn’t recreate the mobile bug on my laptop. *Sigh*

USB debugging

I would have to use remote debugging via Chrome DevTools. The first step was to enable “Developer Options” on my Android device. I was using a S21 Galaxy Ultra. On this device I navigated to “Settings” -> “About Phone” -> “Software information”. Then I triple tapped the “Build number” and received a toast message “Developer mode activated”. This feels familiar, as it has been a similar process on previous Android devices that I have owned. I’d post a picture of my software information screen, but am worried that some of the data could be used maliciously by strangers on the internet.

“Developer options” was revealed in my “Settings” app. From there, I could turn on “USB debugging”

usb debugging in the developer options menu

Now, I could connect my Android to my MacBook. From my MacBook, I opened Chrome and navigated to chrome://inspect/#devices

view usb connected devices running chrome

As long as my Android also had Chrome running, I could see my device listed with any open browser tabs. Clicking “inspect” opened a new window on my laptop that mirrored my cellphone’s screen. When I scrolled on one, it reflected on the other.

Inspect mobile device from desktop

CSS Solution

I could inspect elements from the developer tools panel. This was exactly what I needed to debug the problem. And, the fix ended up being pretty easy. Here’s the original, relevant CSS:

.timeline .year {
  font-size: 1em;
  line-height: 4;
  border-radius: 50%;
  width: 6em;
}

The issue was ultimately with the width and height properties. The circles look correct on my desktop browser because the width and height rendered to nearly identical – 64px by 66px. To get a circle with CSS you need an element with the same height and width (the greater the difference, the less even and more stretched the circle appears), and then set the border-radius to 50%. On Android, that same element was being rendered as 64px by 85px. This was most probably happening because the height was not being explicitly defined.

As a remedy, I hard-coded the width and height properties. I changed the unit of measurement to pixels for both.

.timeline .year {
  font-size: 1em;
  line-height: 4;
  border-radius: 50%;
  width: 65px;
  height: 65px;
}

This fixed the circle from being stretched. But, now the text was not centered that way that it should be.

Fixed CSS displays a circle

That was happening because of the line-height property. Since it was set without a unit of measure, most browsers would interpret it to mean a multiplier of the current font-size. And, the font-size was also using a relative unit of measure, em. Right away, that was a code smell. It was a browser issue, where along the way values were not being calculated as expected.

On mobile, the font-size was being calculated to 20.8px. On desktop, the font-was was being calculated to 16px. I fixed this by changing the line-height value to an absolute unit of measure:

.timeline .year {
  font-size: 1em;
  line-height: 65px;
  border-radius: 50%;
  width: 65px;
  height: 65px;
}

Palindromes in PHP

A palindrome is a word (or a string of characters) that can be read identically either forwards or backwards. Examples include:

racecar
madam
mom
level
civic
kayak
rotavator

The logic for determining a palindrome is simple. Take the input, reverse it, and then compare it to the original. PHP even has a built-in operation, strrev(), to reverse strings. We can write a function to judge if an input string is a palindrome:

function determinePalindromeWithReverse($value){
	$reverse = strrev($value);
	if($reverse === $value){
		echo "true \n";
		return true;
	}
        return false;
}

During an interview, for a role as a Software Engineer, I was asked “Given a string, determine if you can make it a palindrome by removing at most 1 character.”

To solve that challenge, I can loop through the string while increasing the value of a counter variable. On each iteration, I’d remove a single character (whose index is determined by the count), reverse the result, and then compare it.

function determinePalindromeWithReverseRemoveCharacter($value){
	$reverse = strrev($value);
	if($reverse === $value){
		echo "true \n";
		return true;
	}

	for($i=0;$i<=strlen($value);$i++){
		$first_half = substr($value, 0, $i); // first half of string
		$second_half = substr($value, $i + 1);
		$string_with_one_char_removed = $first_half . $second_half;
		echo "$string_with_one_char_removed \n";
		$reverse = strrev($string_with_one_char_removed);
		if($reverse === $string_with_one_char_removed){
			echo "true \n";
			return true;
		}
	}

}
determinePalindromeWithReverseRemoveCharacter("racecfar"); // true

I use PHP’s substr() function to get the each half of “the new string with one character removed.” The first division starts from the beginning (zero index) and continues up until the counter determined position (zero on the first loop, one on the second, and so on). The second part starts one step past the iterative count, and finishes with the string’s end. This results is the original input with a single letter deleted.

To illustrate how this works, I printed out the concatenation each time. You can see that the program continues until the result is a palindrome.

php palindrome

Although this works, reversing the string each time is costly. It reduces the algorithmic efficiency, making the solution “not scalable.” How can we decide if a string is a palindrome without reversing it?

Validating a palindrome using recursion

Judging a string to be a palindrome can be done using recursion. In programming, recursion is when a function calls itself.

Before we worry about removing any characters like we did above, we need a new function to verify a palindrome without reversing it:

function determinePalindromeRecursively($value){
    if ((strlen($value) < 2)){
        // echo "true \n";
        return true;
    }else{
        if (substr($value,0,1) == substr($value,(strlen($value) - 1),1)){
            echo substr($value,1,strlen($value) - 2) . "\n";
            return determinePalindromeRecursively(substr($value,1,strlen($value) -2));
        }else{
            // echo " Not a Palindrome";
            return false;
        }
    }
}

This method compares the first and last characters of the input. If they match, our code will remove them and pass the updated $value back around to itself, recursively. This continues until we get down to a single letter, or less – when we know that the original string was a palindrome.

To get the first character, we tell the substr() method to take the $value, start at the beginning (zero index), and collect a single element: substr($value,0,1)

To get the last character, we tell the substr() method to take the $value, start at the end (the string’s length minus one), and collect a single element: substr($value,(strlen($value) – 1),1)

To remove both the first and last letters, we tell substr() to start just past the first element (represented by an index of 1), and to collect the string’s length worth of characters minus two.

Notice that on each recursive loop, the string loses the front and back symbols.

cli output

Now, remember the original challenge: “Given a string, determine if you can make it a palindrome by removing at most 1 character.”

All that is left is to use our recursive function in tandem with removing a single character per loop.

function determinePalindromeRecursively($value){
    if ((strlen($value) < 2)){
        // echo "true \n";
        return true;
    }else{
        if (substr($value,0,1) == substr($value,(strlen($value) - 1),1)){
            echo substr($value,1,strlen($value) -2) . "\n";
            return determinePalindromeRecursively(substr($value,1,strlen($value) -2));
        }else{
            // echo " Not a Palindrome";
            return false;
        }
    }
}

function determinePalindromeRecursivelyWhileRemovingOneCharacter($value){

    for($i=0;$i<=strlen($value);$i++){
        $first_half = substr($value, 0, $i); // first half of string
        $second_half = substr($value, $i + 1);
        $string_with_one_char_removed = $first_half . $second_half;
        // echo "$string_with_one_char_removed \n";

        if(determinePalindromeRecursively($string_with_one_char_removed)){
            echo "true \n";
            return true;
        }
    }
    echo "false \n";
    return false;

}

determinePalindromeRecursivelyWhileRemovingOneCharacter("racecadr");

Give it a try, refactor my code, and see if you can solve this problem in a different way. There are other computer science puzzles about palindromes that you can apply this logic towards. Have fun!