A palindrome is a word (or a string of characters) that can be read identically either forwards or backwards. Examples include:
racecar
madam
mom
level
civic
kayak
rotavator
The logic for determining a palindrome is simple. Take the input, reverse it, and then compare it to the original. PHP even has a built-in operation, strrev(), to reverse strings. We can write a function to judge if an input string is a palindrome:
function determinePalindromeWithReverse($value){
	$reverse = strrev($value);
	if($reverse === $value){
		echo "true \n";
		return true;
	}
        return false;
}
During an interview, for a role as a Software Engineer, I was asked “Given a string, determine if you can make it a palindrome by removing at most 1 character.”
To solve that challenge, I can loop through the string while increasing the value of a counter variable. On each iteration, I’d remove a single character (whose index is determined by the count), reverse the result, and then compare it.
function determinePalindromeWithReverseRemoveCharacter($value){
$reverse = strrev($value);
if($reverse === $value){
echo "true \n";
return true;
}
for($i=0;$i<=strlen($value);$i++){
$first_half = substr($value, 0, $i); // first half of string
$second_half = substr($value, $i + 1);
$string_with_one_char_removed = $first_half . $second_half;
echo "$string_with_one_char_removed \n";
$reverse = strrev($string_with_one_char_removed);
if($reverse === $string_with_one_char_removed){
echo "true \n";
return true;
}
}
}
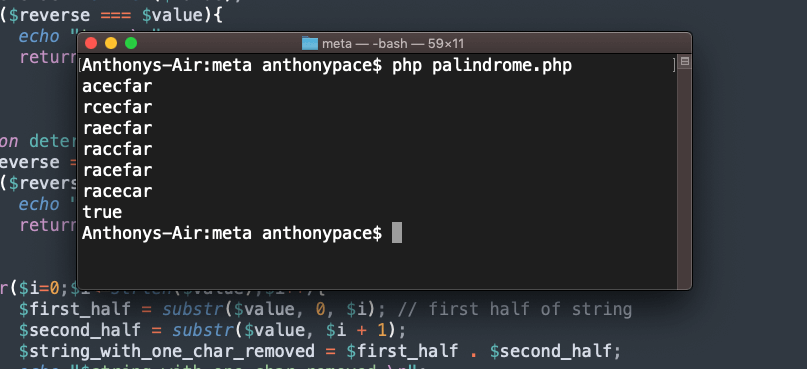
determinePalindromeWithReverseRemoveCharacter("racecfar"); // true
I use PHP’s substr() function to get the each half of “the new string with one character removed.” The first division starts from the beginning (zero index) and continues up until the counter determined position (zero on the first loop, one on the second, and so on). The second part starts one step past the iterative count, and finishes with the string’s end. This results is the original input with a single letter deleted.
To illustrate how this works, I printed out the concatenation each time. You can see that the program continues until the result is a palindrome.
Although this works, reversing the string each time is costly. It reduces the algorithmic efficiency, making the solution “not scalable.” How can we decide if a string is a palindrome without reversing it?
Validating a palindrome using recursion
Judging a string to be a palindrome can be done using recursion. In programming, recursion is when a function calls itself.
Before we worry about removing any characters like we did above, we need a new function to verify a palindrome without reversing it:
function determinePalindromeRecursively($value){
if ((strlen($value) < 2)){
// echo "true \n";
return true;
}else{
if (substr($value,0,1) == substr($value,(strlen($value) - 1),1)){
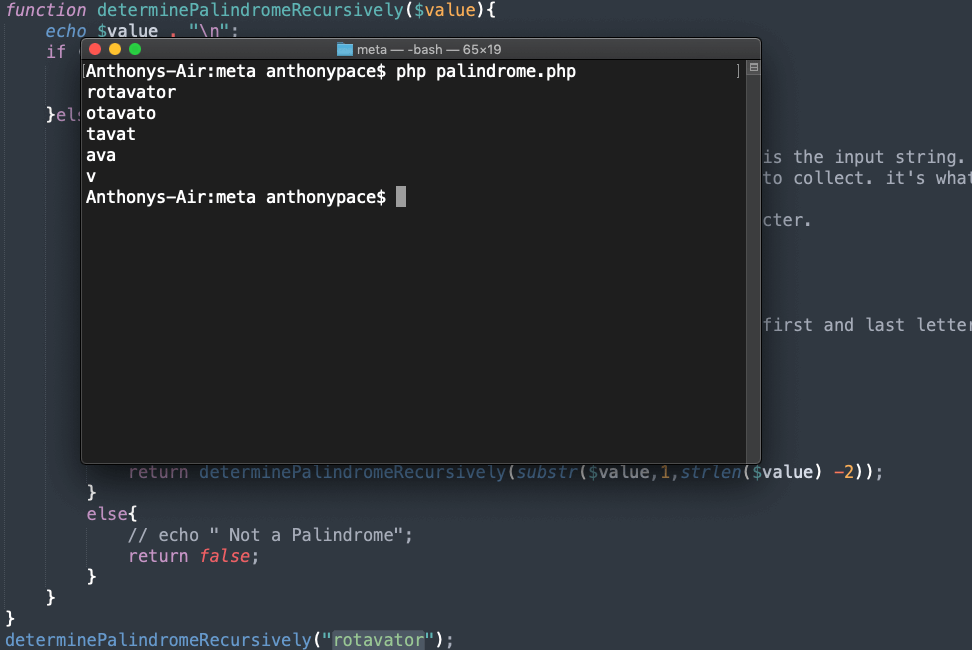
echo substr($value,1,strlen($value) - 2) . "\n";
return determinePalindromeRecursively(substr($value,1,strlen($value) -2));
}else{
// echo " Not a Palindrome";
return false;
}
}
}
This method compares the first and last characters of the input. If they match, our code will remove them and pass the updated $value back around to itself, recursively. This continues until we get down to a single letter, or less – when we know that the original string was a palindrome.
To get the first character, we tell the substr() method to take the $value, start at the beginning (zero index), and collect a single element: substr($value,0,1)
To get the last character, we tell the substr() method to take the $value, start at the end (the string’s length minus one), and collect a single element: substr($value,(strlen($value) – 1),1)
To remove both the first and last letters, we tell substr() to start just past the first element (represented by an index of 1), and to collect the string’s length worth of characters minus two.
Notice that on each recursive loop, the string loses the front and back symbols.
Now, remember the original challenge: “Given a string, determine if you can make it a palindrome by removing at most 1 character.”
All that is left is to use our recursive function in tandem with removing a single character per loop.
function determinePalindromeRecursively($value){
    if ((strlen($value) < 2)){
        // echo "true \n";
        return true;
    }else{
        if (substr($value,0,1) == substr($value,(strlen($value) - 1),1)){
            echo substr($value,1,strlen($value) -2) . "\n";
            return determinePalindromeRecursively(substr($value,1,strlen($value) -2));
        }else{
            // echo " Not a Palindrome";
            return false;
        }
    }
}

function determinePalindromeRecursivelyWhileRemovingOneCharacter($value){

    for($i=0;$i<=strlen($value);$i++){
        $first_half = substr($value, 0, $i); // first half of string
        $second_half = substr($value, $i + 1);
        $string_with_one_char_removed = $first_half . $second_half;
        // echo "$string_with_one_char_removed \n";

        if(determinePalindromeRecursively($string_with_one_char_removed)){
            echo "true \n";
            return true;
        }
    }
    echo "false \n";
    return false;

}

determinePalindromeRecursivelyWhileRemovingOneCharacter("racecadr");
Give it a try, refactor my code, and see if you can solve this problem in a different way. There are other computer science puzzles about palindromes that you can apply this logic towards. Have fun!