Here’s a quick one about how to create a drop-down UI element with an arrow via CSS. The aim is to create a menu that has drop-down sub-menus. Each drop-down should have an arrow that points up towards the parent element.
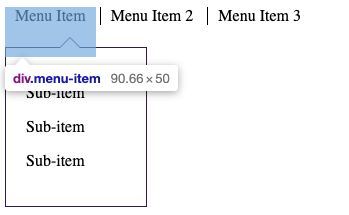
I line the menu-items in a row by setting display to ‘inline-block’. This is preferred over just ‘inline’, so that their height property is respected. This is important because I will create space between the parent item and sub-menu. If the two elements don’t actually overlap, then the hover state will be lost, closing the drop-down. See what I mean:
The sub-menu element overlaps with the parent item, so that the hover state is not lost.
I also set the parent item position to relative, so that the drop-down will be absolutely positioned respective to it.
The sub-menu styling is straight-forward. I set it to display: none, set a width, add a border and padding, and position it absolutely. Its top value pushes it off of the parent item a bit. Setting a left value to zero ensures that it will be aligned with its parent. (If you don’t set a left value, multiple sub-menus will all stack under the very first parent item.)
The next step is building the arrow in the drop-down menu. The challenge is making the arrow’s border blend seamlessly with the container’s border. The illusion is achieved by overlapping the :before and :after pseudo-elements.
The triangle shape that forms the arrow is achieved by giving a bottom border to an element with no height or width. This code pen animation does a phenomenal job of explaining the idea: https://codepen.io/chriscoyier/pen/lotjh
The drop-down’s :before element creates the white triangle that is the heart of the arrow itself. This also creates the gap in the sub-menu’s actual top border
The :after element creates another triangle that is behind and slightly above the first one – creating the illusion of a border that connects just right with the menu’s.
The illusion can be better revealed by manipulating the position and border-width of these pseudo-elements in the inspector.
Here is the code I used for those pseudo elements:
Distributing software to app and plugin markets is a great way to gain organic traffic. Last year I submitted BJJ Tracker to the Google Play store as a Progressive Web App. Since then, I get signups every few days – with zero marketing effort.
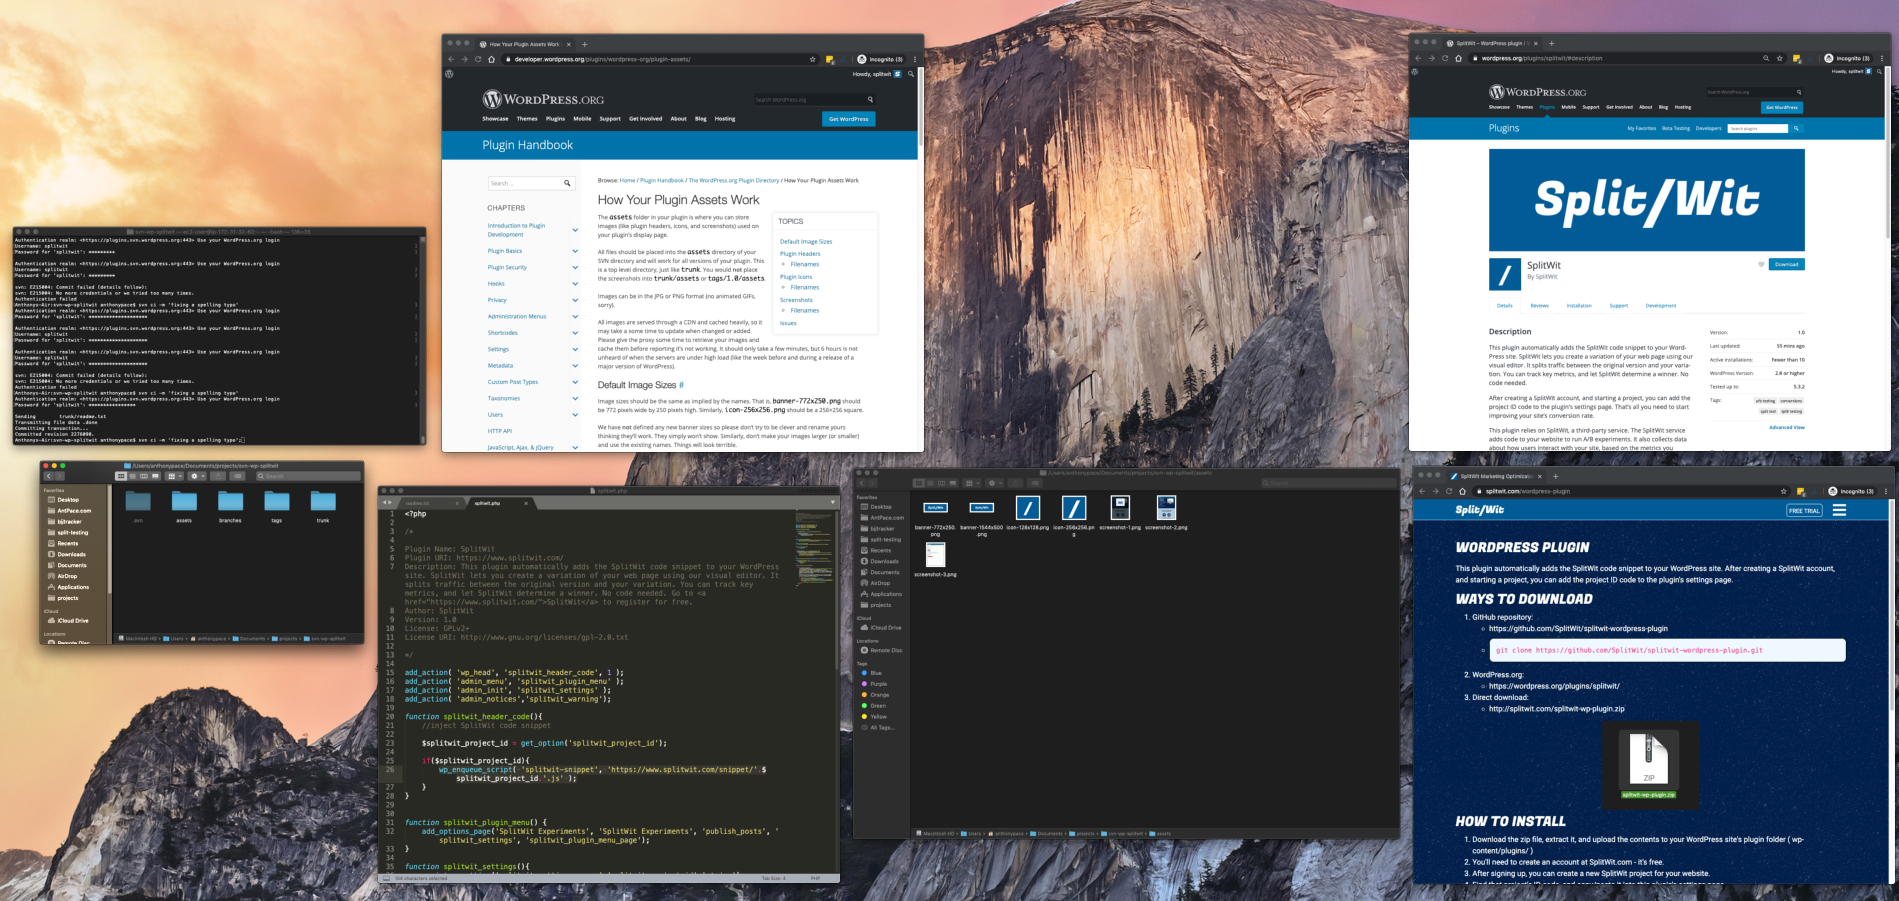
I created a WordPress plugin for SplitWit, to grow its reach in a similar way. SplitWit helps run A/B experiments on the web. A JavaScript snippet needs to be added to your code for it to work. This plugin injects the code snippet automatically.
Here is the process I took to develop and submit it to the WordPress plugin directory.
/*

Plugin Name: SplitWit
Plugin URI: https://www.splitwit.com/
Description: This plugin automatically adds the SplitWit code snippet to your WordPress site. SplitWit lets you create a variation of your web page using our visual editor. It splits traffic between the original version and your variation. You can track key metrics, and let SplitWit determine a winner. No code needed. Go to SplitWit to register for free.
Author: SplitWit
Version: 1.0
License: GPLv2+
License URI: http://www.gnu.org/licenses/gpl-2.0.txt

*/
My PHP code defines six functions, uses four action hooks, and one filter hook.
The first function injects the SplitWit snippet code into the WordPress website’s header:
function splitwit_plugin_menu_page() { ?>

	<div>
		<h1>SplitWit Experiments</h1>
		<p>This plugin automatically adds the <a href="https://www.splitwit.com" target="_blank">SplitWit</a> code snippet to your WordPress site. <a href="https://www.splitwit.com" target="_blank">SplitWit</a> lets you create a variation of your web page using our visual editor. It splits traffic between the original version and your variation. You can track key metrics, and let SplitWit determine a winner. No code needed.
		</p>
		<p>You'll need to create an account at SplitWit.com - it's free. After signing up, you can create a new SplitWit project for your website. Find that project's ID code, and copy/paste it into this page.</p>

		<form method="post" action="options.php">
			<?php settings_fields( 'splitwit_settings_group' ); ?>
			<input style="width: 340px;display: block; margin-bottom: 10px;" type="text" name="splitwit_project_id" value="<?php echo get_option('splitwit_project_id'); ?>" />
			<input type="submit" class="button-primary" value="Save" />
		</form>
	</div>

<?php }
When the SplitWit code snippet is injected into the website’s header, it needs to reference a project ID. I register that value from the menu page:
function splitwit_settings(){
	register_setting('splitwit_settings_group','splitwit_project_id','string');
}
add_action( 'admin_init', 'splitwit_settings' );
If the project ID value has not been defined, I show a warning message at the top of the dashboard:
function splitwit_warning(){
  if (!is_admin()){
     return;
  }

  $splitwit_project_id = get_option("splitwit_project_id");
  if (!$splitwit_project_id || $splitwit_project_id < 1){
    echo "<div class='notice notice-error'><p><strong>SplitWit is missing a project ID code.</strong> You need to enter <a href='options-general.php?page=splitwit_settings'>a SplitWit project ID code</a> for the plugin to work.</p></div>";
  }
}
add_action( 'admin_notices','splitwit_warning');
The readme.txt defines additional meta-data. Each section corresponds to parts of the WordPress plugin directory page. The header section is required, and includes some basic fields that are parsed to the plugin page UI.
=== SplitWit ===
Contributors: SplitWit
Plugin Name: SplitWit
Plugin URI: https://www.splitwit.com
Tags: split test, split testing, ab testing, conversions
Requires at least: 2.8
Tested up to: 5.3.2
Stable tag: 1.0

Optimize your website for maximum convertibility. This plugin lets you use SplitWit to run experiments on your WordPress website.
I also added sections for a long description and installation instructions. Later, I included a screenshots section (see Subversion repo).
Submit for review
Plugin zip files can be uploaded to WordPress.org. Plugins can also be distributed to WordPress users without this step – but having it listed in the WordPress directory lends credibility and visibility. After my initial submission, I received an email indicating issues with my code and requesting changes. The changes were simple: “use wp_enqueue commands” and “document use of an external service”.
Originally, my “splitwit_header_code()” function include the SplitWit JS snippet directly as plain text. I changed it to use the built-in function “wp_enqueue_script()”.
Next, they wanted me to disclose the use of SplitWit, the service that powers the plugin. I added this to my readme.txt:
This plugin relies on SplitWit, a third-party service. The SplitWit service adds code to your website to run A/B experiments. It also collects data about how users interact with your site, based on the metrics you configure.
After making these changes, I replied back with an updated .zip. A few days later I received approval. But, that wasn’t the end – I still needed to upload my code to a WordPress.org hosted SVN repository.
Subversion Repo
I’ve used Git for versioning my entire career. I had heard of SVN, but never used it. What a great opportunity to learn!
The approval email provided me with a SVN URL. On my local machine, I created a new folder, “svn-wp-splitwit”. From a terminal, I navigated to this directory and checked out the pre-built repo:
svn co https://plugins.svn.wordpress.org/splitwit
I added my plugin files (readme.txt and splitwit.php) to the “trunk” folder. This is where the most up-to-date, ready-to-distribute, version of code belongs.
In the “tags” folder, I created a new directory called “1.0” and put a copy of my files there too – for the sake of version control. This step is completely optional and is how SVN handles revisions.
In the assets folder I included my banner, icon, and screenshot files. The filenames follow as prescribed by WordPress.org. I made sure to reference the screenshot files in my readme.txt file, under a new “Screenshots” section.
Finally, I pushed my code back up to the remote:
svn ci -m "Initial commit of my plugin."
You can now find my plugin in the WordPress.org plugin directory. SplitWit is available for a free trial. Give it a try, and let me know what you think.
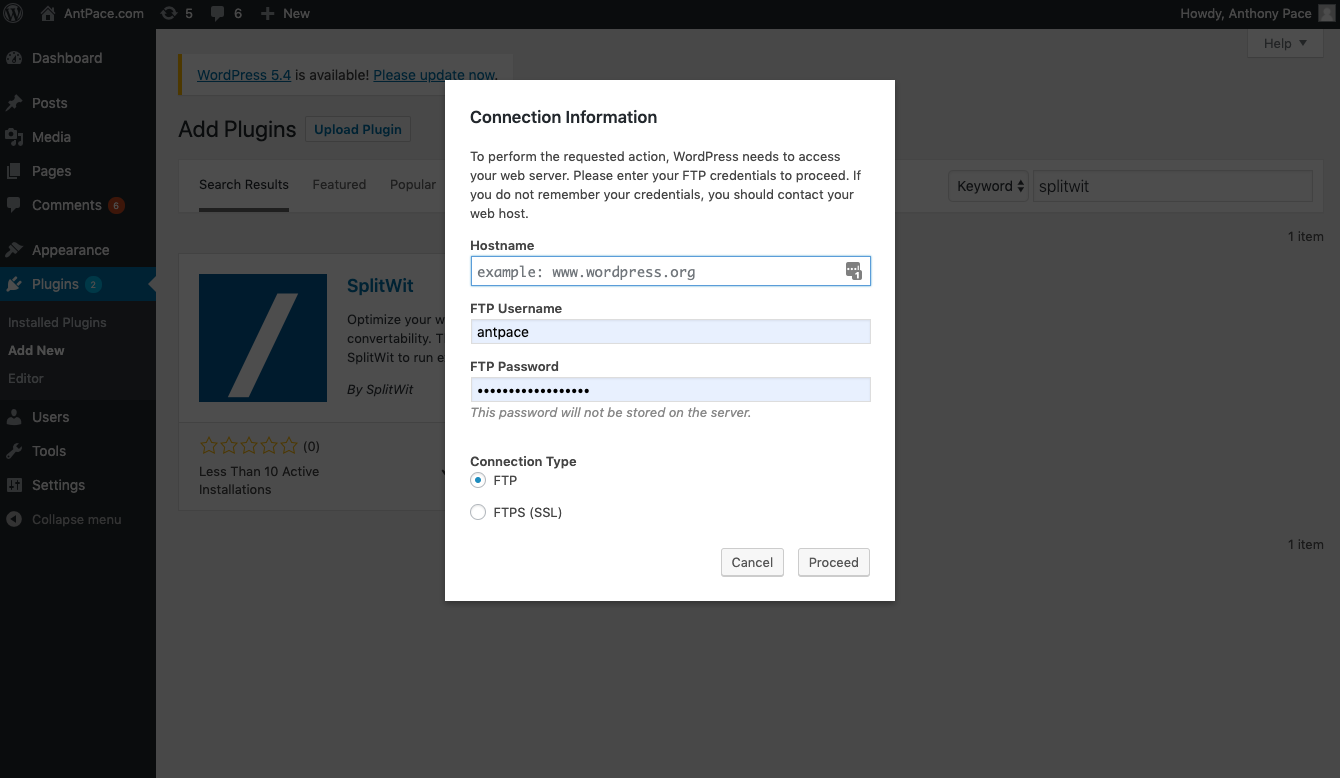
Pro-tip: Some WordPress setups won’t let you to install plugins from the dashboard with out providing FTP credentials, including a password. If you use a key file, instead of a password, this is a roadblock.
Not everyone uses a password to connect to their server.
You can remedy this by defining the file system connection method in your functions.php file:
My last post was about launching a website onto AWS. This covered launching a new EC2 instance, configuring a security group, installing LAMP software, and pointing a domain at the new instance. The only thing missing was to configure SSL and HTTPS.
Secure Sockets Layer (SSL) encrypts traffic between a website and its server. HTTPS is the protocol to deliver secured data via SSL to end-users.
In my last post, I already allowed all traffic through port 443 (the port that HTTPS uses) in the security group for my EC2 instance. Now I’ll install software to provision SSL certificates for the server.
Certbot
Certbot is free software that will communicate with Let’s Encrypt, an SSL certificate authority, to automate the management of encryption certificates.
Before downloading and installing Certbot, we’ll need to install some dependencies (Extra Packages for Enterprise Linux). SSH into the EC2 instance that you want to secure, and run this command in your home directory (/home/ec2-user):
sudo wget -r --no-parent -A 'epel-release-*.rpm' http://dl.fedoraproject.org/pub/epel/7/x86_64/Packages/e/
Finally, schedule an automated task (a cron job) to renew the encryption certificate as needed. If you don’t do this part, HTTPS will fail for your website after a few months. Users will receive an ugly warning, telling them that your website is not secure. Don’t skip this part!
Run this command to open your cron file:
sudo nano /etc/crontab
Schedule Certbot to renew everyday, at 4:05 am:
05 4 * * * root certbot renew --no-self-upgrade
Make sure your cron daemon is running:
sudo systemctl restart crond
That’s it! Now your website, hosted on EC2 will support HTTPS. Next, we’ll force all traffic to use it.
Update (June 2025): Since publishing this guide, I revisited the SSL setup on a legacy EC2 instance running Amazon Linux 2 and found a faster, cleaner process. This time, I used certbot --apache with Amazon Linux Extras to install Certbot directly from the EPEL repository, which streamlined certificate generation and automatic Apache config updates. Rather than manually editing the Apache config or setting up symbolic links, Certbot handled everything—including HTTPS redirects—with a few prompts. I also confirmed that Amazon Linux 2 doesn’t automatically schedule renewals via systemd, so I added a simple cron job to ensure the certificate auto-renews. This approach is quicker, more reliable, and avoids the need for low-level configuration tweaks.
In 2008 I deployed my first website to production. It used a simple LAMP stack , a GoDaddy domain name, and HostGator hosting.
Since 2016, I’ve used AWS as my primary cloud provider. And this year, I’m finally cancelling my HostGator package. Looking through that old server, I found artifacts of past projects – small businesses and start-ups that I helped develop and grow. A virtual memory lane.
Left on that old box was a site that I needed to move to a fresh EC2 instance. This is an opportunity to document how I launch a site to Amazon Web Services.
Amazon Elastic Compute Cloud
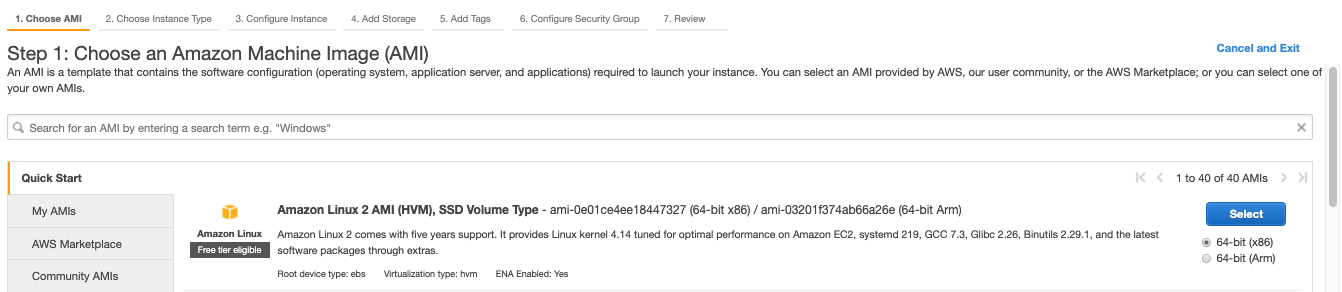
To start, I launch a new EC2 instance from the AWS console. Amazon’s Elastic Compute Cloud provides “secure and resizable compute capacity in the cloud.” When prompted to choose an Amazon Machine Image (AMI), I select “Amazon Linux 2 AMI”. I leave all other settings as default. When I finally click “Launch”, it’ll ask me to either generate a new key file, or use an existing one. I’ll need that file later to SSH or sFTP into this instance. A basic Linux server is spun up, with little else installed.
Amazon Linux 2 AMI is free tier eligible.
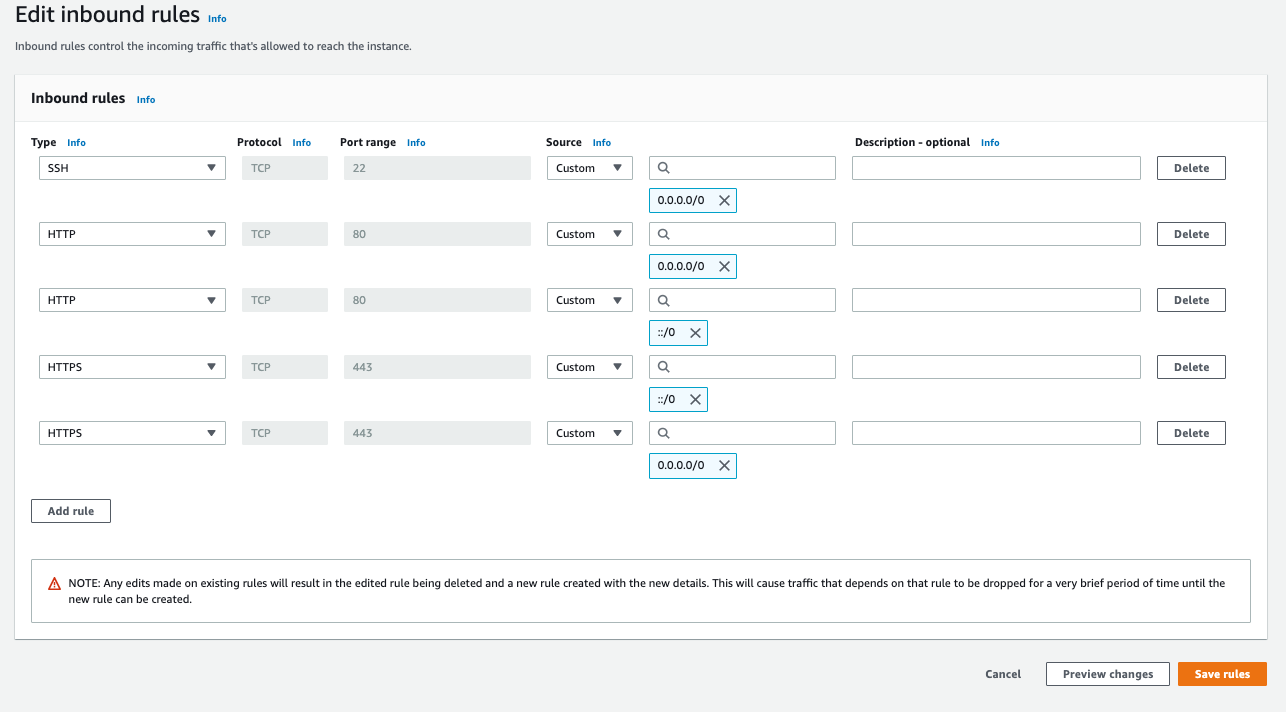
Next, I make sure that instance’s Security Group allows inbound traffic on SSH, HTTP, and HTTPS. We allow all traffic via HTTP and HTTPS (IPv4 and IPv6, which is why there are 2 entries for each). That way end-users can reach the website from a browser. Inbound SSH access should not be left wide open. Only specific IP addresses should be allowed to command-line in to the server. AWS has an option labeled “My IP” that will populate it for your machine.
Don’t allow all IPs to access SSH in a live production environment.
Recent AWS UI updates let you set these common rules directly from the “Launch an instance” screen, under “Network settings”
Configure the server
Now that the hosting server is up-and-running, I can command-line in via SSH from my Mac’s terminal using the key file from before. This is what the command looks like:
” It is required that your private key files are NOT accessible by others. This private key will be ignored. “
That just means you need to update the file permissions on the key file. You should do that from the command line, in the directory where the file resides:
chmod 400 KeyFileNameHere.pem
Make sure everything is up-to-date by running “sudo yum update“. I begin installing the required software to host a website:
That command gives me Apache, PHP, and MariaDB – a basic LAMP stack. This next one installs the database server:
sudo yum install -y httpd mariadb-server
MariaDB is a fork of the typical MySQL, but with better performance.
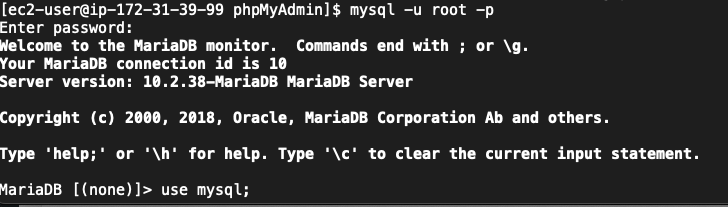
By default, MariaDB will not have any password set. If you choose to install phpMyAdmin, it won’t let you login without a password (as per a default setting). You’ll have to set a password from the command line. While connected to your instance via SSH, dispatch this command:
mysql -u root -p
When it prompts you for a password, just hit enter.
Once you’re logged in, you need to switch to the mysql database by running the following command:
use mysql;
Now you can set a password for the root user with the following command:
UPDATE user SET password = PASSWORD('new_password') WHERE user = 'root';
After setting the password, you need to flush the privileges to apply the changes:
FLUSH PRIVILEGES;
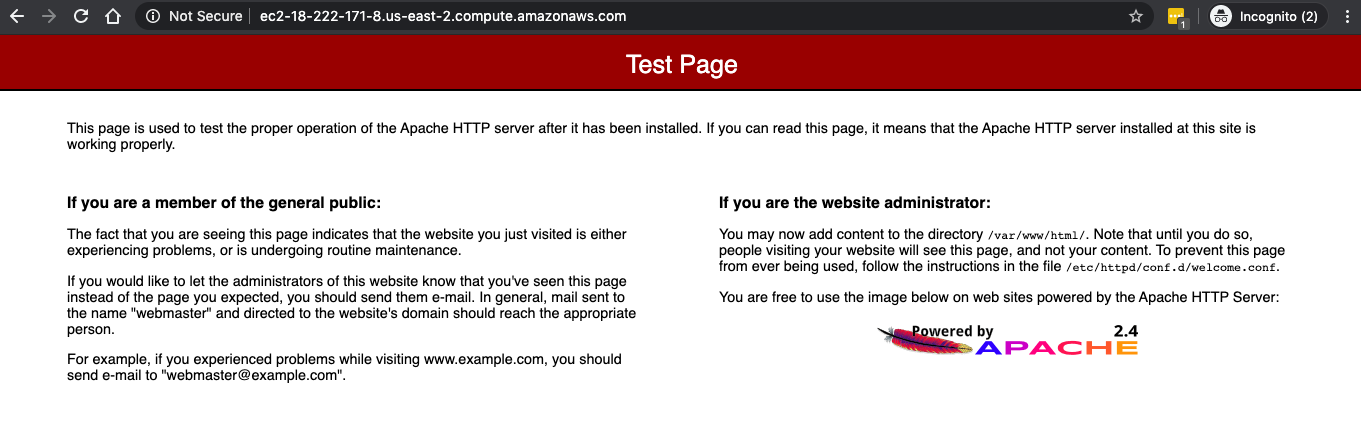
Start Apache: “sudo systemctl start httpd“. And, make sure it always starts when the server boots up “sudo systemctl enable httpd”
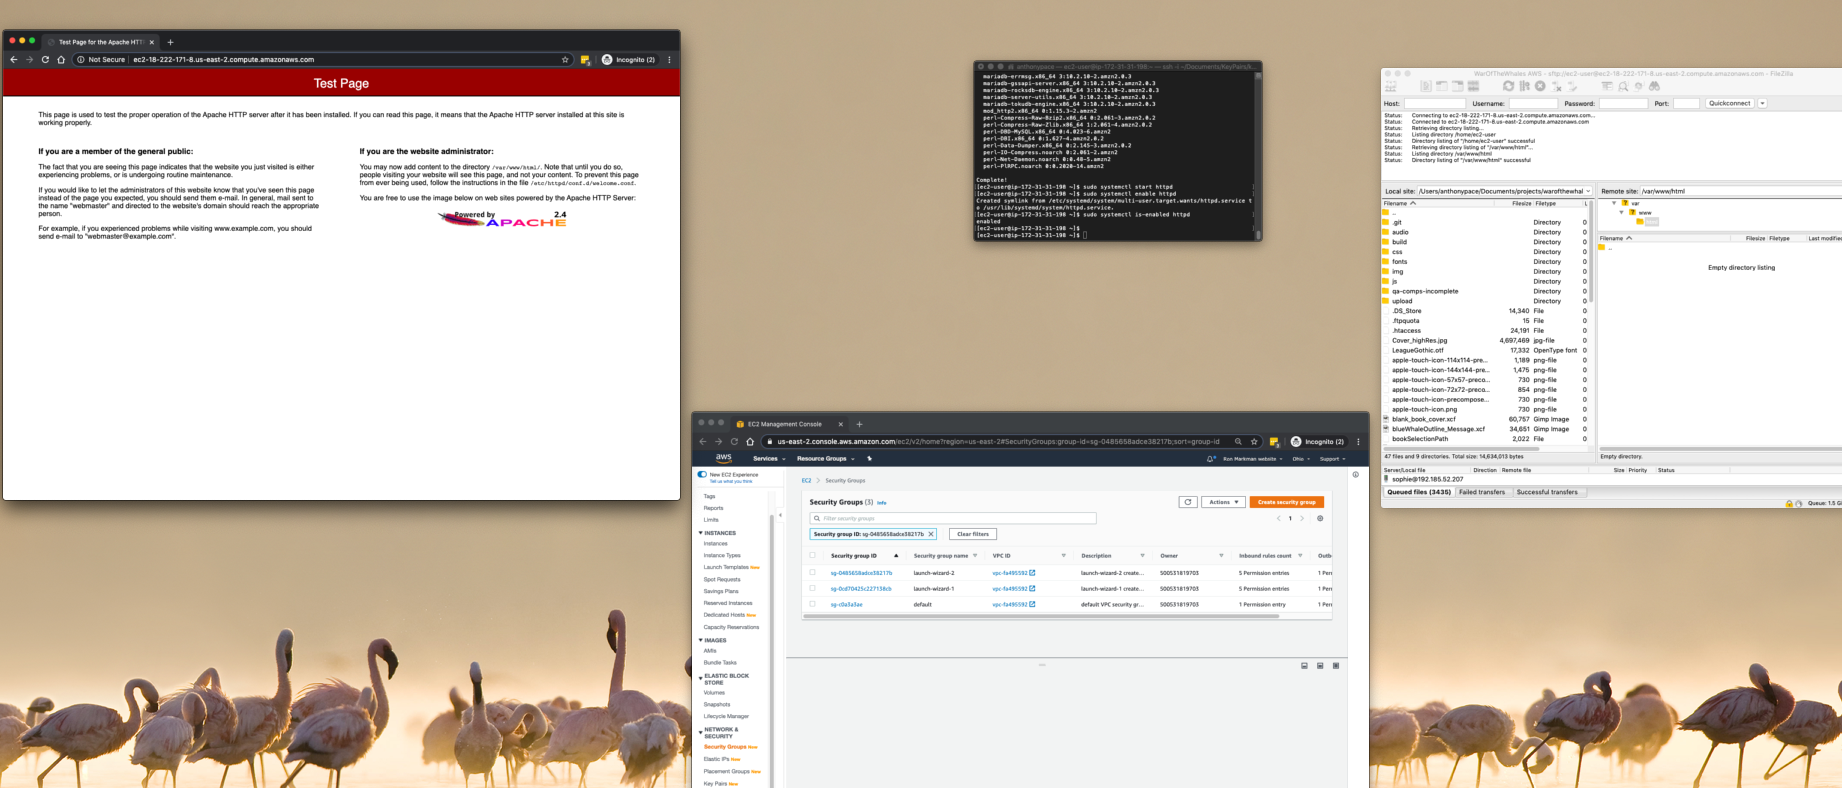
The server setup is complete. I can access an Apache test page from a web browser by navigating to the EC2 instance’s public IP address.
A test page shows when no website files are present.
I’ll take my website files (that are stored on my local machine and synched to a Git repo) and copy them to the server via sFTP.
I use FileZilla to access my EC2 public directory
I need to make sure the Linux user I sFTP with owns the directory “/var/www/html”, or else I’ll get a permission denied error:
sudo chown -R ec2-user /var/www/html
Later, if I want to be able to upload media to the server from the WordPress CMS, I’ll need to be sure to change the owner of the blog’s directory to the apache user (which is the behind-the-scenes daemon user invoked for such things):
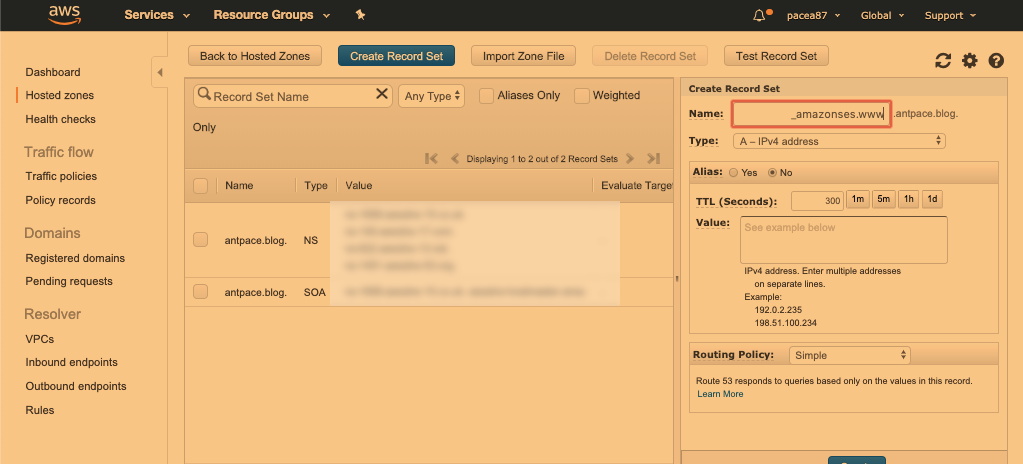
Instead of having to use the EC2 server’s public address to see my website from a browser, I’ll point a domain name at it. AWS Route 53 helps with this. It’s a “DNS web service” that routes users to websites by mapping domain names to IP addresses.
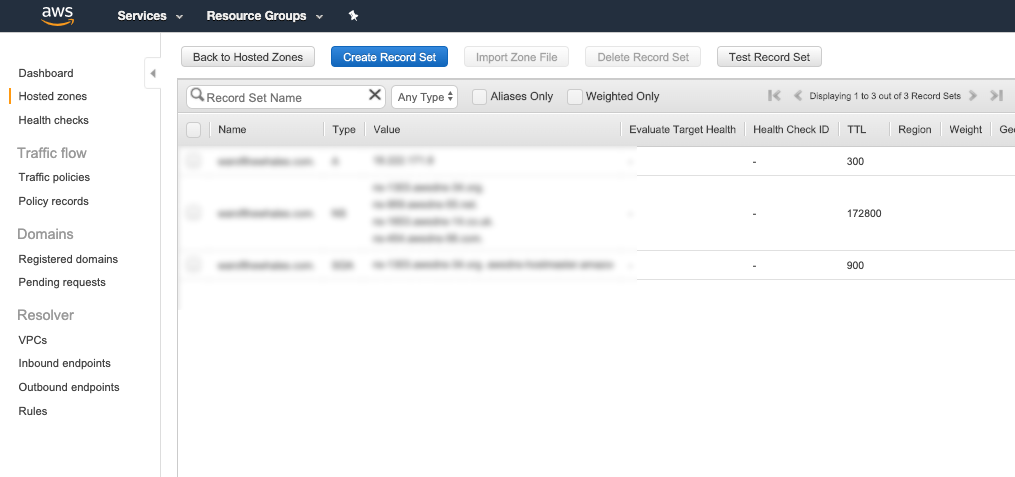
In Route 53 I create a new “hosted zone”, and enter the domain name that I’ll be using for this site. This will automatically generate two record sets: a Name Server (NS) record and a Start-of-Authority (SOA) record. I’ll create one more, an IPv4 address (A) record. The value of that record should be the public IP address that I want my domain to point at. You’ll probably also want to add another, identical to the last one, but specifying “www” in the record name.
Finally, I’ll head over to my domain name registrar, and find my domain name’s settings. I update the nameserver values there to match those in my Route 53 NS record set. It’ll likely take some time for this change to be reflected in the domain’s settings. Once that is complete, the domain name will be pointing at my new EC2 instance.
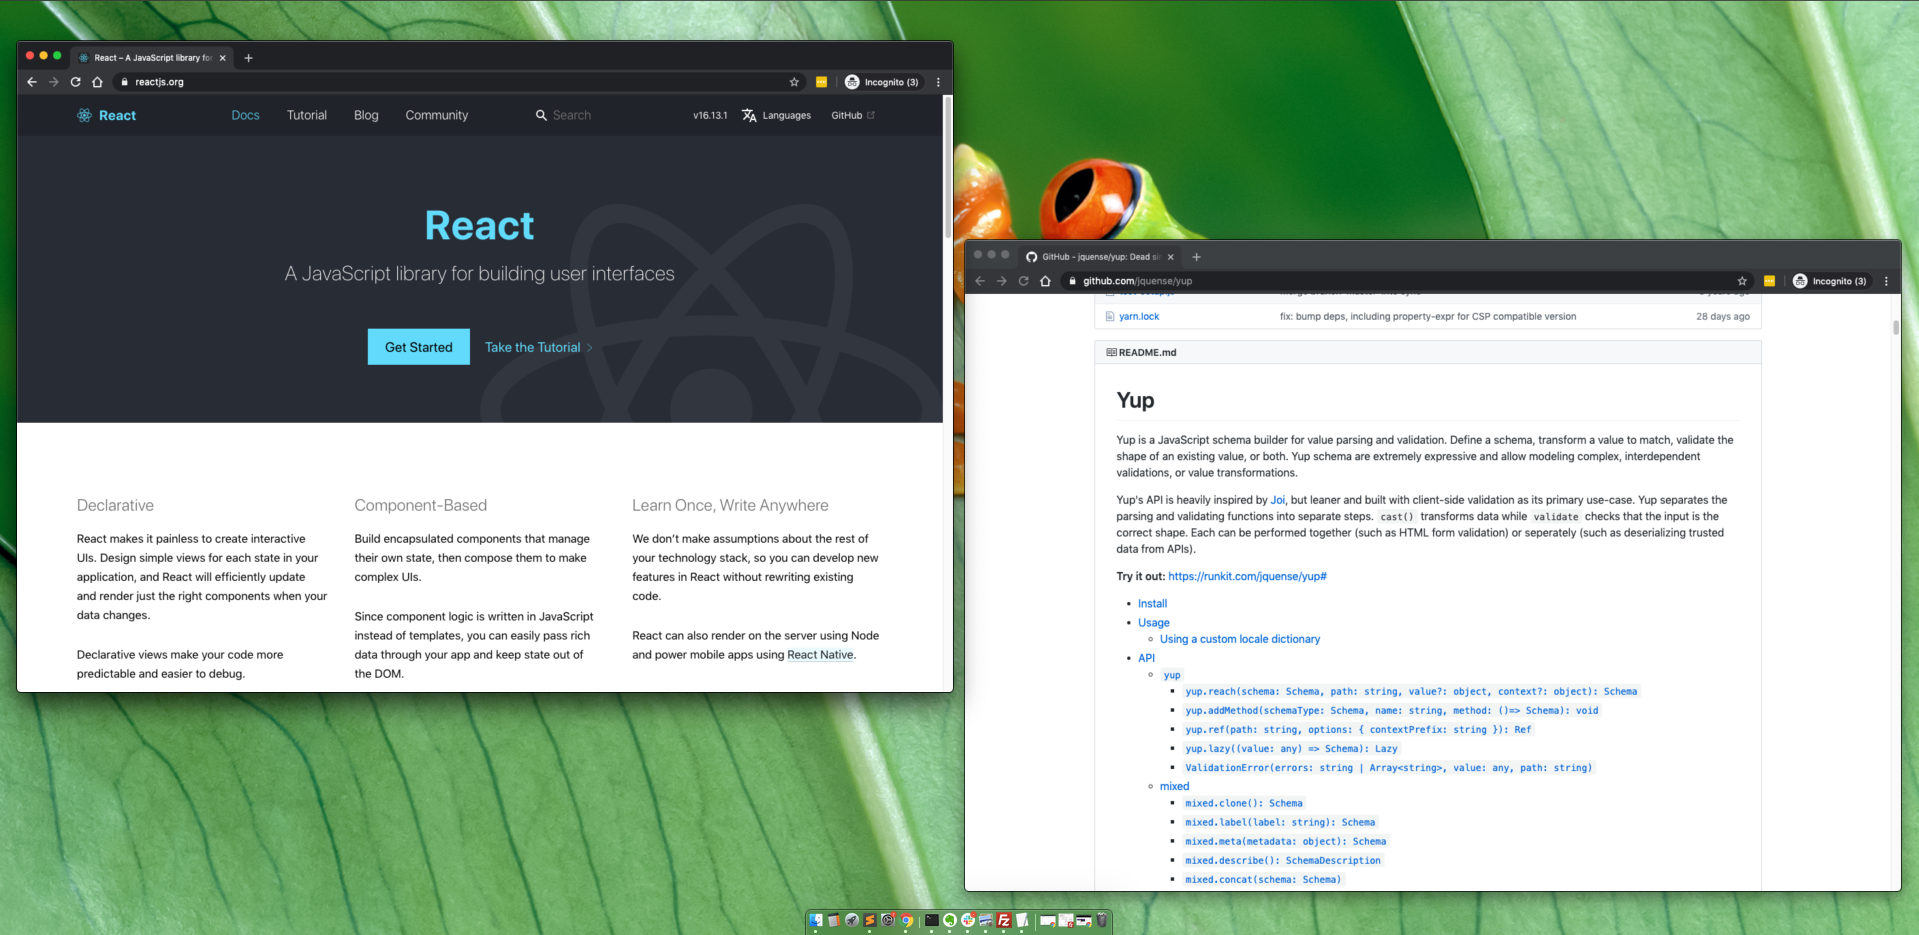
Typically, I avoid using JS app frameworks, and default to plain vanilla JavaScript. But, in keeping up with what is current – and working on projects as part of a team – React is inevitable: “A JavaScript library for building user interfaces” . Yup is the go-to form validation library in this context. Its GitHub page calls it “Dead simple Object schema validation”.
Yup creates validation schemas for inputs. Create a Yup validation object, and wire it up to a form – easy.
The ask
Setting: An existing React project, with a signup form. The form includes address inputs. The “country” input was not a required field – it could be left blank. My assignment was to make that field be required, only if the “state/territory” input was not empty. Sounds straight forward.
At first, I wasn’t sure if I should update this schema code directly. I thought about checking if the state field was blank, or not, and applying a different schema object instead. That would have been the wrong approach.
Doing some research, I discovered that the Yup’s when() method was the solution. It would let me “adjust the schema based on a sibling or sibling children fields”.
My first attempt was wrong, and didn’t work::
export const apValidateMyAddress = () => {
  name: yup.string().required("Don't leave this blank!!"),
  email: yup.string().email(),
  address: yup:string(),
  city: yup.string(),
  state: yup.string(),
  country: yup.string().when('state',{
    is: true,
    then: yup.string().required('This is a required field.')
  })
}
Errors were thrown. Documentation examples were hard to come by, and I was new at this. I wanted the condition to be true if “state” was not blank. Setting the “is” clause as “true” would only work if state was validated as a boolean – state: yup.boolean() . Ultimately, I was able to check that the “state” value existed using the value property:
export const apValidateMyAddress = () => {
  name: yup.string().required("Don't leave this blank!!"),
  email: yup.string().email(),
  address: yup:string(),
  city: yup.string(),
  state: yup.string(),
  country: yup.string().when('state',{
    is: (value: any) => !!value,
    then: yup.string().required('This is a required field.')
  })
}
More Conditional Logic
In another example of validating a field based on the value of another, I leveraged the context attribute. This allows you to pass additional data to the validation schema.
Here, for my order quantity to be valid, it needs to be greater than (or equal to) the previous order quantity, but only when the customer type is “existing”. Although the order quantity is what is being validated, I need the context of the previous order quantity and the customer type.
In my validation schema, I use a when condition to check the customer type and to reference the passed argument:
export const myValidationSchema = Yup.number().when('$customerType',{ is: 'existing', then: Yup.number().min(Yup.ref('$previousOrderQuantity'), "Invalid!")})
Email is the best way that we can communicate with our users; still better than SMS or app notifications. An effective messaging strategy can enhance the journey our products offer.
This post is about sending email from the website or app you’re developing. We will use SES to send transactional emails. AWS documentation describes Simple Email Service (SES) as “an email sending and receiving service that provides an easy, cost-effective way for you to send email.” It abstracts away managing a mail server.
Identity verification
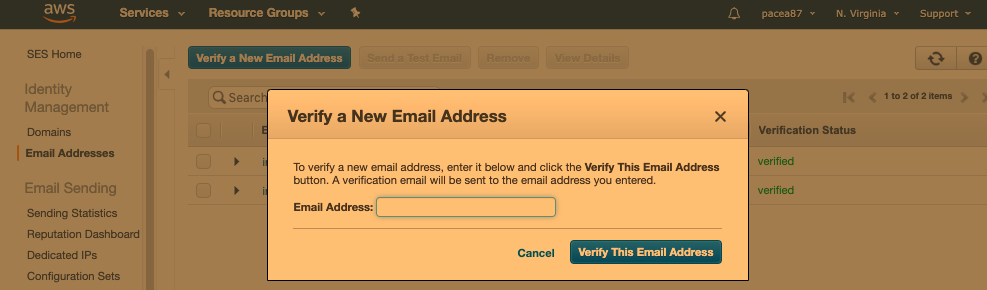
When you first get set up, SES will be in sandbox mode. That means you can only send email to verified receivers. To get production access and start sending emails to the public, you will need to verify an email address and a sending domain.
Configuring your domain name
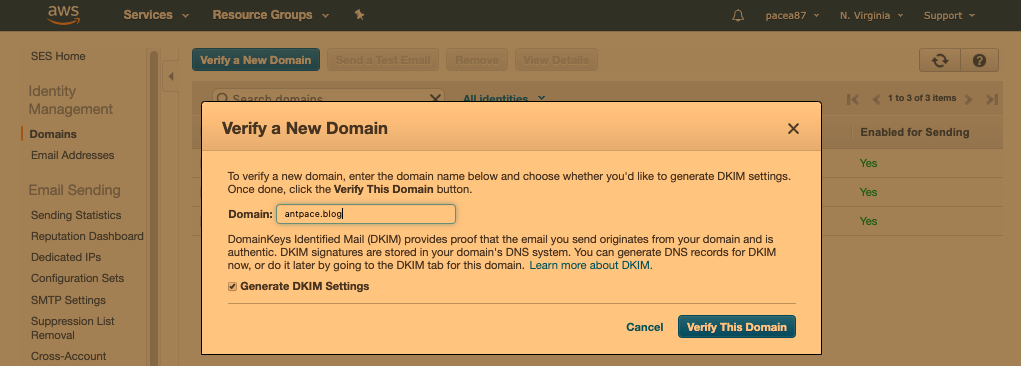
Sending email through SES requires us to verify the domain name that messages will be coming from. We can do this from the “Domains” dashboard.
Verify a new domain name
This will generate a list of record sets that will need to be added to our domain as DNS records. I use Route 53, another Amazon service, to manage my domains – so that’s where I’ll need to enter this info. If this is a new domain that you are working with, you will need to create a “hosted zone”in AWS for it first.
As of this update, Amazon recommends using CNAME DKIM (DomainKeys Identified Mail) records instead of TXT records to authenticate your domain. These signatures enhance the deliverability of your mail with DKIM-compliant email providers. If your domain name is in Route 53, SES will automatically import the CNAME records for you.
Understand deliverability
We want to be confident that intended recipients are actually getting the messages that are sent. Email service providers, and ISPs, want to prevent being abused by spammers. Following best practices, and understanding deliverability, can ensure that emails won’t be blocked.
Verify any email addresses that you are sending messages from: “To maintain trust between email providers and Amazon SES, Amazon SES needs to ensure that its senders are who they say they are.”
You should use an email address that is at the domain you verified. To host business email, I suggest AWS WorkMail or Google Workspace
Make sure DKIM has been verified for your domain: “DomainKeys Identified Mail (DKIM) provides proof that the email you send originates from your domain and is authentic”. If you’re already using Route 53 to manage your DNS records, SES will present an option to automatically create the necessary records.
Be reputable. Send high quality emails and make opt-out easy. You don’t want to be marked as spam. Respect sending quotas. If you’re plan on sending bulk email to a list-serve, I suggest using an Email Service Provider such as MailChimp (SES could be used for that too, but is outside the scope of this writing).
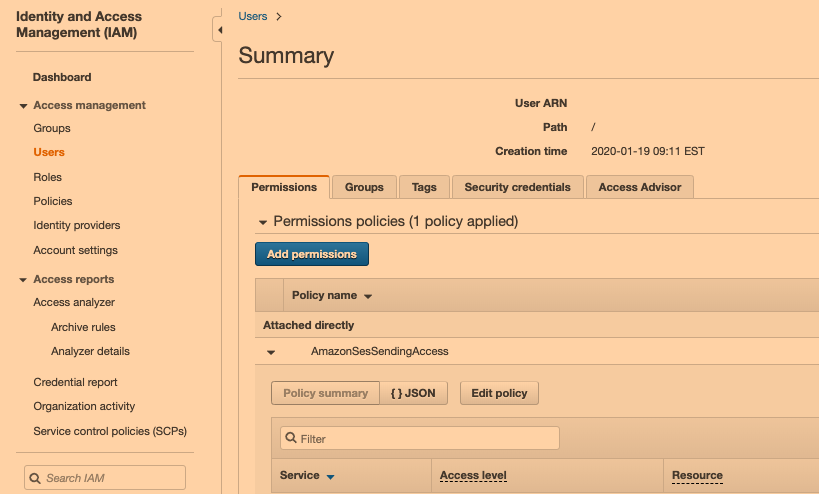
An access key can be created using Identity and Access Management (IAM). “You use access keys to sign programmatic requests that you make to AWS.” This requires creating a user, and setting its permissions policies to include “AmazonSESSendingAccess”. We can create an access key in the “security credentials” for this user.
Permission policy for IAM user
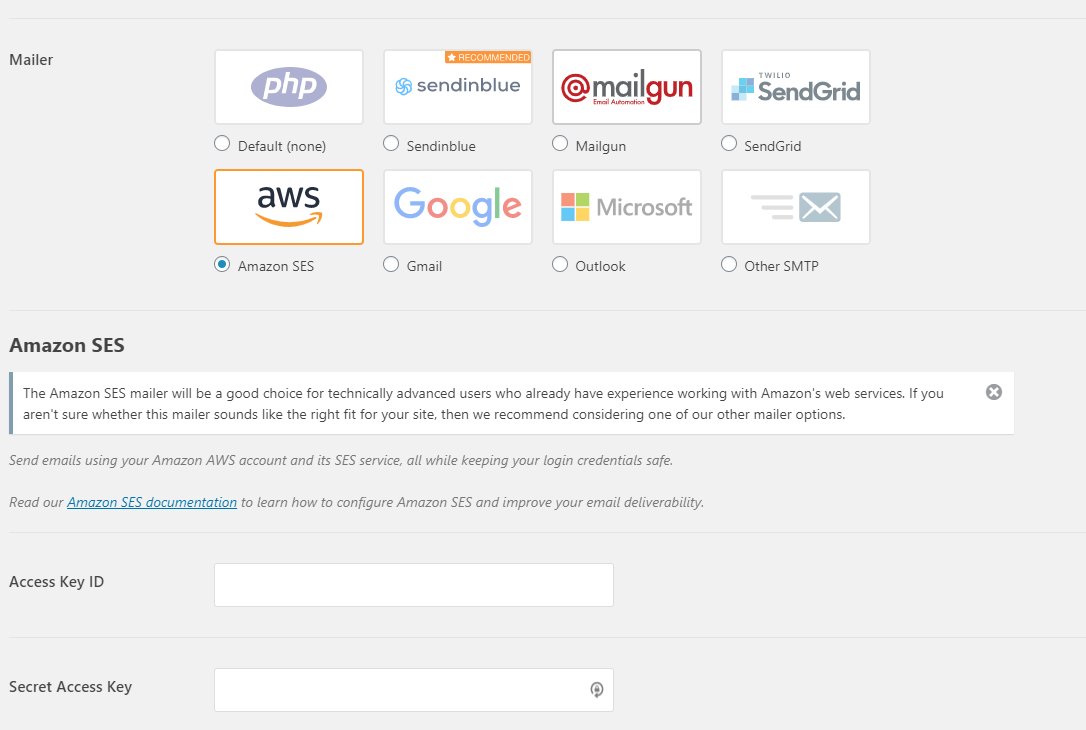
Integrating with WordPress
Sending email from WordPress is made easy with plugins. They can be used to easily create forms. Those forms can be wired to use the outbound mail server of our choice using WP Mail SMTP Pro. All we’ll need to do is enter the access key details. If we try to send email without specifying a mail server, forms will default to sending messages directly from the LAMP box hosting the website. That would result in low-to-no deliverability.
Screenshot of WP Mail SMTP Pro
As of this update, the above plugin now only provides the “Amazon SES” option with a premium (not free) monthly subscription. That’s OK, because we can still use Amazon SES through the “Other SMTP” option. You can read about how I used this choice to send emails from a WordPress site’s contact form.
SMTP Username and Password
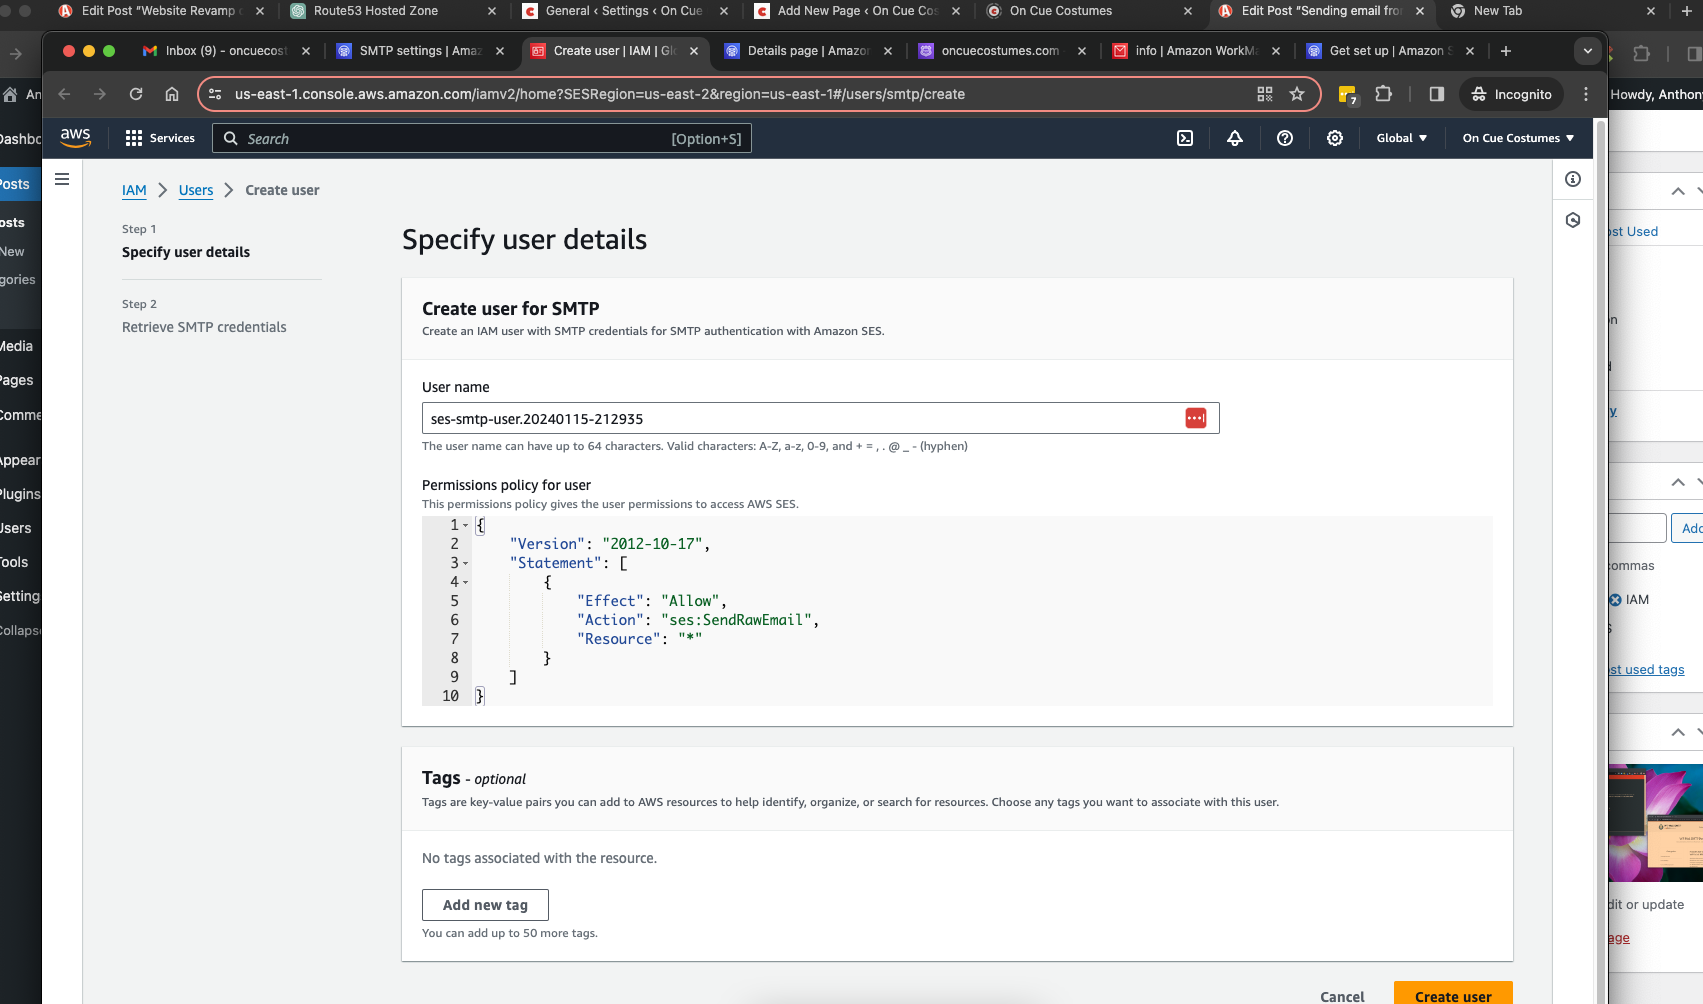
The “Other SMTP” option asks for a username and password. You can create those credentials from Amazon SES by going to “SMTP Settings”. When you click “Create SMTP credentials” you will be redirected to the IAM service to create a user with the details already filled
It will give you the SMTP user name (different than the IAM user name) and password on the following screen. After you add these details to the plugin, any emails sent from this WordPress instance will use SES as the mail server. As a use case, I create forms with another plugin called “Contact Form 7”. Any emails sent through these forms will use the above set up.
Integrating with custom code
Although the WordPress option is simple, the necessary plugin has an annual cost. Alternatively, SES can integrate with custom code we’ve written. We can use PHPMailer to abstract away the details of sending email programmatically. Just include the necessary files, configure some variables, and call a send() method.
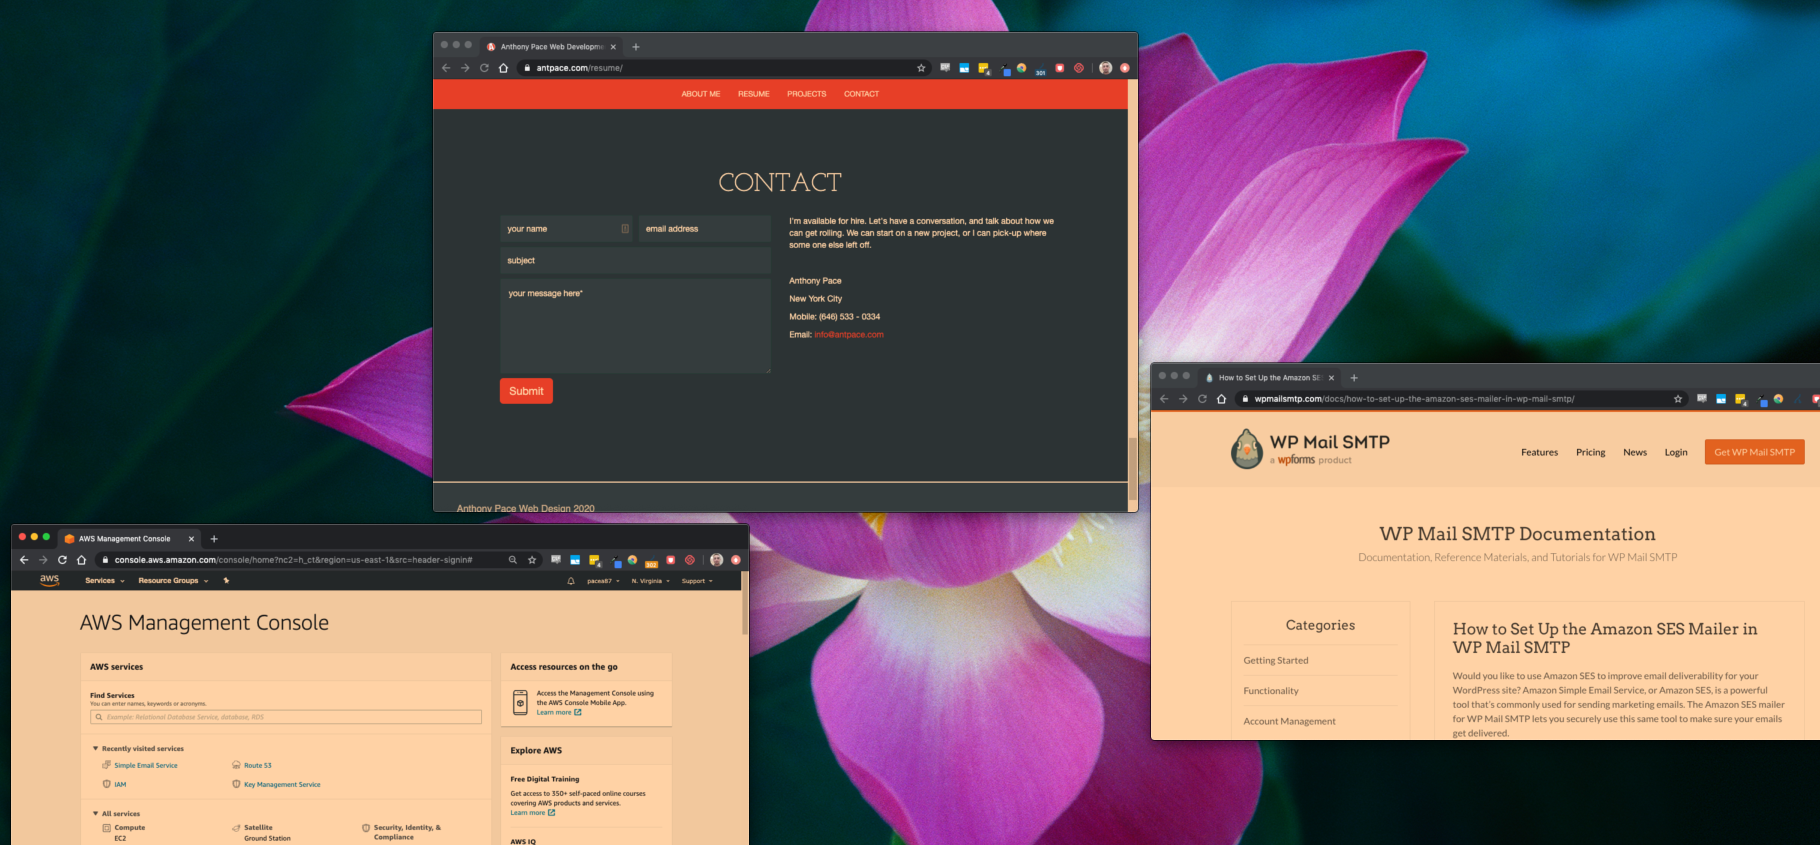
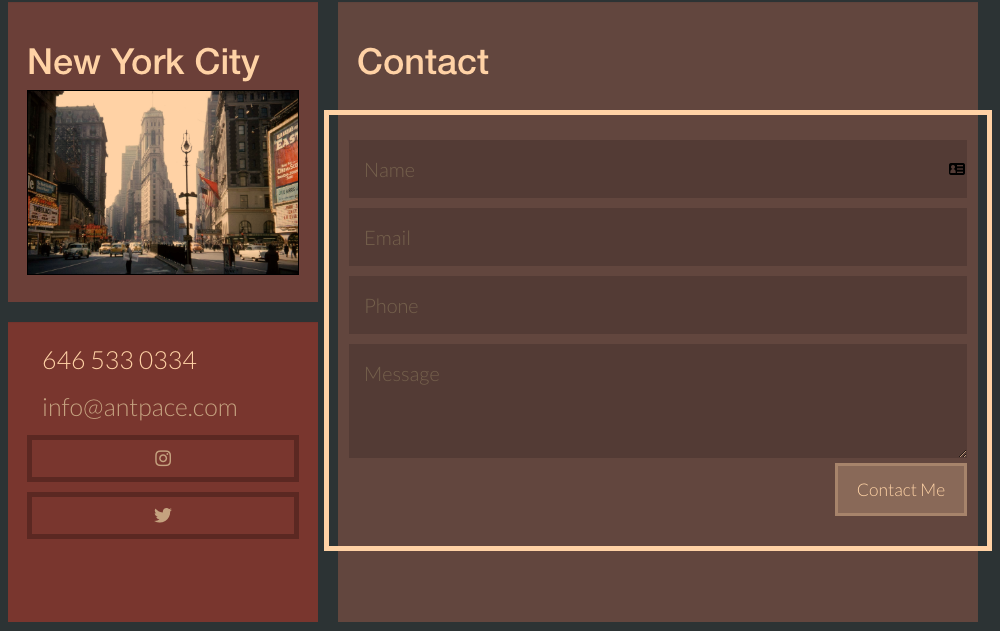
Contact form powered by SES
The contact forms on my résumé and portfolio webpages use this technique. I submit the form data to a PHP file that uses PHPMailer to interact with SES. The front-end uses a UI notification widget to give the user alerts. It’s available on my GitHub, so check it out.
Front-end, client-side:
<form id="contactForm">
    <div class="outer-box">

        <input type="text" placeholder="Name" name="name" value="" class="input-block-level bordered-input">
        <input type="email" placeholder="Email" value="" name="email" class="input-block-level bordered-input">
        <input type="text" placeholder="Phone" value="" name="phone" class="input-block-level bordered-input">

        <textarea placeholder="Message" rows="3" name="message" id="contactMessage" class="input-block-level bordered-input"></textarea>
        <button type="button" id="contactSubmit" class="btn transparent btn-large pull-right">Contact Me</button>
    </div>
</form>
<link rel="stylesheet" type="text/css" href="/ui-messages/css/ui-notifications.css">
<script src="/ui-messages/js/ui-notifications.js"></script>
<script type="text/javascript">
$(function(){
	var notifications = new UINotifications();
	$("#contactSubmit").click(function(){
		var contactMessage = $("#contactMessage").val();
		if(contactMessage < 1){
			notifications.showStatusMessage("Don't leave the message area empty.");
			return;
		}
		var data = $("#contactForm").serialize();
		$.ajax({
			type:"POST",
			data:data,
			url:"assets/contact.php",
			success:function(response){
				console.log(response);
				notifications.showStatusMessage("Thanks for your message. I'll get back to you soon.");
				$("form input, form textarea").val("");
			}

		});
	});
});
</script>
In the PHP file, we set the username and password as the access key ID and access key secret. Make sure the region variable matches what you’re using in AWS. #TODO: It would be best practice to record the message to a database. (The WordPress plugin from earlier handles that out-of-the-box). We might also send an additional email to the user, letting them know their note was received.
Back-end, server-side:
<?php
//send email via amazon ses
use PHPMailer\PHPMailer\PHPMailer;
use PHPMailer\PHPMailer\Exception;

$name = "";
$email = "";
$phone = "";
$message = "";

if(isset($_POST["name"])){
	$name = $_POST["name"];
}
if(isset($_POST["email"])){
	$email = $_POST["email"];
}
if(isset($_POST["phone"])){
	$phone = $_POST["phone"];
}
if(isset($_POST["message"])){
	$message = $_POST["message"];
}

$region = "us-east-1"
$aws_key_id = "xxx"
$aws_key_secret = "xxx"

require '/var/www/html/PHPMailer/src/Exception.php';
require '/var/www/html/PHPMailer/src/PHPMailer.php';
require '/var/www/html/PHPMailer/src/SMTP.php';
// // Instantiation and passing `true` enables exceptions
$mail = new PHPMailer(true);
try {
	if(strlen($message) > 1){
    //Server settings
	    $mail->SMTPDebug = 2;                                       // Enable verbose debug output
	    $mail->isSMTP();                                            // Set mailer to use SMTP
	    $mail->Host       = 'email-smtp.' . $region . '.amazonaws.com';  // Specify main and backup SMTP servers
	    $mail->SMTPAuth   = true;                                   // Enable SMTP authentication
	    $mail->Username   = $aws_key_id;                     // access key ID
	    $mail->Password   = $aws_key_secret;                               // AWS Key Secret
	    $mail->SMTPSecure = 'tls';                                  // Enable TLS encryption, `ssl` also accepted
	    $mail->Port       = 587;                                    // TCP port to connect to

	    //Recipients
	    $mail->setFrom('XXX@antpace.com', 'Portfolio');
	    $mail->addAddress("XXX@antpace.com");     // Add a recipient
	    $mail->addReplyTo('XXX@antpace.com', 'Portfolio');

	    // Content
	    $mail->isHTML(true);                                  // Set email format to HTML

	    $mail->Subject = 'New message from your portfolio page.';
	    $mail->Body    = "This message was sent from: $name - $email - $phone \n Message: $message";
	    $mail->AltBody = "This message was sent from: $name - $email - $phone \n Message: $message";

	    $mail->send();
	    echo 'Message has been sent';
	}

} catch (Exception $e) {
    echo "Message could not be sent. Mailer Error: {$mail->ErrorInfo}";
}

?>
The technical side of sending email from software is straight-forward. The strategy can be fuzzy and requires planning. Transactional emails have an advantage over marketing emails. Since they are triggered by a user’s action, they have more meaning. They have higher open rates, and in that way afford an opportunity.
How can we optimize the usefulness of these emails? Be sure to create a recognizable voice in your communication that resonates your brand. Provide additional useful information, resources, or offers. These kind of emails are an essential part of the user experience and your product’s development.
In a recent project, a client had WordPress set up through AWS lightsail. By default, email sending for WP users’ new accounts and password reseting is not configured out-of-the-box (Unlike using WordPress.com, where it just works). They already were using Google Workspace for their email, so we decided to leverage that instead.
We decided to use ‘app passwords’. We needed to make sure two-factor authentication was set up. This allowed us to generate a password that can be used as the SMTP password.